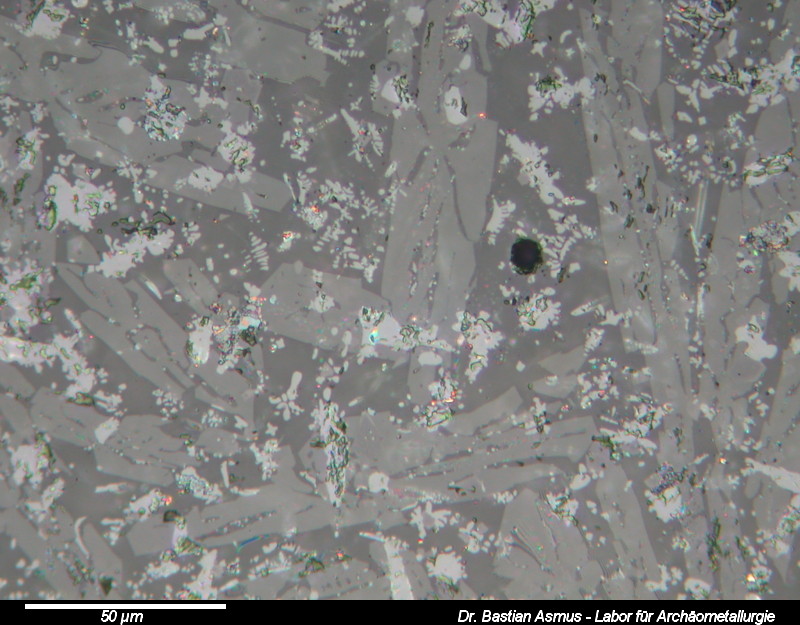
Image width 200 µm, PPL. Medieval copper smelting slag.
The first thing to do is to establish the number of different phases present in the sample. In this case there are five different phases.
If you managed to follow so far, you have now reached part seven part of the slag microscopy course. After sample prep, with find documentation, cutting, mounting, grinding, lapping and polishing we are now going to have a look at the tool to be used for the next sessions: the polarising reflected light microscope, also referred to as an ore microscope.
For this we need:
- polished sections
- a polarising reflected light microscope or an ore microscope
- optional: a digital camera port and camera, for documentation purposes
- a stage micrometer
- as much practice as you can spare
There are several excellent sites around that explain what such an instrument looks like and what it does: e.g. the materials science webpages of the University of Cambridge, but there are a lot of other high quality sites as well. That is why I am not going into too much detail about the actual microscope set-up. You may also refer to the textbooks, such as listed below in the reference section.
Slag microscopy does not differ from ore microscopy. The difference is that anthropogenic samples contain components, so called phases, that do not have parallels in the geological record. There are many phases similar to minerals that may form from magmatic origins, but equally, due to the much faster cooling rates of anthropogenic materials, there are many phases that may not be found in the geological record and thus are not to be found in textbooks on ore microscopy.
To my knowledge, there is no textbook on slag microscopy, let alone for archaeological slag material, that could teach these phases to novices in the field. Instead we have to make do with the mineralogy textbooks that are out there, such as for example or . This is why slag microscopy requires a fair amount of peering down the microscope, to fill in these gaps with your own observations.
Other very helpful resources are the webmineral homepage, the PDF version of the handbook of mineralogy and the RRUF project at the University of Arizona.
Polarising reflected light microscopy
We have to use the reflected light microscope, because many of the phases we try to identify are opaque. Since opaque phases appear dark in a transmitted light microscope, the section needs to be illuminated from above. We are looking at the light that was reflected from our sample. The main components we are going to use in this series are:
- the rotary stage
- pol filters, or better polariser and analyser
- oculars
- objectives
The optical microscope is used to observe physical and optical properties of the phases and minerals we wish to identify. First we identify the number of phases present in the sample, then we go on to describe their properties. Easily recognisable physical properties are:
- crystal habit
- polishing hardness
The crystal habit is the shape the mineral or phase takes on in your sample. It may be a well developed crystal that displays its characteristic external shape. Then it is called euhedral, which means well-formed. If it is not completely well shaped it is called subhedral, if the characteristic shape cannot be made out it is called anhedral.
The hardness of a phase or mineral may be determined in three different ways. the polishing hardness is particularly easy to obtain and provide a relative, i.e. qualitative measure of the hardness. This is often enough for the identification process. Polishing hardness can be seen the boundary between two grains. Softer materials are less resistant towards polishing agents than harder ones. This will produce a very slight relief. Observe the line at the boundary:
You can see that the phase in the centre of the video seems to be getting larger, when the stage is lowered. i.e. when it is moved downwards and out of focus. You may also be able to see a faint lighter coloured line at the grain boundary: This is called Kalb line. It moves towards the softer material when the stage is lowered! The phase – which by the way is a specimen of the spinel group, a magnetite – is harder than the surrounding glassy matrix.
The Kalb line is sometimes difficult to see, especially if the condenser aperture diaphragm is fully open. Try to close it, an the Kalb line will become visible.
There is micro-indentation or Vickers micro-hardness testing, scratch hardness and polishing hardness. Micro-indentation is becoming far less common nowadays. Scratch testing is quite dependent on the force exerted during scratching, but may be used to identify the Mohs hardness.
Easily recognisable optical properties are:
- colour
- reflectance
- bireflectance
- reflection pleochroism
The optical properties will be explained in the next instalment of the slag microscopy series. As always, leave a comment if you like what you are reading here.
References
		{1698736:X4T27VZH},{1698736:MZKJQ647},{1698736:6J4NWE78},{1698736:VAZG796T},{1698736:NDAF4FW7};{1698736:29FP5HMW};{1698736:IQCN44JC}

		default
		asc
		no


		2257
				%7B%22status%22%3A%22success%22%2C%22updateneeded%22%3Afalse%2C%22instance%22%3A%22zotpress-3b19bb4d736c4060db884d1c1b66298e%22%2C%22meta%22%3A%7B%22request_last%22%3A0%2C%22request_next%22%3A0%2C%22used_cache%22%3Atrue%7D%2C%22data%22%3A%5B%7B%22key%22%3A%22NDAF4FW7%22%2C%22library%22%3A%7B%22id%22%3A1698736%7D%2C%22meta%22%3A%7B%22creatorSummary%22%3A%22Ixer%22%2C%22parsedDate%22%3A%221990%22%2C%22numChildren%22%3A1%7D%2C%22bib%22%3A%22%3Cdiv%20class%3D%5C%22csl-bib-body%5C%22%20style%3D%5C%22line-height%3A%202%3B%20padding-left%3A%201em%3B%20text-indent%3A-1em%3B%5C%22%3E%5Cn%20%20%3Cdiv%20class%3D%5C%22csl-entry%5C%22%3EIxer%2C%20R.%20A.%20%281990%29.%20%3Ci%3EAtlas%20of%20opaque%20and%20ore%20minerals%20in%20their%20associations%3C%5C%2Fi%3E.%20Open%20University%20Press.%3C%5C%2Fdiv%3E%5Cn%3C%5C%2Fdiv%3E%22%2C%22data%22%3A%7B%22itemType%22%3A%22book%22%2C%22title%22%3A%22Atlas%20of%20opaque%20and%20ore%20minerals%20in%20their%20associations%22%2C%22creators%22%3A%5B%7B%22creatorType%22%3A%22author%22%2C%22firstName%22%3A%22R.%20A%22%2C%22lastName%22%3A%22Ixer%22%7D%5D%2C%22abstractNote%22%3A%22%22%2C%22date%22%3A%221990%22%2C%22language%22%3A%22English%22%2C%22ISBN%22%3A%220335152171%209780335152179%22%2C%22url%22%3A%22%22%2C%22collections%22%3A%5B%5D%2C%22dateModified%22%3A%222014-01-30T07%3A17%3A43Z%22%7D%7D%2C%7B%22key%22%3A%22X4T27VZH%22%2C%22library%22%3A%7B%22id%22%3A1698736%7D%2C%22meta%22%3A%7B%22creatorSummary%22%3A%22Ineson%22%2C%22parsedDate%22%3A%221989-04%22%2C%22numChildren%22%3A0%7D%2C%22bib%22%3A%22%3Cdiv%20class%3D%5C%22csl-bib-body%5C%22%20style%3D%5C%22line-height%3A%202%3B%20padding-left%3A%201em%3B%20text-indent%3A-1em%3B%5C%22%3E%5Cn%20%20%3Cdiv%20class%3D%5C%22csl-entry%5C%22%3EIneson%2C%20P.%20R.%20%281989%29.%20%3Ci%3EIntroduction%20to%20Practical%20Ore%20Microscopy%3C%5C%2Fi%3E.%20Longman.%3C%5C%2Fdiv%3E%5Cn%3C%5C%2Fdiv%3E%22%2C%22data%22%3A%7B%22itemType%22%3A%22book%22%2C%22title%22%3A%22Introduction%20to%20Practical%20Ore%20Microscopy%22%2C%22creators%22%3A%5B%7B%22creatorType%22%3A%22author%22%2C%22firstName%22%3A%22P.%20R.%22%2C%22lastName%22%3A%22Ineson%22%7D%5D%2C%22abstractNote%22%3A%22%22%2C%22date%22%3A%22April%201989%22%2C%22language%22%3A%22%22%2C%22ISBN%22%3A%220582301408%22%2C%22url%22%3A%22%22%2C%22collections%22%3A%5B%22RI8HAJ3J%22%5D%2C%22dateModified%22%3A%222013-06-20T13%3A11%3A59Z%22%7D%7D%2C%7B%22key%22%3A%22MZKJQ647%22%2C%22library%22%3A%7B%22id%22%3A1698736%7D%2C%22meta%22%3A%7B%22creatorSummary%22%3A%22Nesse%22%2C%22parsedDate%22%3A%222003-08%22%2C%22numChildren%22%3A0%7D%2C%22bib%22%3A%22%3Cdiv%20class%3D%5C%22csl-bib-body%5C%22%20style%3D%5C%22line-height%3A%202%3B%20padding-left%3A%201em%3B%20text-indent%3A-1em%3B%5C%22%3E%5Cn%20%20%3Cdiv%20class%3D%5C%22csl-entry%5C%22%3ENesse%2C%20W.%20D.%20%282003%29.%20%3Ci%3EIntroduction%20to%20Optical%20Mineralogy%3C%5C%2Fi%3E%20%28Third.%29.%20Oxford%20Univ%20Pr.%3C%5C%2Fdiv%3E%5Cn%3C%5C%2Fdiv%3E%22%2C%22data%22%3A%7B%22itemType%22%3A%22book%22%2C%22title%22%3A%22Introduction%20to%20Optical%20Mineralogy%22%2C%22creators%22%3A%5B%7B%22creatorType%22%3A%22author%22%2C%22firstName%22%3A%22William%20D.%22%2C%22lastName%22%3A%22Nesse%22%7D%5D%2C%22abstractNote%22%3A%22%22%2C%22date%22%3A%22August%202003%22%2C%22language%22%3A%22%22%2C%22ISBN%22%3A%220195149106%22%2C%22url%22%3A%22%22%2C%22collections%22%3A%5B%22RI8HAJ3J%22%5D%2C%22dateModified%22%3A%222013-06-20T13%3A11%3A59Z%22%7D%7D%2C%7B%22key%22%3A%226J4NWE78%22%2C%22library%22%3A%7B%22id%22%3A1698736%7D%2C%22meta%22%3A%7B%22creatorSummary%22%3A%22M%5Cu00fccke%22%2C%22parsedDate%22%3A%221989%22%2C%22numChildren%22%3A0%7D%2C%22bib%22%3A%22%3Cdiv%20class%3D%5C%22csl-bib-body%5C%22%20style%3D%5C%22line-height%3A%202%3B%20padding-left%3A%201em%3B%20text-indent%3A-1em%3B%5C%22%3E%5Cn%20%20%3Cdiv%20class%3D%5C%22csl-entry%5C%22%3EM%26%23xFC%3Bcke%2C%20A.%20%281989%29.%20%3Ci%3EAnleitung%20zur%20Erzmikroskopie%3A%20mit%20einer%20Einf%26%23xFC%3Bhrung%20in%20die%20Erzpetrographie%3C%5C%2Fi%3E.%20Enke.%3C%5C%2Fdiv%3E%5Cn%3C%5C%2Fdiv%3E%22%2C%22data%22%3A%7B%22itemType%22%3A%22book%22%2C%22title%22%3A%22Anleitung%20zur%20Erzmikroskopie%3A%20mit%20einer%20Einf%5Cu00fchrung%20in%20die%20Erzpetrographie%22%2C%22creators%22%3A%5B%7B%22creatorType%22%3A%22author%22%2C%22firstName%22%3A%22Arno%22%2C%22lastName%22%3A%22M%5Cu00fccke%22%7D%5D%2C%22abstractNote%22%3A%22%22%2C%22date%22%3A%221989%22%2C%22language%22%3A%22%22%2C%22ISBN%22%3A%22%22%2C%22url%22%3A%22%22%2C%22collections%22%3A%5B%22RI8HAJ3J%22%5D%2C%22dateModified%22%3A%222013-06-20T13%3A11%3A59Z%22%7D%7D%2C%7B%22key%22%3A%2229FP5HMW%22%2C%22library%22%3A%7B%22id%22%3A1698736%7D%2C%22meta%22%3A%7B%22creatorSummary%22%3A%22Klockmann%20et%20al.%22%2C%22parsedDate%22%3A%221978%22%2C%22numChildren%22%3A0%7D%2C%22bib%22%3A%22%3Cdiv%20class%3D%5C%22csl-bib-body%5C%22%20style%3D%5C%22line-height%3A%202%3B%20padding-left%3A%201em%3B%20text-indent%3A-1em%3B%5C%22%3E%5Cn%20%20%3Cdiv%20class%3D%5C%22csl-entry%5C%22%3EKlockmann%2C%20F.%2C%20Strunz%2C%20H.%2C%20%26amp%3B%20Ramdohr%2C%20P.%20%281978%29.%20%3Ci%3EKlockmanns%20Lehrbuch%20der%20Mineralogie%3C%5C%2Fi%3E%20%2816.%29.%20Enke.%3C%5C%2Fdiv%3E%5Cn%3C%5C%2Fdiv%3E%22%2C%22data%22%3A%7B%22itemType%22%3A%22book%22%2C%22title%22%3A%22Klockmanns%20Lehrbuch%20der%20Mineralogie%22%2C%22creators%22%3A%5B%7B%22creatorType%22%3A%22author%22%2C%22firstName%22%3A%22Friedrich%22%2C%22lastName%22%3A%22Klockmann%22%7D%2C%7B%22creatorType%22%3A%22author%22%2C%22firstName%22%3A%22Hugo%22%2C%22lastName%22%3A%22Strunz%22%7D%2C%7B%22creatorType%22%3A%22author%22%2C%22firstName%22%3A%22Paul%22%2C%22lastName%22%3A%22Ramdohr%22%7D%5D%2C%22abstractNote%22%3A%22%22%2C%22date%22%3A%221978%22%2C%22language%22%3A%22%22%2C%22ISBN%22%3A%22%22%2C%22url%22%3A%22%22%2C%22collections%22%3A%5B%22RI8HAJ3J%22%5D%2C%22dateModified%22%3A%222013-06-20T13%3A11%3A59Z%22%7D%7D%2C%7B%22key%22%3A%22VAZG796T%22%2C%22library%22%3A%7B%22id%22%3A1698736%7D%2C%22meta%22%3A%7B%22creatorSummary%22%3A%22Baumann%20and%20Leeder%22%2C%22parsedDate%22%3A%221991%22%2C%22numChildren%22%3A0%7D%2C%22bib%22%3A%22%3Cdiv%20class%3D%5C%22csl-bib-body%5C%22%20style%3D%5C%22line-height%3A%202%3B%20padding-left%3A%201em%3B%20text-indent%3A-1em%3B%5C%22%3E%5Cn%20%20%3Cdiv%20class%3D%5C%22csl-entry%5C%22%3EBaumann%2C%20L.%2C%20%26amp%3B%20Leeder%2C%20O.%20%281991%29.%20%3Ci%3EEinf%26%23xFC%3Bhrung%20in%20die%20Aufichtmikroskopie%3C%5C%2Fi%3E.%20Deutscher%20Verlag%20f%26%23xFC%3Br%20Grundstoffindustrie.%3C%5C%2Fdiv%3E%5Cn%3C%5C%2Fdiv%3E%22%2C%22data%22%3A%7B%22itemType%22%3A%22book%22%2C%22title%22%3A%22Einf%5Cu00fchrung%20in%20die%20Aufichtmikroskopie%22%2C%22creators%22%3A%5B%7B%22creatorType%22%3A%22author%22%2C%22firstName%22%3A%22Ludwig%22%2C%22lastName%22%3A%22Baumann%22%7D%2C%7B%22creatorType%22%3A%22author%22%2C%22firstName%22%3A%22Otto%22%2C%22lastName%22%3A%22Leeder%22%7D%5D%2C%22abstractNote%22%3A%22%22%2C%22date%22%3A%221991%22%2C%22language%22%3A%22%22%2C%22ISBN%22%3A%22%22%2C%22url%22%3A%22%22%2C%22collections%22%3A%5B%22RI8HAJ3J%22%5D%2C%22dateModified%22%3A%222013-06-20T13%3A11%3A59Z%22%7D%7D%2C%7B%22key%22%3A%22IQCN44JC%22%2C%22library%22%3A%7B%22id%22%3A1698736%7D%2C%22meta%22%3A%7B%22creatorSummary%22%3A%22Ramdohr%22%2C%22parsedDate%22%3A%221980%22%2C%22numChildren%22%3A0%7D%2C%22bib%22%3A%22%3Cdiv%20class%3D%5C%22csl-bib-body%5C%22%20style%3D%5C%22line-height%3A%202%3B%20padding-left%3A%201em%3B%20text-indent%3A-1em%3B%5C%22%3E%5Cn%20%20%3Cdiv%20class%3D%5C%22csl-entry%5C%22%3ERamdohr%2C%20P.%20%281980%29.%20%3Ci%3EThe%20ore%20minerals%20and%20their%20intergrowths%3C%5C%2Fi%3E%20%282nd%20ed.%2C%20Vol.%202%29.%20Pergamon%20Press.%3C%5C%2Fdiv%3E%5Cn%3C%5C%2Fdiv%3E%22%2C%22data%22%3A%7B%22itemType%22%3A%22book%22%2C%22title%22%3A%22The%20ore%20minerals%20and%20their%20intergrowths%22%2C%22creators%22%3A%5B%7B%22creatorType%22%3A%22author%22%2C%22firstName%22%3A%22Paul%22%2C%22lastName%22%3A%22Ramdohr%22%7D%5D%2C%22abstractNote%22%3A%22%22%2C%22date%22%3A%221980%22%2C%22language%22%3A%22%22%2C%22ISBN%22%3A%22%22%2C%22url%22%3A%22%22%2C%22collections%22%3A%5B%22RI8HAJ3J%22%5D%2C%22dateModified%22%3A%222013-06-20T13%3A11%3A59Z%22%7D%7D%5D%7D


  Ixer, R. A. (1990). Atlas of opaque and ore minerals in their associations. Open University Press.


  Ineson, P. R. (1989). Introduction to Practical Ore Microscopy. Longman.


  Nesse, W. D. (2003). Introduction to Optical Mineralogy (Third.). Oxford Univ Pr.


  Mücke, A. (1989). Anleitung zur Erzmikroskopie: mit einer Einführung in die Erzpetrographie. Enke.


  Klockmann, F., Strunz, H., & Ramdohr, P. (1978). Klockmanns Lehrbuch der Mineralogie (16.). Enke.


  Baumann, L., & Leeder, O. (1991). Einführung in die Aufichtmikroskopie. Deutscher Verlag für Grundstoffindustrie.


  Ramdohr, P. (1980). The ore minerals and their intergrowths (2nd ed., Vol. 2). Pergamon Press.
Weblinks
Dissemination of IT for the Promotion of Materials Science (DoITPoMS) on optical microscopy
Optical microscopy primer


