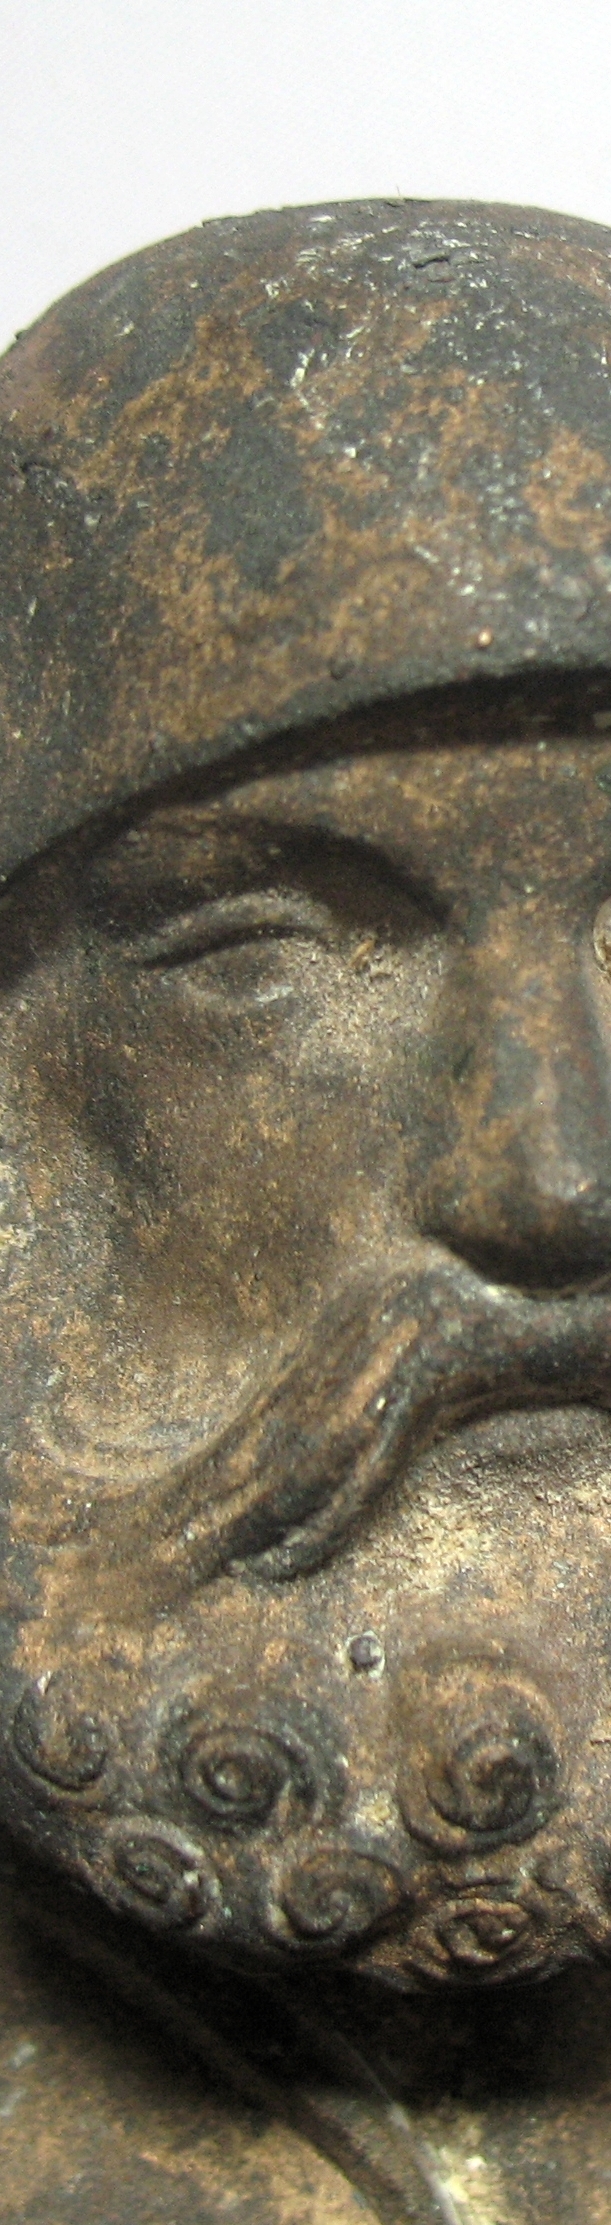
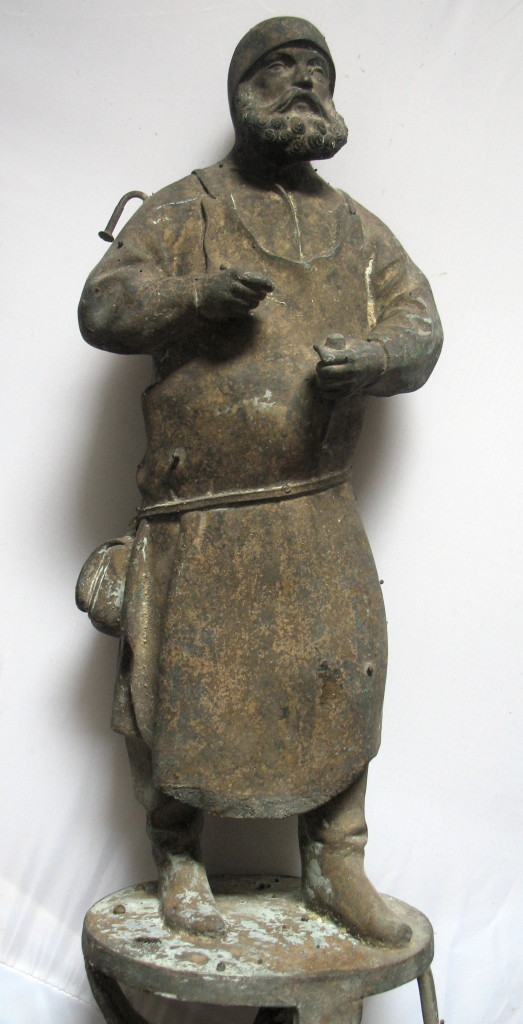
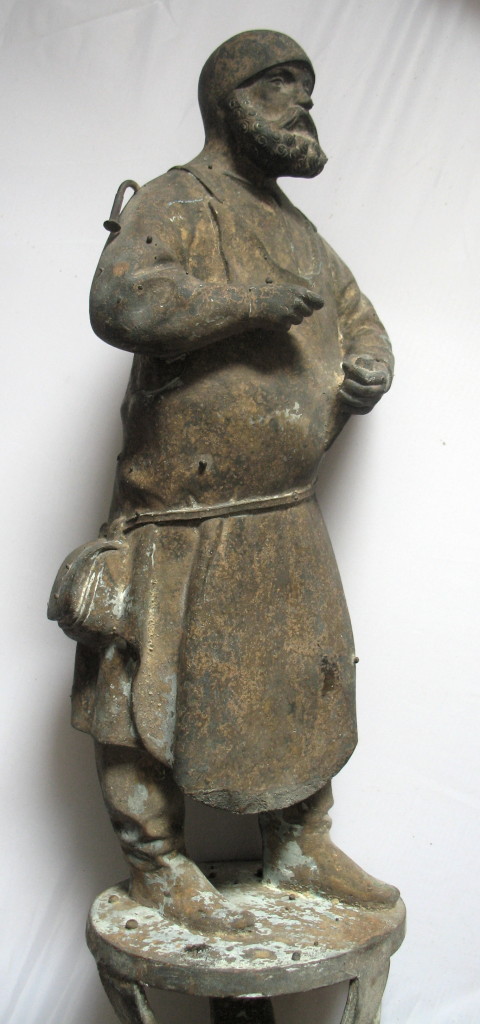
Details of a second cast of a self-portrait of Peter Vischer (1455-1529) from the shrine of Saint Sebald, Nuremberg. Original size of head: 6 cm.
I know the title says Peter Vischer the Elder, however this is a post on one piece of his work only: namely the self portrait of Peter Vischer. When I returned from a fantastic conference on Medieval Copper, Bronze and Brass in Dinant and Namur, Belgium , I remembered that back in the nineties I had to make journeyman’s piece towards the end of my apprenticeship as an artistic bronze founder. This journeyman’s piece is the self portrait of Peter Vischer the Elder, the other two where portrait medals of Martin Luther and Albrecht Dürer, cast in a specialised medal casting technique. The self-portrait of Vischer is located at the front end of the shrine of Saint Sebald . The shrine was commissioned in 1499 and was finished in 1519. Peter Vischer the Elder was granted the title of a master in the
The self-portrait of Peter Vischer the Elder
References
{1698736:DIZCERXT}
apa
default
asc
0
2450
%7B%22status%22%3A%22success%22%2C%22updateneeded%22%3Afalse%2C%22instance%22%3Afalse%2C%22meta%22%3A%7B%22request_last%22%3A1200%2C%22request_next%22%3A50%2C%22used_cache%22%3Atrue%7D%2C%22data%22%3A%5B%7B%22key%22%3A%2226JM8AN2%22%2C%22library%22%3A%7B%22id%22%3A1698736%7D%2C%22meta%22%3A%7B%22creatorSummary%22%3A%22Stephan%20M%5Cu00f6slein%22%2C%22parsedDate%22%3A%222008%22%2C%22numChildren%22%3A1%7D%2C%22bib%22%3A%22%26lt%3Bdiv%20class%3D%26quot%3Bcsl-bib-body%26quot%3B%20style%3D%26quot%3Bline-height%3A%202%3B%20padding-left%3A%202em%3B%20text-indent%3A-2em%3B%26quot%3B%26gt%3B%5Cn%20%20%26lt%3Bdiv%20class%3D%26quot%3Bcsl-entry%26quot%3B%26gt%3BStephan%20M%26%23xF6%3Bslein.%20%282008%29.%20Fr%26%23xFC%3Bhbronzezeitliche%20Depotfunde%20im%20Alpenvorland%20%26%23x2013%3B%20neue%20Befunde%20%28pp.%20109%26%23x2013%3B130%29.%20Presented%20at%20the%20Vortr%26%23xE4%3Bge%20des%2026.%20NIederbayerischen%20Arch%26%23xE4%3Bologentages%2C%20Deggendorf%2C%20Rahden%5C%2FWestfalen.%26lt%3B%5C%2Fdiv%26gt%3B%5Cn%26lt%3B%5C%2Fdiv%26gt%3B%22%2C%22data%22%3A%7B%22itemType%22%3A%22conferencePaper%22%2C%22title%22%3A%22Fr%5Cu00fchbronzezeitliche%20Depotfunde%20im%20Alpenvorland%20%5Cu2013%20neue%20Befunde%22%2C%22creators%22%3A%5B%7B%22creatorType%22%3A%22author%22%2C%22name%22%3A%22Stephan%20M%5Cu00f6slein%22%7D%5D%2C%22abstractNote%22%3A%22%22%2C%22date%22%3A%222008%22%2C%22proceedingsTitle%22%3A%22%22%2C%22conferenceName%22%3A%22Vortr%5Cu00e4ge%20des%2026.%20NIederbayerischen%20Arch%5Cu00e4ologentages%2C%20Deggendorf%22%2C%22language%22%3A%22%22%2C%22DOI%22%3A%22%22%2C%22ISBN%22%3A%22%22%2C%22url%22%3A%22%22%2C%22collections%22%3A%5B%5D%2C%22dateModified%22%3A%222019-05-31T15%3A13%3A30Z%22%7D%7D%2C%7B%22key%22%3A%2246XIMTVI%22%2C%22library%22%3A%7B%22id%22%3A1698736%7D%2C%22meta%22%3A%7B%22creatorSummary%22%3A%22J.J.%20Butler%22%2C%22parsedDate%22%3A%222002%22%2C%22numChildren%22%3A1%7D%2C%22bib%22%3A%22%26lt%3Bdiv%20class%3D%26quot%3Bcsl-bib-body%26quot%3B%20style%3D%26quot%3Bline-height%3A%202%3B%20padding-left%3A%202em%3B%20text-indent%3A-2em%3B%26quot%3B%26gt%3B%5Cn%20%20%26lt%3Bdiv%20class%3D%26quot%3Bcsl-entry%26quot%3B%26gt%3BJ.J.%20Butler.%20%282002%29.%20Ingots%20and%20Insights%3A%20Reflections%20on%20Rings%20and%20Ribs.%20In%20%26lt%3Bi%26gt%3BDie%20Anf%26%23xE4%3Bnge%20der%20Metallurgie%20in%20der%20alten%20Welt%20%3D%3A%20The%20beginnings%20of%20metallurgy%20in%20the%20old%20world%26lt%3B%5C%2Fi%26gt%3B%20%28pp.%20229%26%23x2013%3B243%29.%20Rahden%2C%20Westf%3A%20Verlag%20Marie%20Leidorf.%26lt%3B%5C%2Fdiv%26gt%3B%5Cn%26lt%3B%5C%2Fdiv%26gt%3B%22%2C%22data%22%3A%7B%22itemType%22%3A%22bookSection%22%2C%22title%22%3A%22Ingots%20and%20Insights%3A%20Reflections%20on%20Rings%20and%20Ribs%22%2C%22creators%22%3A%5B%7B%22creatorType%22%3A%22author%22%2C%22name%22%3A%22J.J.%20Butler%22%7D%5D%2C%22abstractNote%22%3A%22%22%2C%22bookTitle%22%3A%22Die%20Anf%5Cu00e4nge%20der%20Metallurgie%20in%20der%20alten%20Welt%20%3D%3A%20The%20beginnings%20of%20metallurgy%20in%20the%20old%20world%22%2C%22date%22%3A%222002%22%2C%22language%22%3A%22ger%20eng%20fre%22%2C%22ISBN%22%3A%22978-3-89646-871-0%22%2C%22url%22%3A%22%22%2C%22collections%22%3A%5B%5D%2C%22dateModified%22%3A%222019-05-31T15%3A09%3A14Z%22%7D%7D%2C%7B%22key%22%3A%22AWUKGXXR%22%2C%22library%22%3A%7B%22id%22%3A1698736%7D%2C%22meta%22%3A%7B%22numChildren%22%3A0%7D%2C%22bib%22%3A%22%26lt%3Bdiv%20class%3D%26quot%3Bcsl-bib-body%26quot%3B%20style%3D%26quot%3Bline-height%3A%202%3B%20padding-left%3A%202em%3B%20text-indent%3A-2em%3B%26quot%3B%26gt%3B%5Cn%20%20%26lt%3Bdiv%20class%3D%26quot%3Bcsl-entry%26quot%3B%26gt%3BIngots%20and%20Insights%3A%20Reflections%20on%20RIngs%20and%20Ribs.%20%28n.d.%29%20%28pp.%20229%26%23x2013%3B243%29.%26lt%3B%5C%2Fdiv%26gt%3B%5Cn%26lt%3B%5C%2Fdiv%26gt%3B%22%2C%22data%22%3A%7B%22itemType%22%3A%22conferencePaper%22%2C%22title%22%3A%22Ingots%20and%20Insights%3A%20Reflections%20on%20RIngs%20and%20Ribs%22%2C%22creators%22%3A%5B%5D%2C%22abstractNote%22%3A%22%22%2C%22date%22%3A%22%22%2C%22proceedingsTitle%22%3A%22%22%2C%22conferenceName%22%3A%22%22%2C%22language%22%3A%22%22%2C%22DOI%22%3A%22%22%2C%22ISBN%22%3A%22%22%2C%22url%22%3A%22%22%2C%22collections%22%3A%5B%5D%2C%22dateModified%22%3A%222019-05-31T15%3A06%3A07Z%22%7D%7D%2C%7B%22key%22%3A%225H87R8UU%22%2C%22library%22%3A%7B%22id%22%3A1698736%7D%2C%22meta%22%3A%7B%22creatorSummary%22%3A%22Dines%22%2C%22parsedDate%22%3A%222010%22%2C%22numChildren%22%3A1%7D%2C%22bib%22%3A%22%26lt%3Bdiv%20class%3D%26quot%3Bcsl-bib-body%26quot%3B%20style%3D%26quot%3Bline-height%3A%202%3B%20padding-left%3A%202em%3B%20text-indent%3A-2em%3B%26quot%3B%26gt%3B%5Cn%20%20%26lt%3Bdiv%20class%3D%26quot%3Bcsl-entry%26quot%3B%26gt%3BDines%2C%20I.%20%282010%29.%20The%20Theophilus%20Manuscript%20Tradition%20Reconsidered%20in%20the%20Light%20of%20New%20Manuscript%20Discoveries.%20In%20M.%20Maui%26%23xE8%3Bge%20%26amp%3B%20H.%20Westerman-Angerhausen%20%28Eds.%29%2C%20%26lt%3Bi%26gt%3BZwischen%20Kunsthandwerk%20und%20Kunst%3A%20Die%20Schedula%20diversarum%20artium%26lt%3B%5C%2Fi%26gt%3B%20%28pp.%203%26%23x2013%3B14%29.%20Berlin%5C%2FBoston%3A%20de%20Gruyter.%26lt%3B%5C%2Fdiv%26gt%3B%5Cn%26lt%3B%5C%2Fdiv%26gt%3B%22%2C%22data%22%3A%7B%22itemType%22%3A%22bookSection%22%2C%22title%22%3A%22The%20Theophilus%20Manuscript%20Tradition%20Reconsidered%20in%20the%20Light%20of%20New%20Manuscript%20Discoveries%22%2C%22creators%22%3A%5B%7B%22creatorType%22%3A%22author%22%2C%22firstName%22%3A%22Ilya%22%2C%22lastName%22%3A%22Dines%22%7D%2C%7B%22creatorType%22%3A%22editor%22%2C%22firstName%22%3A%22Maxime%22%2C%22lastName%22%3A%22Maui%5Cu00e8ge%22%7D%2C%7B%22creatorType%22%3A%22editor%22%2C%22firstName%22%3A%22Hiltrud%22%2C%22lastName%22%3A%22Westerman-Angerhausen%22%7D%5D%2C%22abstractNote%22%3A%22%22%2C%22bookTitle%22%3A%22Zwischen%20Kunsthandwerk%20und%20Kunst%3A%20Die%20Schedula%20diversarum%20artium%22%2C%22date%22%3A%222010%22%2C%22language%22%3A%22%22%2C%22ISBN%22%3A%22%22%2C%22url%22%3A%22%22%2C%22collections%22%3A%5B%5D%2C%22dateModified%22%3A%222019-05-08T07%3A39%3A33Z%22%7D%7D%2C%7B%22key%22%3A%224ICDYHGU%22%2C%22library%22%3A%7B%22id%22%3A1698736%7D%2C%22meta%22%3A%7B%22creatorSummary%22%3A%22Rossi%22%2C%22parsedDate%22%3A%221890%22%2C%22numChildren%22%3A1%7D%2C%22bib%22%3A%22%26lt%3Bdiv%20class%3D%26quot%3Bcsl-bib-body%26quot%3B%20style%3D%26quot%3Bline-height%3A%202%3B%20padding-left%3A%202em%3B%20text-indent%3A-2em%3B%26quot%3B%26gt%3B%5Cn%20%20%26lt%3Bdiv%20class%3D%26quot%3Bcsl-entry%26quot%3B%26gt%3BRossi%2C%20J.-B.%20de.%20%281890%29.%20Cloche%2C%20avec%20inscription%20d%26%23xE9%3Bdicatoire%2C%20du%20VIIIe%20ou%20IXe%20si%26%23xE8%3Bcle%2C%20trouv%26%23xE9%3Be%20%26%23xE0%3B%20Canino.%20%26lt%3Bi%26gt%3BRevue%20de%20l%26%23x2019%3Bart%20Chr%26%23xE9%3Btien%26lt%3B%5C%2Fi%26gt%3B%2C%20%2833%29%2C%201%26%23x2013%3B5.%20Retrieved%20from%20%26lt%3Ba%20class%3D%26%23039%3Bzp-ItemURL%26%23039%3B%20href%3D%26%23039%3Bhttps%3A%5C%2F%5C%2Farchive.org%5C%2Fdetails%5C%2Frevuedelartchr1890lill%26%23039%3B%26gt%3Bhttps%3A%5C%2F%5C%2Farchive.org%5C%2Fdetails%5C%2Frevuedelartchr1890lill%26lt%3B%5C%2Fa%26gt%3B%26lt%3B%5C%2Fdiv%26gt%3B%5Cn%26lt%3B%5C%2Fdiv%26gt%3B%22%2C%22data%22%3A%7B%22itemType%22%3A%22journalArticle%22%2C%22title%22%3A%22Cloche%2C%20avec%20inscription%20d%5Cu00e9dicatoire%2C%20du%20VIIIe%20ou%20IXe%20si%5Cu00e8cle%2C%20trouv%5Cu00e9e%20%5Cu00e0%20Canino%22%2C%22creators%22%3A%5B%7B%22creatorType%22%3A%22author%22%2C%22firstName%22%3A%22J.-Baptista%20de%22%2C%22lastName%22%3A%22Rossi%22%7D%5D%2C%22abstractNote%22%3A%22%22%2C%22date%22%3A%221890%22%2C%22language%22%3A%22%22%2C%22DOI%22%3A%22%22%2C%22ISSN%22%3A%22%22%2C%22url%22%3A%22https%3A%5C%2F%5C%2Farchive.org%5C%2Fdetails%5C%2Frevuedelartchr1890lill%22%2C%22collections%22%3A%5B%5D%2C%22dateModified%22%3A%222019-05-08T07%3A37%3A55Z%22%7D%7D%2C%7B%22key%22%3A%22G52836AQ%22%2C%22library%22%3A%7B%22id%22%3A1698736%7D%2C%22meta%22%3A%7B%22creatorSummary%22%3A%22Drescher%22%2C%22parsedDate%22%3A%221961%22%2C%22numChildren%22%3A1%7D%2C%22bib%22%3A%22%26lt%3Bdiv%20class%3D%26quot%3Bcsl-bib-body%26quot%3B%20style%3D%26quot%3Bline-height%3A%202%3B%20padding-left%3A%202em%3B%20text-indent%3A-2em%3B%26quot%3B%26gt%3B%5Cn%20%20%26lt%3Bdiv%20class%3D%26quot%3Bcsl-entry%26quot%3B%26gt%3BDrescher%2C%20H.%20%281961%29.%20Zwei%20mittelalterliche%20Gie%26%23xDF%3Bereien%20auf%20dem%20Gel%26%23xE4%3Bnde%20des%20ehemaligen%20Hamburger%20Doms.%20%26lt%3Bi%26gt%3BHammaburg%26lt%3B%5C%2Fi%26gt%3B%2C%20%26lt%3Bi%26gt%3BA.%20F.%208%26lt%3B%5C%2Fi%26gt%3B%2C%20107%26%23x2013%3B132.%26lt%3B%5C%2Fdiv%26gt%3B%5Cn%26lt%3B%5C%2Fdiv%26gt%3B%22%2C%22data%22%3A%7B%22itemType%22%3A%22journalArticle%22%2C%22title%22%3A%22Zwei%20mittelalterliche%20Gie%5Cu00dfereien%20auf%20dem%20Gel%5Cu00e4nde%20des%20ehemaligen%20Hamburger%20Doms%22%2C%22creators%22%3A%5B%7B%22creatorType%22%3A%22author%22%2C%22firstName%22%3A%22Hans%22%2C%22lastName%22%3A%22Drescher%22%7D%5D%2C%22abstractNote%22%3A%22%22%2C%22date%22%3A%221961%22%2C%22language%22%3A%22%22%2C%22DOI%22%3A%22%22%2C%22ISSN%22%3A%22%22%2C%22url%22%3A%22%22%2C%22collections%22%3A%5B%5D%2C%22dateModified%22%3A%222019-05-08T07%3A37%3A02Z%22%7D%7D%2C%7B%22key%22%3A%222DF9XDGI%22%2C%22library%22%3A%7B%22id%22%3A1698736%7D%2C%22meta%22%3A%7B%22creatorSummary%22%3A%22Drescher%22%2C%22parsedDate%22%3A%221968%22%2C%22numChildren%22%3A0%7D%2C%22bib%22%3A%22%26lt%3Bdiv%20class%3D%26quot%3Bcsl-bib-body%26quot%3B%20style%3D%26quot%3Bline-height%3A%202%3B%20padding-left%3A%202em%3B%20text-indent%3A-2em%3B%26quot%3B%26gt%3B%5Cn%20%20%26lt%3Bdiv%20class%3D%26quot%3Bcsl-entry%26quot%3B%26gt%3BDrescher%2C%20H.%20%281968%29.%20Mittelalterliche%20Bronzegrapen%20aus%20L%26%23xFC%3Bbeck.%20%26lt%3Bi%26gt%3BDer%20Wagen.%20Ein%20L%26%23xFC%3Bbeckisches%20Jahrbuch%26lt%3B%5C%2Fi%26gt%3B%2C%20164%26%23x2013%3B171.%26lt%3B%5C%2Fdiv%26gt%3B%5Cn%26lt%3B%5C%2Fdiv%26gt%3B%22%2C%22data%22%3A%7B%22itemType%22%3A%22journalArticle%22%2C%22title%22%3A%22Mittelalterliche%20Bronzegrapen%20aus%20L%5Cu00fcbeck%22%2C%22creators%22%3A%5B%7B%22creatorType%22%3A%22author%22%2C%22firstName%22%3A%22Hans%22%2C%22lastName%22%3A%22Drescher%22%7D%5D%2C%22abstractNote%22%3A%22%22%2C%22date%22%3A%221968%22%2C%22language%22%3A%22%22%2C%22DOI%22%3A%22%22%2C%22ISSN%22%3A%22%22%2C%22url%22%3A%22%22%2C%22collections%22%3A%5B%22RI8HAJ3J%22%5D%2C%22dateModified%22%3A%222019-05-08T07%3A36%3A55Z%22%7D%7D%2C%7B%22key%22%3A%228IN9A2H8%22%2C%22library%22%3A%7B%22id%22%3A1698736%7D%2C%22meta%22%3A%7B%22creatorSummary%22%3A%22Drescher%22%2C%22parsedDate%22%3A%221982%22%2C%22numChildren%22%3A0%7D%2C%22bib%22%3A%22%26lt%3Bdiv%20class%3D%26quot%3Bcsl-bib-body%26quot%3B%20style%3D%26quot%3Bline-height%3A%202%3B%20padding-left%3A%202em%3B%20text-indent%3A-2em%3B%26quot%3B%26gt%3B%5Cn%20%20%26lt%3Bdiv%20class%3D%26quot%3Bcsl-entry%26quot%3B%26gt%3BDrescher%2C%20H.%20%281982%29.%20Zu%20den%20bronzenen%20Grapen%20des%2012.-16.%20Jahrhunderts%20aus%20Nordwestdeuschland.%20In%20R.%20Pohl-Weber%20%28Ed.%29%2C%20%26lt%3Bi%26gt%3BAus%20dem%20Alltag%20der%20Mittelalterlichen%20Stadt.%20Handbuch%20zur%20Sonderausstellung%26lt%3B%5C%2Fi%26gt%3B%20%28Vol.%2040%2C%20pp.%20157%26%23x2013%3B174%29.%20Bremen.%26lt%3B%5C%2Fdiv%26gt%3B%5Cn%26lt%3B%5C%2Fdiv%26gt%3B%22%2C%22data%22%3A%7B%22itemType%22%3A%22bookSection%22%2C%22title%22%3A%22Zu%20den%20bronzenen%20Grapen%20des%2012.-16.%20Jahrhunderts%20aus%20Nordwestdeuschland%22%2C%22creators%22%3A%5B%7B%22creatorType%22%3A%22author%22%2C%22firstName%22%3A%22Hans%22%2C%22lastName%22%3A%22Drescher%22%7D%2C%7B%22creatorType%22%3A%22editor%22%2C%22firstName%22%3A%22R.%22%2C%22lastName%22%3A%22Pohl-Weber%22%7D%5D%2C%22abstractNote%22%3A%22%22%2C%22bookTitle%22%3A%22Aus%20dem%20Alltag%20der%20Mittelalterlichen%20Stadt.%20Handbuch%20zur%20Sonderausstellung%22%2C%22date%22%3A%221982%22%2C%22language%22%3A%22%22%2C%22ISBN%22%3A%22%22%2C%22url%22%3A%22%22%2C%22collections%22%3A%5B%22RI8HAJ3J%22%5D%2C%22dateModified%22%3A%222019-05-08T07%3A36%3A43Z%22%7D%7D%2C%7B%22key%22%3A%22FWBHWHWG%22%2C%22library%22%3A%7B%22id%22%3A1698736%7D%2C%22meta%22%3A%7B%22creatorSummary%22%3A%22Drescher%22%2C%22parsedDate%22%3A%221986%22%2C%22numChildren%22%3A0%7D%2C%22bib%22%3A%22%26lt%3Bdiv%20class%3D%26quot%3Bcsl-bib-body%26quot%3B%20style%3D%26quot%3Bline-height%3A%202%3B%20padding-left%3A%202em%3B%20text-indent%3A-2em%3B%26quot%3B%26gt%3B%5Cn%20%20%26lt%3Bdiv%20class%3D%26quot%3Bcsl-entry%26quot%3B%26gt%3BDrescher%2C%20H.%20%281986%29.%20Zum%20Guss%20von%20Bronze%2C%20Messing%20und%20Zinn%20%26%23x201C%3Bum%201200.%26%23x201D%3B%20%26lt%3Bi%26gt%3BZeitschrift%20F%26%23xFC%3Br%20Arch%26%23xE4%3Bologie%20Des%20Mittelalters%26lt%3B%5C%2Fi%26gt%3B%2C%20%26lt%3Bi%26gt%3BBeiheft%204%26lt%3B%5C%2Fi%26gt%3B%2C%20389%26%23x2013%3B405.%26lt%3B%5C%2Fdiv%26gt%3B%5Cn%26lt%3B%5C%2Fdiv%26gt%3B%22%2C%22data%22%3A%7B%22itemType%22%3A%22journalArticle%22%2C%22title%22%3A%22Zum%20Guss%20von%20Bronze%2C%20Messing%20und%20Zinn%20%5C%22um%201200%5C%22%22%2C%22creators%22%3A%5B%7B%22creatorType%22%3A%22author%22%2C%22firstName%22%3A%22Hans%22%2C%22lastName%22%3A%22Drescher%22%7D%5D%2C%22abstractNote%22%3A%22%22%2C%22date%22%3A%221986%22%2C%22language%22%3A%22%22%2C%22DOI%22%3A%22%22%2C%22ISSN%22%3A%22%22%2C%22url%22%3A%22%22%2C%22collections%22%3A%5B%5D%2C%22dateModified%22%3A%222019-05-08T07%3A36%3A34Z%22%7D%7D%2C%7B%22key%22%3A%22P2DXZ99G%22%2C%22library%22%3A%7B%22id%22%3A1698736%7D%2C%22meta%22%3A%7B%22creatorSummary%22%3A%22Drescher%22%2C%22parsedDate%22%3A%221987%22%2C%22numChildren%22%3A0%7D%2C%22bib%22%3A%22%26lt%3Bdiv%20class%3D%26quot%3Bcsl-bib-body%26quot%3B%20style%3D%26quot%3Bline-height%3A%202%3B%20padding-left%3A%202em%3B%20text-indent%3A-2em%3B%26quot%3B%26gt%3B%5Cn%20%20%26lt%3Bdiv%20class%3D%26quot%3Bcsl-entry%26quot%3B%26gt%3BDrescher%2C%20H.%20%281987%29.%20Erg%26%23xE4%3Bnzende%20Bemerkungen%20zum%20Giessereifund%20von%20Bonn-Schwarzrheindorf.%20In%20W.%20Janssen%20%28Ed.%29%2C%20%26lt%3Bi%26gt%3BEine%20mittelalterliche%20Metallgie%26%23xDF%3Berei%20in%20Bonn-Schwarzrheindorf%26lt%3B%5C%2Fi%26gt%3B%20%28Vol.%2027%2C%20pp.%20201%26%23x2013%3B227%29.%26lt%3B%5C%2Fdiv%26gt%3B%5Cn%26lt%3B%5C%2Fdiv%26gt%3B%22%2C%22data%22%3A%7B%22itemType%22%3A%22conferencePaper%22%2C%22title%22%3A%22Erg%5Cu00e4nzende%20Bemerkungen%20zum%20Giessereifund%20von%20Bonn-Schwarzrheindorf%22%2C%22creators%22%3A%5B%7B%22creatorType%22%3A%22author%22%2C%22firstName%22%3A%22Hans%22%2C%22lastName%22%3A%22Drescher%22%7D%2C%7B%22creatorType%22%3A%22editor%22%2C%22firstName%22%3A%22W%22%2C%22lastName%22%3A%22Janssen%22%7D%5D%2C%22abstractNote%22%3A%22%22%2C%22date%22%3A%221987%22%2C%22proceedingsTitle%22%3A%22Eine%20mittelalterliche%20Metallgie%5Cu00dferei%20in%20Bonn-Schwarzrheindorf%22%2C%22conferenceName%22%3A%22%22%2C%22language%22%3A%22%22%2C%22DOI%22%3A%22%22%2C%22ISBN%22%3A%22%22%2C%22url%22%3A%22%22%2C%22collections%22%3A%5B%22RI8HAJ3J%22%5D%2C%22dateModified%22%3A%222019-05-08T07%3A36%3A29Z%22%7D%7D%2C%7B%22key%22%3A%22CPX92XCU%22%2C%22library%22%3A%7B%22id%22%3A1698736%7D%2C%22meta%22%3A%7B%22creatorSummary%22%3A%22Drescher%22%2C%22parsedDate%22%3A%221992%22%2C%22numChildren%22%3A0%7D%2C%22bib%22%3A%22%26lt%3Bdiv%20class%3D%26quot%3Bcsl-bib-body%26quot%3B%20style%3D%26quot%3Bline-height%3A%202%3B%20padding-left%3A%202em%3B%20text-indent%3A-2em%3B%26quot%3B%26gt%3B%5Cn%20%20%26lt%3Bdiv%20class%3D%26quot%3Bcsl-entry%26quot%3B%26gt%3BDrescher%2C%20H.%20%281992%29.%20Glocken%20und%20Glockenguss%20im%2011.%20und%2012.%20Jahrhundert.%20In%20G.%20Waurick%20%26amp%3B%20H.%20W.%20B%26%23xF6%3Bhme%20%28Eds.%29%2C%20%26lt%3Bi%26gt%3BDas%20Reich%20der%20Salier%201024%20-%201125%26%23x202F%3B%3A%20Katalog%20zur%20Ausstellung%20des%20Landes%20Rheinland-Pfalz%3B%20%5BAusstellung%20im%20Historischen%20Museum%20der%20Pfalz%2C%20Speyer%2C%20vom%2023.%20M%26%23xE4%3Brz%20bis%2021.%20Juni%201992%5D%26lt%3B%5C%2Fi%26gt%3B%20%28pp.%20405%26%23x2013%3B414%29.%20Sigmaringen%3A%20Thorbecke.%26lt%3B%5C%2Fdiv%26gt%3B%5Cn%26lt%3B%5C%2Fdiv%26gt%3B%22%2C%22data%22%3A%7B%22itemType%22%3A%22bookSection%22%2C%22title%22%3A%22Glocken%20und%20Glockenguss%20im%2011.%20und%2012.%20Jahrhundert%22%2C%22creators%22%3A%5B%7B%22creatorType%22%3A%22editor%22%2C%22firstName%22%3A%22G%5Cu00f6tz%22%2C%22lastName%22%3A%22Waurick%22%7D%2C%7B%22creatorType%22%3A%22editor%22%2C%22firstName%22%3A%22Horst%20Wolfgang%22%2C%22lastName%22%3A%22B%5Cu00f6hme%22%7D%2C%7B%22creatorType%22%3A%22author%22%2C%22firstName%22%3A%22Hans%22%2C%22lastName%22%3A%22Drescher%22%7D%5D%2C%22abstractNote%22%3A%22%22%2C%22bookTitle%22%3A%22Das%20Reich%20der%20Salier%201024%20-%201125%20%3A%20Katalog%20zur%20Ausstellung%20des%20Landes%20Rheinland-Pfalz%3B%20%5BAusstellung%20im%20Historischen%20Museum%20der%20Pfalz%2C%20Speyer%2C%20vom%2023.%20M%5Cu00e4rz%20bis%2021.%20Juni%201992%5D%22%2C%22date%22%3A%221992%22%2C%22language%22%3A%22%22%2C%22ISBN%22%3A%223-7995-4140-3%22%2C%22url%22%3A%22%22%2C%22collections%22%3A%5B%5D%2C%22dateModified%22%3A%222019-05-08T07%3A36%3A21Z%22%7D%7D%2C%7B%22key%22%3A%226WNC9C3B%22%2C%22library%22%3A%7B%22id%22%3A1698736%7D%2C%22meta%22%3A%7B%22creatorSummary%22%3A%22Drescher%22%2C%22parsedDate%22%3A%221993%22%2C%22numChildren%22%3A0%7D%2C%22bib%22%3A%22%26lt%3Bdiv%20class%3D%26quot%3Bcsl-bib-body%26quot%3B%20style%3D%26quot%3Bline-height%3A%202%3B%20padding-left%3A%202em%3B%20text-indent%3A-2em%3B%26quot%3B%26gt%3B%5Cn%20%20%26lt%3Bdiv%20class%3D%26quot%3Bcsl-entry%26quot%3B%26gt%3BDrescher%2C%20H.%20%281993%29.%20Ein%20Kommentar%20zu%3A%20Gerhard%20Laub%2C%20Zum%20Nachweis%20von%20Rammelsberger%20Kupfer%20in%20Kunstgegenst%26%23xE4%3Bnden%20aus%20Goslar%20und%20in%20anderen%20Metallarbeiten%20des%20Mittelalters.%20In%20%26lt%3Bi%26gt%3BGoslar%20Bergstadt%20-%20Kaiserstadt%20in%20Geschichte%20und%20Kunst%26lt%3B%5C%2Fi%26gt%3B%20%28pp.%20313%26%23x2013%3B316%29.%26lt%3B%5C%2Fdiv%26gt%3B%5Cn%26lt%3B%5C%2Fdiv%26gt%3B%22%2C%22data%22%3A%7B%22itemType%22%3A%22bookSection%22%2C%22title%22%3A%22Ein%20Kommentar%20zu%3A%20Gerhard%20Laub%2C%20Zum%20Nachweis%20von%20Rammelsberger%20Kupfer%20in%20Kunstgegenst%5Cu00e4nden%20aus%20Goslar%20und%20in%20anderen%20Metallarbeiten%20des%20Mittelalters%22%2C%22creators%22%3A%5B%7B%22creatorType%22%3A%22author%22%2C%22firstName%22%3A%22Hans%22%2C%22lastName%22%3A%22Drescher%22%7D%5D%2C%22abstractNote%22%3A%22%22%2C%22bookTitle%22%3A%22Goslar%20Bergstadt%20-%20Kaiserstadt%20in%20Geschichte%20und%20Kunst%22%2C%22date%22%3A%221993%22%2C%22language%22%3A%22%22%2C%22ISBN%22%3A%22%22%2C%22url%22%3A%22%22%2C%22collections%22%3A%5B%22RI8HAJ3J%22%5D%2C%22dateModified%22%3A%222019-05-08T07%3A36%3A16Z%22%7D%7D%2C%7B%22key%22%3A%22RKIKABBU%22%2C%22library%22%3A%7B%22id%22%3A1698736%7D%2C%22meta%22%3A%7B%22creatorSummary%22%3A%22Drescher%22%2C%22parsedDate%22%3A%221993%22%2C%22numChildren%22%3A0%7D%2C%22bib%22%3A%22%26lt%3Bdiv%20class%3D%26quot%3Bcsl-bib-body%26quot%3B%20style%3D%26quot%3Bline-height%3A%202%3B%20padding-left%3A%202em%3B%20text-indent%3A-2em%3B%26quot%3B%26gt%3B%5Cn%20%20%26lt%3Bdiv%20class%3D%26quot%3Bcsl-entry%26quot%3B%26gt%3BDrescher%2C%20H.%20%281993%29.%20Zur%20Herstellungstechnik%20mittelalterlicher%20Bronzen%20aus%20Goslar.%20Der%20Marktbrunnen%2C%20der%20neu%20gefundene%20Bronze%20Vogel%2C%20der%20Greif%20vom%20Kaiserhaus%20und%20der%20Kaiserstuhl.%20In%20%26lt%3Bi%26gt%3BGoslar%20Bergstadt%20-%20Kaiserstadt%20in%20Geschichte%20und%20Kunst%26lt%3B%5C%2Fi%26gt%3B%20%28pp.%20251%26%23x2013%3B301%29.%20G%26%23xF6%3Bttingen.%26lt%3B%5C%2Fdiv%26gt%3B%5Cn%26lt%3B%5C%2Fdiv%26gt%3B%22%2C%22data%22%3A%7B%22itemType%22%3A%22bookSection%22%2C%22title%22%3A%22Zur%20Herstellungstechnik%20mittelalterlicher%20Bronzen%20aus%20Goslar.%20Der%20Marktbrunnen%2C%20der%20neu%20gefundene%20Bronze%20Vogel%2C%20der%20Greif%20vom%20Kaiserhaus%20und%20der%20Kaiserstuhl%22%2C%22creators%22%3A%5B%7B%22creatorType%22%3A%22author%22%2C%22firstName%22%3A%22Hans%22%2C%22lastName%22%3A%22Drescher%22%7D%5D%2C%22abstractNote%22%3A%22%22%2C%22bookTitle%22%3A%22Goslar%20Bergstadt%20-%20Kaiserstadt%20in%20Geschichte%20und%20Kunst%22%2C%22date%22%3A%221993%22%2C%22language%22%3A%22%22%2C%22ISBN%22%3A%22%22%2C%22url%22%3A%22%22%2C%22collections%22%3A%5B%22RI8HAJ3J%22%5D%2C%22dateModified%22%3A%222019-05-08T07%3A36%3A12Z%22%7D%7D%2C%7B%22key%22%3A%22FFUFS9V6%22%2C%22library%22%3A%7B%22id%22%3A1698736%7D%2C%22meta%22%3A%7B%22creatorSummary%22%3A%22Drescher%22%2C%22parsedDate%22%3A%221993%22%2C%22numChildren%22%3A0%7D%2C%22bib%22%3A%22%26lt%3Bdiv%20class%3D%26quot%3Bcsl-bib-body%26quot%3B%20style%3D%26quot%3Bline-height%3A%202%3B%20padding-left%3A%202em%3B%20text-indent%3A-2em%3B%26quot%3B%26gt%3B%5Cn%20%20%26lt%3Bdiv%20class%3D%26quot%3Bcsl-entry%26quot%3B%26gt%3BDrescher%2C%20H.%20%281993%29.%20Zur%20Technik%20berwardinischer%20Silber-%20und%20Bronzeg%26%23xFC%3Bsse.%20In%20%26lt%3Bi%26gt%3BBernward%20von%20Hildesheim%20und%20das%20Zeitalter%20der%20Ottonen%3A%20Katalog%20der%20Ausstellung%2C%20Hildesheim%201993.%20Band%201%26lt%3B%5C%2Fi%26gt%3B%20%28pp.%20337%26%23x2013%3B351%29.%26lt%3B%5C%2Fdiv%26gt%3B%5Cn%26lt%3B%5C%2Fdiv%26gt%3B%22%2C%22data%22%3A%7B%22itemType%22%3A%22bookSection%22%2C%22title%22%3A%22Zur%20Technik%20berwardinischer%20Silber-%20und%20Bronzeg%5Cu00fcsse%22%2C%22creators%22%3A%5B%7B%22creatorType%22%3A%22author%22%2C%22firstName%22%3A%22Hans%22%2C%22lastName%22%3A%22Drescher%22%7D%5D%2C%22abstractNote%22%3A%22%22%2C%22bookTitle%22%3A%22Bernward%20von%20Hildesheim%20und%20das%20Zeitalter%20der%20Ottonen%3A%20Katalog%20der%20Ausstellung%2C%20Hildesheim%201993.%20Band%201%22%2C%22date%22%3A%221993%22%2C%22language%22%3A%22%22%2C%22ISBN%22%3A%22%22%2C%22url%22%3A%22%22%2C%22collections%22%3A%5B%22RI8HAJ3J%22%5D%2C%22dateModified%22%3A%222019-05-08T07%3A36%3A07Z%22%7D%7D%2C%7B%22key%22%3A%22CKJS5RNK%22%2C%22library%22%3A%7B%22id%22%3A1698736%7D%2C%22meta%22%3A%7B%22creatorSummary%22%3A%22Drescher%22%2C%22parsedDate%22%3A%221995%22%2C%22numChildren%22%3A1%7D%2C%22bib%22%3A%22%26lt%3Bdiv%20class%3D%26quot%3Bcsl-bib-body%26quot%3B%20style%3D%26quot%3Bline-height%3A%202%3B%20padding-left%3A%202em%3B%20text-indent%3A-2em%3B%26quot%3B%26gt%3B%5Cn%20%20%26lt%3Bdiv%20class%3D%26quot%3Bcsl-entry%26quot%3B%26gt%3BDrescher%2C%20H.%20%281995%29.%20Gie%26%23xDF%3Bformen%20fr%26%23xFC%3Bher%20Glocken%20aus%20Mainz.%20%26lt%3Bi%26gt%3BMainzer%20Zeitschrift%26lt%3B%5C%2Fi%26gt%3B%2C%20%26lt%3Bi%26gt%3B90%5C%2F91%26lt%3B%5C%2Fi%26gt%3B%2C%20183%26%23x2013%3B225.%26lt%3B%5C%2Fdiv%26gt%3B%5Cn%26lt%3B%5C%2Fdiv%26gt%3B%22%2C%22data%22%3A%7B%22itemType%22%3A%22journalArticle%22%2C%22title%22%3A%22Gie%5Cu00dfformen%20fr%5Cu00fcher%20Glocken%20aus%20Mainz%22%2C%22creators%22%3A%5B%7B%22creatorType%22%3A%22author%22%2C%22firstName%22%3A%22Hans%22%2C%22lastName%22%3A%22Drescher%22%7D%5D%2C%22abstractNote%22%3A%22%22%2C%22date%22%3A%221995%5C%2F96%22%2C%22language%22%3A%22%22%2C%22DOI%22%3A%22%22%2C%22ISSN%22%3A%22%22%2C%22url%22%3A%22%22%2C%22collections%22%3A%5B%5D%2C%22dateModified%22%3A%222019-05-08T07%3A36%3A02Z%22%7D%7D%2C%7B%22key%22%3A%22JNZVJZ6N%22%2C%22library%22%3A%7B%22id%22%3A1698736%7D%2C%22meta%22%3A%7B%22creatorSummary%22%3A%22Drescher%22%2C%22parsedDate%22%3A%221999%22%2C%22numChildren%22%3A0%7D%2C%22bib%22%3A%22%26lt%3Bdiv%20class%3D%26quot%3Bcsl-bib-body%26quot%3B%20style%3D%26quot%3Bline-height%3A%202%3B%20padding-left%3A%202em%3B%20text-indent%3A-2em%3B%26quot%3B%26gt%3B%5Cn%20%20%26lt%3Bdiv%20class%3D%26quot%3Bcsl-entry%26quot%3B%26gt%3BDrescher%2C%20H.%20%281999%29.%20Die%20Glocken%20der%20karolingerzeitlichen%20Stiftdkirche%20bei%20Vreden%2C%20Kreis%20Ahaus.%20In%20C.%20Stiegemann%20%26amp%3B%20M.%20Wemhoff%20%28Eds.%29%2C%20%26lt%3Bi%26gt%3B799%2C%20Kunst%20und%20Kultur%20der%20Karolingerzeit%3A%20Karl%20der%20Grosse%20und%20Papst%20Leo%20III.%20in%20Paderborn%3A%20Katalog%20der%20Ausstellung%2C%20Paderborn%201999%26lt%3B%5C%2Fi%26gt%3B%20%28pp.%20356%26%23x2013%3B364%29.%20Mainz%3A%20P.%20von%20Zabern.%26lt%3B%5C%2Fdiv%26gt%3B%5Cn%26lt%3B%5C%2Fdiv%26gt%3B%22%2C%22data%22%3A%7B%22itemType%22%3A%22bookSection%22%2C%22title%22%3A%22Die%20Glocken%20der%20karolingerzeitlichen%20Stiftdkirche%20bei%20Vreden%2C%20Kreis%20Ahaus%22%2C%22creators%22%3A%5B%7B%22creatorType%22%3A%22editor%22%2C%22firstName%22%3A%22Christoph%22%2C%22lastName%22%3A%22Stiegemann%22%7D%2C%7B%22creatorType%22%3A%22editor%22%2C%22firstName%22%3A%22Matthias%22%2C%22lastName%22%3A%22Wemhoff%22%7D%2C%7B%22creatorType%22%3A%22author%22%2C%22firstName%22%3A%22Hans%22%2C%22lastName%22%3A%22Drescher%22%7D%5D%2C%22abstractNote%22%3A%22%22%2C%22bookTitle%22%3A%22799%2C%20Kunst%20und%20Kultur%20der%20Karolingerzeit%3A%20Karl%20der%20Grosse%20und%20Papst%20Leo%20III.%20in%20Paderborn%3A%20Katalog%20der%20Ausstellung%2C%20Paderborn%201999%22%2C%22date%22%3A%221999%22%2C%22language%22%3A%22%22%2C%22ISBN%22%3A%22978-3-8053-2456-4%20978-3-8053-2460-1%22%2C%22url%22%3A%22%22%2C%22collections%22%3A%5B%5D%2C%22dateModified%22%3A%222019-05-08T07%3A35%3A56Z%22%7D%7D%2C%7B%22key%22%3A%227ZV3MN3T%22%2C%22library%22%3A%7B%22id%22%3A1698736%7D%2C%22meta%22%3A%7B%22creatorSummary%22%3A%22Janssen%22%2C%22parsedDate%22%3A%221987%22%2C%22numChildren%22%3A0%7D%2C%22bib%22%3A%22%26lt%3Bdiv%20class%3D%26quot%3Bcsl-bib-body%26quot%3B%20style%3D%26quot%3Bline-height%3A%202%3B%20padding-left%3A%202em%3B%20text-indent%3A-2em%3B%26quot%3B%26gt%3B%5Cn%20%20%26lt%3Bdiv%20class%3D%26quot%3Bcsl-entry%26quot%3B%26gt%3BJanssen%2C%20W.%20%281987%29.%20Eine%20mittelalterliche%20Metallgie%26%23xDF%3Berei%20in%20Bonn-%20Schwarzrheindorf.%20Mit%20Beitr%26%23xE4%3Bgen%20von%20Hans%20Drescher%2C%20Christoph%20J.%20Raub%20und%20Josef%20Riederer.%20In%20%26lt%3Bi%26gt%3BBeitr%26%23xE4%3Bge%20zur%20Arch%26%23xE4%3Bologie%20des%20Rheinlandes.%20Rheinische%20Ausgrabungen%26lt%3B%5C%2Fi%26gt%3B%20%28Vol.%2027%2C%20pp.%20135%26%23x2013%3B235%29.%20K%26%23xF6%3Bln.%26lt%3B%5C%2Fdiv%26gt%3B%5Cn%26lt%3B%5C%2Fdiv%26gt%3B%22%2C%22data%22%3A%7B%22itemType%22%3A%22bookSection%22%2C%22title%22%3A%22Eine%20mittelalterliche%20Metallgie%5Cu00dferei%20in%20Bonn-%20Schwarzrheindorf.%20Mit%20Beitr%5Cu00e4gen%20von%20Hans%20Drescher%2C%20Christoph%20J.%20Raub%20und%20Josef%20Riederer.%22%2C%22creators%22%3A%5B%7B%22creatorType%22%3A%22author%22%2C%22firstName%22%3A%22Walter%22%2C%22lastName%22%3A%22Janssen%22%7D%5D%2C%22abstractNote%22%3A%22%22%2C%22bookTitle%22%3A%22Beitr%5Cu00e4ge%20zur%20Arch%5Cu00e4ologie%20des%20Rheinlandes.%20Rheinische%20Ausgrabungen%22%2C%22date%22%3A%221987%22%2C%22language%22%3A%22%22%2C%22ISBN%22%3A%22%22%2C%22url%22%3A%22%22%2C%22collections%22%3A%5B%5D%2C%22dateModified%22%3A%222019-05-08T07%3A35%3A49Z%22%7D%7D%2C%7B%22key%22%3A%22EXBIW7AU%22%2C%22library%22%3A%7B%22id%22%3A1698736%7D%2C%22meta%22%3A%7B%22creatorSummary%22%3A%22Haiduck%22%2C%22parsedDate%22%3A%221997%22%2C%22numChildren%22%3A1%7D%2C%22bib%22%3A%22%26lt%3Bdiv%20class%3D%26quot%3Bcsl-bib-body%26quot%3B%20style%3D%26quot%3Bline-height%3A%202%3B%20padding-left%3A%202em%3B%20text-indent%3A-2em%3B%26quot%3B%26gt%3B%5Cn%20%20%26lt%3Bdiv%20class%3D%26quot%3Bcsl-entry%26quot%3B%26gt%3BHaiduck%2C%20H.%20%281997%29.%20Die%20mittelalterliche%20Gussform%20eines%20Taufkessels%20aus%20der%20Kirche%20von%20Cappel%20%28Kreis%20Cuxhaven%29.%20%26lt%3Bi%26gt%3BZeitschrift%20F%26%23xFC%3Br%20Arch%26%23xE4%3Bologie%20Des%20Mittelalters%26lt%3B%5C%2Fi%26gt%3B%2C%20%26lt%3Bi%26gt%3B25%5C%2F26%26lt%3B%5C%2Fi%26gt%3B%2C%2087%26%23x2013%3B105.%26lt%3B%5C%2Fdiv%26gt%3B%5Cn%26lt%3B%5C%2Fdiv%26gt%3B%22%2C%22data%22%3A%7B%22itemType%22%3A%22journalArticle%22%2C%22title%22%3A%22Die%20mittelalterliche%20Gussform%20eines%20Taufkessels%20aus%20der%20Kirche%20von%20Cappel%20%28Kreis%20Cuxhaven%29%22%2C%22creators%22%3A%5B%7B%22creatorType%22%3A%22author%22%2C%22firstName%22%3A%22H.%22%2C%22lastName%22%3A%22Haiduck%22%7D%5D%2C%22abstractNote%22%3A%22%22%2C%22date%22%3A%221997%5C%2F98%22%2C%22language%22%3A%22%22%2C%22DOI%22%3A%22%22%2C%22ISSN%22%3A%22%22%2C%22url%22%3A%22%22%2C%22collections%22%3A%5B%5D%2C%22dateModified%22%3A%222019-05-08T07%3A35%3A16Z%22%7D%7D%2C%7B%22key%22%3A%22WZJGGXE6%22%2C%22library%22%3A%7B%22id%22%3A1698736%7D%2C%22meta%22%3A%7B%22creatorSummary%22%3A%22Sugaki%20et%20al.%22%2C%22parsedDate%22%3A%221981%22%2C%22numChildren%22%3A0%7D%2C%22bib%22%3A%22%26lt%3Bdiv%20class%3D%26quot%3Bcsl-bib-body%26quot%3B%20style%3D%26quot%3Bline-height%3A%202%3B%20padding-left%3A%202em%3B%20text-indent%3A-2em%3B%26quot%3B%26gt%3B%5Cn%20%20%26lt%3Bdiv%20class%3D%26quot%3Bcsl-entry%26quot%3B%26gt%3BSugaki%2C%20A.%2C%20Shima%2C%20H.%2C%20Kitakaze%2C%20A.%2C%20%26amp%3B%20Mizota%2C%20T.%20%281981%29.%20Hydrothermal%20synthesis%20of%20nukundamite%20and%20its%20crystal%20structure.%20%26lt%3Bi%26gt%3BAmerican%20Mineralogist%26lt%3B%5C%2Fi%26gt%3B%2C%20%26lt%3Bi%26gt%3B66%26lt%3B%5C%2Fi%26gt%3B%2C%20398%26%23x2013%3B402.%26lt%3B%5C%2Fdiv%26gt%3B%5Cn%26lt%3B%5C%2Fdiv%26gt%3B%22%2C%22data%22%3A%7B%22itemType%22%3A%22journalArticle%22%2C%22title%22%3A%22Hydrothermal%20synthesis%20of%20nukundamite%20and%20its%20crystal%20structure%22%2C%22creators%22%3A%5B%7B%22creatorType%22%3A%22author%22%2C%22firstName%22%3A%22A.%22%2C%22lastName%22%3A%22Sugaki%22%7D%2C%7B%22creatorType%22%3A%22author%22%2C%22firstName%22%3A%22H.%22%2C%22lastName%22%3A%22Shima%22%7D%2C%7B%22creatorType%22%3A%22author%22%2C%22firstName%22%3A%22A.%22%2C%22lastName%22%3A%22Kitakaze%22%7D%2C%7B%22creatorType%22%3A%22author%22%2C%22firstName%22%3A%22T.%22%2C%22lastName%22%3A%22Mizota%22%7D%5D%2C%22abstractNote%22%3A%22%22%2C%22date%22%3A%221981%22%2C%22language%22%3A%22%22%2C%22DOI%22%3A%22%22%2C%22ISSN%22%3A%22%22%2C%22url%22%3A%22%22%2C%22collections%22%3A%5B%22RI8HAJ3J%22%5D%2C%22dateModified%22%3A%222019-05-08T07%3A34%3A06Z%22%7D%7D%2C%7B%22key%22%3A%22MIQUCSWR%22%2C%22library%22%3A%7B%22id%22%3A1698736%7D%2C%22meta%22%3A%7B%22creatorSummary%22%3A%22Suhling%22%2C%22parsedDate%22%3A%221997%22%2C%22numChildren%22%3A0%7D%2C%22bib%22%3A%22%26lt%3Bdiv%20class%3D%26quot%3Bcsl-bib-body%26quot%3B%20style%3D%26quot%3Bline-height%3A%202%3B%20padding-left%3A%202em%3B%20text-indent%3A-2em%3B%26quot%3B%26gt%3B%5Cn%20%20%26lt%3Bdiv%20class%3D%26quot%3Bcsl-entry%26quot%3B%26gt%3BSuhling%2C%20L.%20%281997%29.%20Kupfer-%20und%20Silberh%26%23xFC%3Btten%20in%20Buchillustrationen%20der%20fr%26%23xFC%3Bhen%20Neuzeit.%20%26lt%3Bi%26gt%3BBerichte%20Der%20Geologischen%20Bundesanstalt%26lt%3B%5C%2Fi%26gt%3B%2C%20%26lt%3Bi%26gt%3B41%26lt%3B%5C%2Fi%26gt%3B%2C%20219%26%23x2013%3B231.%26lt%3B%5C%2Fdiv%26gt%3B%5Cn%26lt%3B%5C%2Fdiv%26gt%3B%22%2C%22data%22%3A%7B%22itemType%22%3A%22journalArticle%22%2C%22title%22%3A%22Kupfer-%20und%20Silberh%5Cu00fctten%20in%20Buchillustrationen%20der%20fr%5Cu00fchen%20Neuzeit%22%2C%22creators%22%3A%5B%7B%22creatorType%22%3A%22author%22%2C%22firstName%22%3A%22Lothar%22%2C%22lastName%22%3A%22Suhling%22%7D%5D%2C%22abstractNote%22%3A%22%22%2C%22date%22%3A%221997%22%2C%22language%22%3A%22%22%2C%22DOI%22%3A%22%22%2C%22ISSN%22%3A%22%22%2C%22url%22%3A%22%22%2C%22collections%22%3A%5B%22RI8HAJ3J%22%5D%2C%22dateModified%22%3A%222019-05-08T07%3A33%3A49Z%22%7D%7D%2C%7B%22key%22%3A%22DGKI7EUF%22%2C%22library%22%3A%7B%22id%22%3A1698736%7D%2C%22meta%22%3A%7B%22creatorSummary%22%3A%22Telle%20and%20Th%5Cu00f6nni%5Cu00dfen%22%2C%22parsedDate%22%3A%222006%22%2C%22numChildren%22%3A0%7D%2C%22bib%22%3A%22%26lt%3Bdiv%20class%3D%26quot%3Bcsl-bib-body%26quot%3B%20style%3D%26quot%3Bline-height%3A%202%3B%20padding-left%3A%202em%3B%20text-indent%3A-2em%3B%26quot%3B%26gt%3B%5Cn%20%20%26lt%3Bdiv%20class%3D%26quot%3Bcsl-entry%26quot%3B%26gt%3BTelle%2C%20R.%2C%20%26amp%3B%20Th%26%23xF6%3Bnni%26%23xDF%3Ben%2C%20M.%20%282006%29.%20Pr%26%23xE4%3Bhistorische%20feuerfeste%20Werkstoffe%20und%20ihre%20Weiterentwicklung%20in%20keltischer%20und%20r%26%23xF6%3Bmischer%20Zeit.%20%26lt%3Bi%26gt%3BPr%26%23xE4%3Bhistorische%20Feuerfeste%20Werkstoffe%20Und%20Ihre%20Weiterentwicklung%20in%20Keltischer%20Und%20R%26%23xF6%3Bmischer%20Zeit%26lt%3B%5C%2Fi%26gt%3B%2C%20%26lt%3Bi%26gt%3B43%26lt%3B%5C%2Fi%26gt%3B%282%29%2C%2055%26%23x2013%3B87.%26lt%3B%5C%2Fdiv%26gt%3B%5Cn%26lt%3B%5C%2Fdiv%26gt%3B%22%2C%22data%22%3A%7B%22itemType%22%3A%22journalArticle%22%2C%22title%22%3A%22Pr%5Cu00e4historische%20feuerfeste%20Werkstoffe%20und%20ihre%20Weiterentwicklung%20in%20keltischer%20und%20r%5Cu00f6mischer%20Zeit%22%2C%22creators%22%3A%5B%7B%22creatorType%22%3A%22author%22%2C%22firstName%22%3A%22Rainer%22%2C%22lastName%22%3A%22Telle%22%7D%2C%7B%22creatorType%22%3A%22author%22%2C%22firstName%22%3A%22Martina%22%2C%22lastName%22%3A%22Th%5Cu00f6nni%5Cu00dfen%22%7D%5D%2C%22abstractNote%22%3A%22%22%2C%22date%22%3A%222006%22%2C%22language%22%3A%22%22%2C%22DOI%22%3A%22%22%2C%22ISSN%22%3A%22%22%2C%22url%22%3A%22%22%2C%22collections%22%3A%5B%22RI8HAJ3J%22%5D%2C%22dateModified%22%3A%222019-05-08T07%3A33%3A27Z%22%7D%7D%2C%7B%22key%22%3A%22M7EWRSMR%22%2C%22library%22%3A%7B%22id%22%3A1698736%7D%2C%22meta%22%3A%7B%22creatorSummary%22%3A%22Thies%22%2C%22parsedDate%22%3A%221993%22%2C%22numChildren%22%3A0%7D%2C%22bib%22%3A%22%26lt%3Bdiv%20class%3D%26quot%3Bcsl-bib-body%26quot%3B%20style%3D%26quot%3Bline-height%3A%202%3B%20padding-left%3A%202em%3B%20text-indent%3A-2em%3B%26quot%3B%26gt%3B%5Cn%20%20%26lt%3Bdiv%20class%3D%26quot%3Bcsl-entry%26quot%3B%26gt%3BThies%2C%20H.%20%281993%29.%20Goslar%20und%20die%20fr%26%23xFC%3Bhen%20nieders%26%23xE4%3Bchsichen%20Geb%26%23xE4%3Bude.%20In%20%26lt%3Bi%26gt%3BGoslar%20Bergstadt%20-%20Kaiserstadt%20in%20Geschichte%20und%20Kunst%26lt%3B%5C%2Fi%26gt%3B%20%28pp.%2095%26%23x2013%3B113%29.%26lt%3B%5C%2Fdiv%26gt%3B%5Cn%26lt%3B%5C%2Fdiv%26gt%3B%22%2C%22data%22%3A%7B%22itemType%22%3A%22bookSection%22%2C%22title%22%3A%22Goslar%20und%20die%20fr%5Cu00fchen%20nieders%5Cu00e4chsichen%20Geb%5Cu00e4ude%22%2C%22creators%22%3A%5B%7B%22creatorType%22%3A%22author%22%2C%22firstName%22%3A%22Harmen%22%2C%22lastName%22%3A%22Thies%22%7D%5D%2C%22abstractNote%22%3A%22%22%2C%22bookTitle%22%3A%22Goslar%20Bergstadt%20-%20Kaiserstadt%20in%20Geschichte%20und%20Kunst%22%2C%22date%22%3A%221993%22%2C%22language%22%3A%22%22%2C%22ISBN%22%3A%22%22%2C%22url%22%3A%22%22%2C%22collections%22%3A%5B%22RI8HAJ3J%22%5D%2C%22dateModified%22%3A%222019-05-08T07%3A33%3A19Z%22%7D%7D%2C%7B%22key%22%3A%2252VEN5A4%22%2C%22library%22%3A%7B%22id%22%3A1698736%7D%2C%22meta%22%3A%7B%22creatorSummary%22%3A%22Tholl%22%2C%22parsedDate%22%3A%222001%22%2C%22numChildren%22%3A0%7D%2C%22bib%22%3A%22%26lt%3Bdiv%20class%3D%26quot%3Bcsl-bib-body%26quot%3B%20style%3D%26quot%3Bline-height%3A%202%3B%20padding-left%3A%202em%3B%20text-indent%3A-2em%3B%26quot%3B%26gt%3B%5Cn%20%20%26lt%3Bdiv%20class%3D%26quot%3Bcsl-entry%26quot%3B%26gt%3BTholl%2C%20S.%20%282001%29.%20Macht%20und%20Pracht.%20In%20%26lt%3Bi%26gt%3BDer%20Rammelsberg.%20Tausend%20Jahre%20Mensch%20%26%23x2013%3B%20Natur%20%26%23x2013%3B%20Technik.%20Band%202%26lt%3B%5C%2Fi%26gt%3B%20%28pp.%20302%26%23x2013%3B315%29.%26lt%3B%5C%2Fdiv%26gt%3B%5Cn%26lt%3B%5C%2Fdiv%26gt%3B%22%2C%22data%22%3A%7B%22itemType%22%3A%22bookSection%22%2C%22title%22%3A%22Macht%20und%20Pracht%22%2C%22creators%22%3A%5B%7B%22creatorType%22%3A%22author%22%2C%22firstName%22%3A%22Stefan%22%2C%22lastName%22%3A%22Tholl%22%7D%5D%2C%22abstractNote%22%3A%22%22%2C%22bookTitle%22%3A%22Der%20Rammelsberg.%20Tausend%20Jahre%20Mensch%20%5Cu2013%20Natur%20%5Cu2013%20Technik.%20Band%202%22%2C%22date%22%3A%222001%22%2C%22language%22%3A%22%22%2C%22ISBN%22%3A%22%22%2C%22url%22%3A%22%22%2C%22collections%22%3A%5B%22RI8HAJ3J%22%5D%2C%22dateModified%22%3A%222019-05-08T07%3A33%3A13Z%22%7D%7D%2C%7B%22key%22%3A%22EHWFFTXG%22%2C%22library%22%3A%7B%22id%22%3A1698736%7D%2C%22meta%22%3A%7B%22creatorSummary%22%3A%22Thornton%20et%20al.%22%2C%22parsedDate%22%3A%222009%22%2C%22numChildren%22%3A0%7D%2C%22bib%22%3A%22%26lt%3Bdiv%20class%3D%26quot%3Bcsl-bib-body%26quot%3B%20style%3D%26quot%3Bline-height%3A%202%3B%20padding-left%3A%202em%3B%20text-indent%3A-2em%3B%26quot%3B%26gt%3B%5Cn%20%20%26lt%3Bdiv%20class%3D%26quot%3Bcsl-entry%26quot%3B%26gt%3BThornton%2C%20C.%2C%20Rehren%2C%20T.%2C%20%26amp%3B%20Pigott%2C%20V.%20%282009%29.%20The%20Production%20of%20Speiss%20%28Iron%20Arsenide%29%20during%20the%20Early%20Bronze%20Age%20in%20Iran.%20%26lt%3Bi%26gt%3BJournal%20of%20Archaeological%20Science%26lt%3B%5C%2Fi%26gt%3B%2C%20%26lt%3Bi%26gt%3B36%26lt%3B%5C%2Fi%26gt%3B%282%29%2C%20308%26%23x2013%3B316.%26lt%3B%5C%2Fdiv%26gt%3B%5Cn%26lt%3B%5C%2Fdiv%26gt%3B%22%2C%22data%22%3A%7B%22itemType%22%3A%22journalArticle%22%2C%22title%22%3A%22The%20Production%20of%20Speiss%20%28Iron%20Arsenide%29%20during%20the%20Early%20Bronze%20Age%20in%20Iran%22%2C%22creators%22%3A%5B%7B%22creatorType%22%3A%22author%22%2C%22firstName%22%3A%22Chris%22%2C%22lastName%22%3A%22Thornton%22%7D%2C%7B%22creatorType%22%3A%22author%22%2C%22firstName%22%3A%22Thilo%22%2C%22lastName%22%3A%22Rehren%22%7D%2C%7B%22creatorType%22%3A%22author%22%2C%22firstName%22%3A%22Vincent%22%2C%22lastName%22%3A%22Pigott%22%7D%5D%2C%22abstractNote%22%3A%22%22%2C%22date%22%3A%222009%22%2C%22language%22%3A%22%22%2C%22DOI%22%3A%22%22%2C%22ISSN%22%3A%22%22%2C%22url%22%3A%22%22%2C%22collections%22%3A%5B%22RI8HAJ3J%22%5D%2C%22dateModified%22%3A%222019-05-08T07%3A33%3A04Z%22%7D%7D%2C%7B%22key%22%3A%22V2HRQMZK%22%2C%22library%22%3A%7B%22id%22%3A1698736%7D%2C%22meta%22%3A%7B%22creatorSummary%22%3A%22Thornton%20and%20Giardino%22%2C%22parsedDate%22%3A%222012%22%2C%22numChildren%22%3A1%7D%2C%22bib%22%3A%22%26lt%3Bdiv%20class%3D%26quot%3Bcsl-bib-body%26quot%3B%20style%3D%26quot%3Bline-height%3A%202%3B%20padding-left%3A%202em%3B%20text-indent%3A-2em%3B%26quot%3B%26gt%3B%5Cn%20%20%26lt%3Bdiv%20class%3D%26quot%3Bcsl-entry%26quot%3B%26gt%3BThornton%2C%20C.%20P.%2C%20%26amp%3B%20Giardino%2C%20C.%20%282012%29.%20Serge%20Cleuziou%20and%20the%20%26%23x201C%3BTin%20Problem.%26%23x201D%3B%20In%20%26lt%3Bi%26gt%3BAux%20Marges%20de%20l%26%23x2019%3Barcheologie%3A%20Hommage%20a%20Serge%20Cleuziou%26lt%3B%5C%2Fi%26gt%3B%20%28pp.%20253%26%23x2013%3B260%29.%20Paris%3A%20De%20Boccard.%26lt%3B%5C%2Fdiv%26gt%3B%5Cn%26lt%3B%5C%2Fdiv%26gt%3B%22%2C%22data%22%3A%7B%22itemType%22%3A%22bookSection%22%2C%22title%22%3A%22Serge%20Cleuziou%20and%20the%20%27Tin%20Problem%27%22%2C%22creators%22%3A%5B%7B%22creatorType%22%3A%22author%22%2C%22firstName%22%3A%22Chrisoph%20Peter%22%2C%22lastName%22%3A%22Thornton%22%7D%2C%7B%22creatorType%22%3A%22author%22%2C%22firstName%22%3A%22Claudio%22%2C%22lastName%22%3A%22Giardino%22%7D%5D%2C%22abstractNote%22%3A%22%22%2C%22bookTitle%22%3A%22Aux%20Marges%20de%20l%27archeologie%3A%20Hommage%20a%20Serge%20Cleuziou%22%2C%22date%22%3A%222012%22%2C%22language%22%3A%22%22%2C%22ISBN%22%3A%22%22%2C%22url%22%3A%22%22%2C%22collections%22%3A%5B%22RI8HAJ3J%22%5D%2C%22dateModified%22%3A%222019-05-08T07%3A32%3A59Z%22%7D%7D%2C%7B%22key%22%3A%22ANUMU228%22%2C%22library%22%3A%7B%22id%22%3A1698736%7D%2C%22meta%22%3A%7B%22creatorSummary%22%3A%22Thornton%22%2C%22parsedDate%22%3A%222009%22%2C%22numChildren%22%3A1%7D%2C%22bib%22%3A%22%26lt%3Bdiv%20class%3D%26quot%3Bcsl-bib-body%26quot%3B%20style%3D%26quot%3Bline-height%3A%202%3B%20padding-left%3A%202em%3B%20text-indent%3A-2em%3B%26quot%3B%26gt%3B%5Cn%20%20%26lt%3Bdiv%20class%3D%26quot%3Bcsl-entry%26quot%3B%26gt%3BThornton%2C%20C.%20%282009%29.%20The%20Emergence%20of%20Complex%20Metallurgy%20on%20the%20Iranian%20Plateau%3A%20Escaping%20the%20Levantine%20Paradigm.%20%26lt%3Bi%26gt%3BJournal%20of%20World%20Prehistory%26lt%3B%5C%2Fi%26gt%3B%2C%20%26lt%3Bi%26gt%3B22%26lt%3B%5C%2Fi%26gt%3B%283%29%2C%20301%26%23x2013%3B327.%20%26lt%3Ba%20class%3D%26%23039%3Bzp-DOIURL%26%23039%3B%20href%3D%26%23039%3Bhttps%3A%5C%2F%5C%2Fdoi.org%5C%2F10.1007%5C%2Fs10963-009-9019-1%26%23039%3B%26gt%3Bhttps%3A%5C%2F%5C%2Fdoi.org%5C%2F10.1007%5C%2Fs10963-009-9019-1%26lt%3B%5C%2Fa%26gt%3B%26lt%3B%5C%2Fdiv%26gt%3B%5Cn%26lt%3B%5C%2Fdiv%26gt%3B%22%2C%22data%22%3A%7B%22itemType%22%3A%22journalArticle%22%2C%22title%22%3A%22The%20Emergence%20of%20Complex%20Metallurgy%20on%20the%20Iranian%20Plateau%3A%20Escaping%20the%20Levantine%20Paradigm%22%2C%22creators%22%3A%5B%7B%22creatorType%22%3A%22author%22%2C%22firstName%22%3A%22Christopher%22%2C%22lastName%22%3A%22Thornton%22%7D%5D%2C%22abstractNote%22%3A%22Abstract%20Models%20for%20the%20development%20of%20metallurgy%20in%20Southwest%20Asia%20have%20for%20a%20long%20time%20been%20focussed%20on%20research%20carried%20out%20in%20the%20lowland%20regions%20of%20the%20Levant%20and%20Mesopotamia.%20These%20models%20do%20not%20take%20into%20account%20the%20different%20developmental%20trajectories%20witnessed%20in%20the%20resource-rich%20highlands%20of%20Anatolia%2C%20the%20Caucasus%2C%20and%20Iran.%20In%20this%20paper%2C%20the%20beginnings%20of%20the%20use%20and%20production%20of%20metals%20in%20Iran%20will%20be%20juxtaposed%20with%20a%20cursory%20overview%20of%20the%20lowland%20model%20%28the%20%5Cu2018Levantine%20Paradigm%5Cu2019%29%20in%20order%20to%20highlight%20these%20differences.%20By%20synthesizing%20data%20from%20a%20number%20of%20current%20research%20projects%20exploring%20the%20early%20metallurgy%20of%20the%20Iranian%20Plateau%2C%20this%20paper%20demonstrates%20how%20at%20least%20one%20of%20the%20highland%20regions%20of%20Southwest%20Asia%20was%20at%20the%20very%20forefront%20of%20technological%20innovation%20from%20the%20seventh%20through%20the%20second%20millennium%20BC.%22%2C%22date%22%3A%222009%22%2C%22language%22%3A%22%22%2C%22DOI%22%3A%2210.1007%5C%2Fs10963-009-9019-1%22%2C%22ISSN%22%3A%22%22%2C%22url%22%3A%22http%3A%5C%2F%5C%2Fdx.doi.org%5C%2F10.1007%5C%2Fs10963-009-9019-1%22%2C%22collections%22%3A%5B%22RI8HAJ3J%22%5D%2C%22dateModified%22%3A%222019-05-08T07%3A32%3A53Z%22%7D%7D%2C%7B%22key%22%3A%22G2EKR4P6%22%2C%22library%22%3A%7B%22id%22%3A1698736%7D%2C%22meta%22%3A%7B%22creatorSummary%22%3A%22Thornton%22%2C%22parsedDate%22%3A%222007%22%2C%22numChildren%22%3A0%7D%2C%22bib%22%3A%22%26lt%3Bdiv%20class%3D%26quot%3Bcsl-bib-body%26quot%3B%20style%3D%26quot%3Bline-height%3A%202%3B%20padding-left%3A%202em%3B%20text-indent%3A-2em%3B%26quot%3B%26gt%3B%5Cn%20%20%26lt%3Bdiv%20class%3D%26quot%3Bcsl-entry%26quot%3B%26gt%3BThornton%2C%20C.%20P.%20%282007%29.%20Of%20brass%20and%20bronze%20in%20prehistoric%20Southwest%20Asia.%20In%20%26lt%3Bi%26gt%3BMetals%20and%20Mines.%20Studies%20in%20Archaeometallurgy%26lt%3B%5C%2Fi%26gt%3B%20%28pp.%20123%26%23x2013%3B135%29.%26lt%3B%5C%2Fdiv%26gt%3B%5Cn%26lt%3B%5C%2Fdiv%26gt%3B%22%2C%22data%22%3A%7B%22itemType%22%3A%22bookSection%22%2C%22title%22%3A%22Of%20brass%20and%20bronze%20in%20prehistoric%20Southwest%20Asia%22%2C%22creators%22%3A%5B%7B%22creatorType%22%3A%22author%22%2C%22firstName%22%3A%22Christopher%20P.%22%2C%22lastName%22%3A%22Thornton%22%7D%5D%2C%22abstractNote%22%3A%22%22%2C%22bookTitle%22%3A%22Metals%20and%20Mines.%20Studies%20in%20Archaeometallurgy%22%2C%22date%22%3A%222007%22%2C%22language%22%3A%22%22%2C%22ISBN%22%3A%22%22%2C%22url%22%3A%22%22%2C%22collections%22%3A%5B%5D%2C%22dateModified%22%3A%222019-05-08T07%3A32%3A46Z%22%7D%7D%2C%7B%22key%22%3A%226BHB294B%22%2C%22library%22%3A%7B%22id%22%3A1698736%7D%2C%22meta%22%3A%7B%22creatorSummary%22%3A%22Timberlake%22%2C%22parsedDate%22%3A%222002%22%2C%22numChildren%22%3A0%7D%2C%22bib%22%3A%22%26lt%3Bdiv%20class%3D%26quot%3Bcsl-bib-body%26quot%3B%20style%3D%26quot%3Bline-height%3A%202%3B%20padding-left%3A%202em%3B%20text-indent%3A-2em%3B%26quot%3B%26gt%3B%5Cn%20%20%26lt%3Bdiv%20class%3D%26quot%3Bcsl-entry%26quot%3B%26gt%3BTimberlake%2C%20S.%20%282002%29.%20Medieval%20lead%20smelting%20boles%20near%20Penguelan%2C%20Cwmystwyth%2C%20Ceredigion.%20%26lt%3Bi%26gt%3BArchaeology%20in%20Wales%26lt%3B%5C%2Fi%26gt%3B%2C%20%26lt%3Bi%26gt%3B42%26lt%3B%5C%2Fi%26gt%3B%2C%2045%26%23x2013%3B59.%26lt%3B%5C%2Fdiv%26gt%3B%5Cn%26lt%3B%5C%2Fdiv%26gt%3B%22%2C%22data%22%3A%7B%22itemType%22%3A%22journalArticle%22%2C%22title%22%3A%22Medieval%20lead%20smelting%20boles%20near%20Penguelan%2C%20Cwmystwyth%2C%20Ceredigion%22%2C%22creators%22%3A%5B%7B%22creatorType%22%3A%22author%22%2C%22firstName%22%3A%22Simon%22%2C%22lastName%22%3A%22Timberlake%22%7D%5D%2C%22abstractNote%22%3A%22%22%2C%22date%22%3A%222002%22%2C%22language%22%3A%22%22%2C%22DOI%22%3A%22%22%2C%22ISSN%22%3A%22%22%2C%22url%22%3A%22%22%2C%22collections%22%3A%5B%22RI8HAJ3J%22%5D%2C%22dateModified%22%3A%222019-05-08T07%3A32%3A36Z%22%7D%7D%2C%7B%22key%22%3A%22K8Z9P8RJ%22%2C%22library%22%3A%7B%22id%22%3A1698736%7D%2C%22meta%22%3A%7B%22creatorSummary%22%3A%22Tong%22%2C%22parsedDate%22%3A%221983%22%2C%22numChildren%22%3A1%7D%2C%22bib%22%3A%22%26lt%3Bdiv%20class%3D%26quot%3Bcsl-bib-body%26quot%3B%20style%3D%26quot%3Bline-height%3A%202%3B%20padding-left%3A%202em%3B%20text-indent%3A-2em%3B%26quot%3B%26gt%3B%5Cn%20%20%26lt%3Bdiv%20class%3D%26quot%3Bcsl-entry%26quot%3B%26gt%3BTong%2C%20K.-W.%20%281983%29.%20Shang%20musical%20instruments%20%28Teil%202%29.%20%26lt%3Bi%26gt%3BAsian%20Music%26lt%3B%5C%2Fi%26gt%3B%2C%20%26lt%3Bi%26gt%3B15%26lt%3B%5C%2Fi%26gt%3B%2C%20103%26%23x2013%3B184.%26lt%3B%5C%2Fdiv%26gt%3B%5Cn%26lt%3B%5C%2Fdiv%26gt%3B%22%2C%22data%22%3A%7B%22itemType%22%3A%22journalArticle%22%2C%22title%22%3A%22Shang%20musical%20instruments%20%28Teil%202%29%22%2C%22creators%22%3A%5B%7B%22creatorType%22%3A%22author%22%2C%22firstName%22%3A%22Kin-Woon%22%2C%22lastName%22%3A%22Tong%22%7D%5D%2C%22abstractNote%22%3A%22%22%2C%22date%22%3A%221983%5C%2F84%22%2C%22language%22%3A%22%22%2C%22DOI%22%3A%22%22%2C%22ISSN%22%3A%22%22%2C%22url%22%3A%22%22%2C%22collections%22%3A%5B%5D%2C%22dateModified%22%3A%222019-05-08T07%3A32%3A15Z%22%7D%7D%2C%7B%22key%22%3A%22XNDV4HTD%22%2C%22library%22%3A%7B%22id%22%3A1698736%7D%2C%22meta%22%3A%7B%22creatorSummary%22%3A%22Toulmin%20and%20Barton%22%2C%22parsedDate%22%3A%221964-05%22%2C%22numChildren%22%3A0%7D%2C%22bib%22%3A%22%26lt%3Bdiv%20class%3D%26quot%3Bcsl-bib-body%26quot%3B%20style%3D%26quot%3Bline-height%3A%202%3B%20padding-left%3A%202em%3B%20text-indent%3A-2em%3B%26quot%3B%26gt%3B%5Cn%20%20%26lt%3Bdiv%20class%3D%26quot%3Bcsl-entry%26quot%3B%26gt%3BToulmin%2C%20P.%2C%20%26amp%3B%20Barton%2C%20P.%20B.%20%281964%29.%20A%20thermodynamic%20study%20of%20pyrite%20and%20pyrrhotite.%20%26lt%3Bi%26gt%3BGeochimica%20et%20Cosmochimica%20Acta%26lt%3B%5C%2Fi%26gt%3B%2C%20%26lt%3Bi%26gt%3B28%26lt%3B%5C%2Fi%26gt%3B%285%29%2C%20641%26%23x2013%3B671.%20%26lt%3Ba%20class%3D%26%23039%3Bzp-DOIURL%26%23039%3B%20href%3D%26%23039%3Bhttps%3A%5C%2F%5C%2Fdoi.org%5C%2F10.1016%5C%2F0016-7037%2864%2990083-3%26%23039%3B%26gt%3Bhttps%3A%5C%2F%5C%2Fdoi.org%5C%2F10.1016%5C%2F0016-7037%2864%2990083-3%26lt%3B%5C%2Fa%26gt%3B%26lt%3B%5C%2Fdiv%26gt%3B%5Cn%26lt%3B%5C%2Fdiv%26gt%3B%22%2C%22data%22%3A%7B%22itemType%22%3A%22journalArticle%22%2C%22title%22%3A%22A%20thermodynamic%20study%20of%20pyrite%20and%20pyrrhotite%22%2C%22creators%22%3A%5B%7B%22creatorType%22%3A%22author%22%2C%22firstName%22%3A%22P.%22%2C%22lastName%22%3A%22Toulmin%22%7D%2C%7B%22creatorType%22%3A%22author%22%2C%22firstName%22%3A%22P.%20B.%22%2C%22lastName%22%3A%22Barton%22%7D%5D%2C%22abstractNote%22%3A%22%22%2C%22date%22%3A%22May%201964%22%2C%22language%22%3A%22%22%2C%22DOI%22%3A%2210.1016%5C%2F0016-7037%2864%2990083-3%22%2C%22ISSN%22%3A%220016-7037%22%2C%22url%22%3A%22http%3A%5C%2F%5C%2Fwww.sciencedirect.com.libproxy.ucl.ac.uk%5C%2Fscience%5C%2Farticle%5C%2FB6V66-48C8FV2-R%5C%2F2%5C%2F9c31a1d20677d979c2491a7f2007be65%22%2C%22collections%22%3A%5B%22RI8HAJ3J%22%5D%2C%22dateModified%22%3A%222019-05-08T07%3A32%3A11Z%22%7D%7D%2C%7B%22key%22%3A%22NEQIVK3N%22%2C%22library%22%3A%7B%22id%22%3A1698736%7D%2C%22meta%22%3A%7B%22creatorSummary%22%3A%22Tsemekhman%20et%20al.%22%2C%22parsedDate%22%3A%222002%22%2C%22numChildren%22%3A0%7D%2C%22bib%22%3A%22%26lt%3Bdiv%20class%3D%26quot%3Bcsl-bib-body%26quot%3B%20style%3D%26quot%3Bline-height%3A%202%3B%20padding-left%3A%202em%3B%20text-indent%3A-2em%3B%26quot%3B%26gt%3B%5Cn%20%20%26lt%3Bdiv%20class%3D%26quot%3Bcsl-entry%26quot%3B%26gt%3BTsemekhman%2C%20L.%20S.%2C%20Burylev%2C%20B.%20P.%2C%20Golov%2C%20A.%20N.%2C%20%26amp%3B%20Miroevskii%2C%20G.%20P.%20%282002%29.%20Modeling%20of%20Thermodynamic%20Properties%20and%20Fusion%20Diagrams%20of%20Ternary%20Oxosulfide%20Systems.%20%26lt%3Bi%26gt%3BRussian%20Journal%20of%20Applied%20Chemistry%26lt%3B%5C%2Fi%26gt%3B%2C%20%26lt%3Bi%26gt%3B75%26lt%3B%5C%2Fi%26gt%3B%282%29%2C%20186%26%23x2013%3B190.%26lt%3B%5C%2Fdiv%26gt%3B%5Cn%26lt%3B%5C%2Fdiv%26gt%3B%22%2C%22data%22%3A%7B%22itemType%22%3A%22journalArticle%22%2C%22title%22%3A%22Modeling%20of%20Thermodynamic%20Properties%20and%20Fusion%20Diagrams%20of%20Ternary%20Oxosulfide%20Systems%22%2C%22creators%22%3A%5B%7B%22creatorType%22%3A%22author%22%2C%22firstName%22%3A%22L.%20Sh%22%2C%22lastName%22%3A%22Tsemekhman%22%7D%2C%7B%22creatorType%22%3A%22author%22%2C%22firstName%22%3A%22B.%20P.%22%2C%22lastName%22%3A%22Burylev%22%7D%2C%7B%22creatorType%22%3A%22author%22%2C%22firstName%22%3A%22A.%20N.%22%2C%22lastName%22%3A%22Golov%22%7D%2C%7B%22creatorType%22%3A%22author%22%2C%22firstName%22%3A%22G.%20P.%22%2C%22lastName%22%3A%22Miroevskii%22%7D%5D%2C%22abstractNote%22%3A%22Three%20different%20approximations%20are%20used%20to%20determine%20the%20thermodynamic%20properties%20of%20components%20and%20fusion%20diagrams%20of%20ternary%20oxosulfide%20systems%20FeS-FeO-Cu2S%20and%20FeS-FeO-Ni3S2.%20The%20coordinates%20of%20eutectic%20points%20and%20eutectic%20temperatures%20are%20obtained%2C%20and%20equations%20for%20calculating%20the%20thermodynamic%20activities%20of%20the%20components%20are%20derived%20for%20the%20system%20FeS-FeO-Cu2S.%22%2C%22date%22%3A%222002%22%2C%22language%22%3A%22%22%2C%22DOI%22%3A%22%22%2C%22ISSN%22%3A%22%22%2C%22url%22%3A%22%22%2C%22collections%22%3A%5B%22RI8HAJ3J%22%5D%2C%22dateModified%22%3A%222019-05-08T07%3A32%3A05Z%22%7D%7D%2C%7B%22key%22%3A%22RCEPPNS5%22%2C%22library%22%3A%7B%22id%22%3A1698736%7D%2C%22meta%22%3A%7B%22creatorSummary%22%3A%22Ullwer%22%2C%22parsedDate%22%3A%222001%22%2C%22numChildren%22%3A0%7D%2C%22bib%22%3A%22%26lt%3Bdiv%20class%3D%26quot%3Bcsl-bib-body%26quot%3B%20style%3D%26quot%3Bline-height%3A%202%3B%20padding-left%3A%202em%3B%20text-indent%3A-2em%3B%26quot%3B%26gt%3B%5Cn%20%20%26lt%3Bdiv%20class%3D%26quot%3Bcsl-entry%26quot%3B%26gt%3BUllwer%2C%20H.%20%282001%29.%20Messingherstellung%20nach%20dem%20alten%20Galmeiverfahren.%20%26lt%3Bi%26gt%3BErzmetall%26lt%3B%5C%2Fi%26gt%3B%2C%20%26lt%3Bi%26gt%3B54%26lt%3B%5C%2Fi%26gt%3B%286%29%2C%20319%26%23x2013%3B326.%26lt%3B%5C%2Fdiv%26gt%3B%5Cn%26lt%3B%5C%2Fdiv%26gt%3B%22%2C%22data%22%3A%7B%22itemType%22%3A%22journalArticle%22%2C%22title%22%3A%22Messingherstellung%20nach%20dem%20alten%20Galmeiverfahren%22%2C%22creators%22%3A%5B%7B%22creatorType%22%3A%22author%22%2C%22firstName%22%3A%22Helmut%22%2C%22lastName%22%3A%22Ullwer%22%7D%5D%2C%22abstractNote%22%3A%22%22%2C%22date%22%3A%222001%22%2C%22language%22%3A%22%22%2C%22DOI%22%3A%22%22%2C%22ISSN%22%3A%22%22%2C%22url%22%3A%22%22%2C%22collections%22%3A%5B%22RI8HAJ3J%22%5D%2C%22dateModified%22%3A%222019-05-08T07%3A31%3A50Z%22%7D%7D%2C%7B%22key%22%3A%22GB8GSJCA%22%2C%22library%22%3A%7B%22id%22%3A1698736%7D%2C%22meta%22%3A%7B%22creatorSummary%22%3A%22%5Cu00dcnsal%20Yal%5Cu00e7in%20and%20H.%20G%5Cu00f6n%5Cu00fcl%20Yal%5Cu00e7in%22%2C%22parsedDate%22%3A%222009%22%2C%22numChildren%22%3A1%7D%2C%22bib%22%3A%22%26lt%3Bdiv%20class%3D%26quot%3Bcsl-bib-body%26quot%3B%20style%3D%26quot%3Bline-height%3A%202%3B%20padding-left%3A%202em%3B%20text-indent%3A-2em%3B%26quot%3B%26gt%3B%5Cn%20%20%26lt%3Bdiv%20class%3D%26quot%3Bcsl-entry%26quot%3B%26gt%3B%26%23xDC%3Bnsal%20Yal%26%23xE7%3Bin%2C%20%26amp%3B%20H.%20G%26%23xF6%3Bn%26%23xFC%3Bl%20Yal%26%23xE7%3Bin.%20%282009%29.%20Evidence%20for%20early%20use%20of%20tin%20at%20T%26%23xFC%3Blintepe%20in%20eastern%20Anatolia.%20%26lt%3Bi%26gt%3BT%26%23xDC%3BBA-AR%26lt%3B%5C%2Fi%26gt%3B%2C%20%26lt%3Bi%26gt%3B12%26lt%3B%5C%2Fi%26gt%3B%2C%20123%26%23x2013%3B142.%26lt%3B%5C%2Fdiv%26gt%3B%5Cn%26lt%3B%5C%2Fdiv%26gt%3B%22%2C%22data%22%3A%7B%22itemType%22%3A%22journalArticle%22%2C%22title%22%3A%22Evidence%20for%20early%20use%20of%20tin%20at%20T%5Cu00fclintepe%20in%20eastern%20Anatolia%22%2C%22creators%22%3A%5B%7B%22creatorType%22%3A%22author%22%2C%22name%22%3A%22%5Cu00dcnsal%20Yal%5Cu00e7in%22%7D%2C%7B%22creatorType%22%3A%22author%22%2C%22name%22%3A%22H.%20G%5Cu00f6n%5Cu00fcl%20Yal%5Cu00e7in%22%7D%5D%2C%22abstractNote%22%3A%22%22%2C%22date%22%3A%222009%22%2C%22language%22%3A%22%22%2C%22DOI%22%3A%22%22%2C%22ISSN%22%3A%22%22%2C%22url%22%3A%22%22%2C%22collections%22%3A%5B%22RI8HAJ3J%22%5D%2C%22dateModified%22%3A%222019-05-08T07%3A31%3A44Z%22%7D%7D%2C%7B%22key%22%3A%22YAMUDVJD%22%2C%22library%22%3A%7B%22id%22%3A1698736%7D%2C%22meta%22%3A%7B%22creatorSummary%22%3A%22Ursula%20Mende%22%2C%22parsedDate%22%3A%221984%22%2C%22numChildren%22%3A0%7D%2C%22bib%22%3A%22%26lt%3Bdiv%20class%3D%26quot%3Bcsl-bib-body%26quot%3B%20style%3D%26quot%3Bline-height%3A%202%3B%20padding-left%3A%202em%3B%20text-indent%3A-2em%3B%26quot%3B%26gt%3B%5Cn%20%20%26lt%3Bdiv%20class%3D%26quot%3Bcsl-entry%26quot%3B%26gt%3BUrsula%20Mende.%20%281984%29.%20Romanische%20Giessl%26%23xF6%3Bwen%20in%20N%26%23xFC%3Brnberg%20und%20Wien%20und%20ihre%20Zuordnung%20zur%20Magdeburger%20Giessh%26%23xFC%3Btte.%20%26lt%3Bi%26gt%3BAnzeiger%20Des%20Germanischen%20Nationalmuseums%26lt%3B%5C%2Fi%26gt%3B%2C%207%26%23x2013%3B12.%26lt%3B%5C%2Fdiv%26gt%3B%5Cn%26lt%3B%5C%2Fdiv%26gt%3B%22%2C%22data%22%3A%7B%22itemType%22%3A%22journalArticle%22%2C%22title%22%3A%22Romanische%20Giessl%5Cu00f6wen%20in%20N%5Cu00fcrnberg%20und%20Wien%20und%20ihre%20Zuordnung%20zur%20Magdeburger%20Giessh%5Cu00fctte%22%2C%22creators%22%3A%5B%7B%22creatorType%22%3A%22author%22%2C%22name%22%3A%22Ursula%20Mende%22%7D%5D%2C%22abstractNote%22%3A%22%22%2C%22date%22%3A%221984%22%2C%22language%22%3A%22%22%2C%22DOI%22%3A%22%22%2C%22ISSN%22%3A%22%22%2C%22url%22%3A%22%22%2C%22collections%22%3A%5B%5D%2C%22dateModified%22%3A%222019-05-08T07%3A31%3A39Z%22%7D%7D%2C%7B%22key%22%3A%228IIEFNDZ%22%2C%22library%22%3A%7B%22id%22%3A1698736%7D%2C%22meta%22%3A%7B%22creatorSummary%22%3A%22Valde-Nowak%20et%20al.%22%2C%22parsedDate%22%3A%222004%22%2C%22numChildren%22%3A0%7D%2C%22bib%22%3A%22%26lt%3Bdiv%20class%3D%26quot%3Bcsl-bib-body%26quot%3B%20style%3D%26quot%3Bline-height%3A%202%3B%20padding-left%3A%202em%3B%20text-indent%3A-2em%3B%26quot%3B%26gt%3B%5Cn%20%20%26lt%3Bdiv%20class%3D%26quot%3Bcsl-entry%26quot%3B%26gt%3BValde-Nowak%2C%20P.%2C%20Klappauf%2C%20L.%2C%20%26amp%3B%20Linke%2C%20F.%20A.%20%282004%29.%20Neolithische%20Besiedlung%20der%20Gebirgslandschaften%3A%20Fallstudie%20Harz.%20%26lt%3Bi%26gt%3BNachrichten%20Aus%20Niedersachsens%20Urgeschichte%26lt%3B%5C%2Fi%26gt%3B%2C%20%26lt%3Bi%26gt%3B73%26lt%3B%5C%2Fi%26gt%3B%2C%2043%26%23x2013%3B48.%26lt%3B%5C%2Fdiv%26gt%3B%5Cn%26lt%3B%5C%2Fdiv%26gt%3B%22%2C%22data%22%3A%7B%22itemType%22%3A%22journalArticle%22%2C%22title%22%3A%22Neolithische%20Besiedlung%20der%20Gebirgslandschaften%3A%20Fallstudie%20Harz%22%2C%22creators%22%3A%5B%7B%22creatorType%22%3A%22author%22%2C%22firstName%22%3A%22Pawel%22%2C%22lastName%22%3A%22Valde-Nowak%22%7D%2C%7B%22creatorType%22%3A%22author%22%2C%22firstName%22%3A%22Lothar%22%2C%22lastName%22%3A%22Klappauf%22%7D%2C%7B%22creatorType%22%3A%22author%22%2C%22firstName%22%3A%22Friedrich%20A.%22%2C%22lastName%22%3A%22Linke%22%7D%5D%2C%22abstractNote%22%3A%22%22%2C%22date%22%3A%222004%22%2C%22language%22%3A%22%22%2C%22DOI%22%3A%22%22%2C%22ISSN%22%3A%22%22%2C%22url%22%3A%22%22%2C%22collections%22%3A%5B%22RI8HAJ3J%22%5D%2C%22dateModified%22%3A%222019-05-08T07%3A31%3A35Z%22%7D%7D%2C%7B%22key%22%3A%2242GQSNMU%22%2C%22library%22%3A%7B%22id%22%3A1698736%7D%2C%22meta%22%3A%7B%22creatorSummary%22%3A%22V%5Cu00e1lyi%22%2C%22parsedDate%22%3A%221999%22%2C%22numChildren%22%3A0%7D%2C%22bib%22%3A%22%26lt%3Bdiv%20class%3D%26quot%3Bcsl-bib-body%26quot%3B%20style%3D%26quot%3Bline-height%3A%202%3B%20padding-left%3A%202em%3B%20text-indent%3A-2em%3B%26quot%3B%26gt%3B%5Cn%20%20%26lt%3Bdiv%20class%3D%26quot%3Bcsl-entry%26quot%3B%26gt%3BV%26%23xE1%3Blyi%2C%20K.%20%281999%29.%20Glockengu%26%23xDF%3Banlage%20und%20Bronzeschmelz%26%23xF6%3Bfen%20im%20Hof%20des%20Klosters%20von%20Szer%20vom%20Anfang%20des%2013.%20Jahrhunderts.%20%26lt%3Bi%26gt%3BComunicationes%20Archaeologicae%20Hungariae%26lt%3B%5C%2Fi%26gt%3B%2C%20143--169.%26lt%3B%5C%2Fdiv%26gt%3B%5Cn%26lt%3B%5C%2Fdiv%26gt%3B%22%2C%22data%22%3A%7B%22itemType%22%3A%22journalArticle%22%2C%22title%22%3A%22Glockengu%5Cu00dfanlage%20und%20Bronzeschmelz%5Cu00f6fen%20im%20Hof%20des%20Klosters%20von%20Szer%20vom%20Anfang%20des%2013.%20Jahrhunderts%22%2C%22creators%22%3A%5B%7B%22creatorType%22%3A%22author%22%2C%22firstName%22%3A%22Katalin%22%2C%22lastName%22%3A%22V%5Cu00e1lyi%22%7D%5D%2C%22abstractNote%22%3A%22%22%2C%22date%22%3A%221999%22%2C%22language%22%3A%22%22%2C%22DOI%22%3A%22%22%2C%22ISSN%22%3A%22%22%2C%22url%22%3A%22%22%2C%22collections%22%3A%5B%5D%2C%22dateModified%22%3A%222019-05-08T07%3A31%3A27Z%22%7D%7D%2C%7B%22key%22%3A%22M9AL2LL4%22%2C%22library%22%3A%7B%22id%22%3A1698736%7D%2C%22meta%22%3A%7B%22creatorSummary%22%3A%22Verschiedene%22%2C%22parsedDate%22%3A%221400%22%2C%22numChildren%22%3A0%7D%2C%22bib%22%3A%22%26lt%3Bdiv%20class%3D%26quot%3Bcsl-bib-body%26quot%3B%20style%3D%26quot%3Bline-height%3A%202%3B%20padding-left%3A%202em%3B%20text-indent%3A-2em%3B%26quot%3B%26gt%3B%5Cn%20%20%26lt%3Bdiv%20class%3D%26quot%3Bcsl-entry%26quot%3B%26gt%3BVerschiedene.%20%281400%29.%20Sammelhandschrift%20zur%20Kriegskunst.%20Wien.%20Retrieved%20from%20%26lt%3Ba%20class%3D%26%23039%3Bzp-ItemURL%26%23039%3B%20href%3D%26%23039%3Bhttp%3A%5C%2F%5C%2Fwww.onb.ac.at%5C%2Fsammlungen%5C%2Fhschrift%5C%2Fhandschriften_benuetzung.htm%26%23039%3B%26gt%3Bhttp%3A%5C%2F%5C%2Fwww.onb.ac.at%5C%2Fsammlungen%5C%2Fhschrift%5C%2Fhandschriften_benuetzung.htm%26lt%3B%5C%2Fa%26gt%3B%26lt%3B%5C%2Fdiv%26gt%3B%5Cn%26lt%3B%5C%2Fdiv%26gt%3B%22%2C%22data%22%3A%7B%22itemType%22%3A%22document%22%2C%22title%22%3A%22Sammelhandschrift%20zur%20Kriegskunst%22%2C%22creators%22%3A%5B%7B%22creatorType%22%3A%22author%22%2C%22name%22%3A%22Verschiedene%22%7D%2C%7B%22creatorType%22%3A%22contributor%22%2C%22name%22%3A%22Johannes%20Wienner%22%7D%5D%2C%22abstractNote%22%3A%22Anmerkungen%3A%20Titel%20fingiert.%20-%20Volldigitalisat.%20%2C%20Johannes%20Wienner%20%28um%201437%29%3A%20Schreiber%3B%20%5BUnterkircher%2C%20Datierte%20IV%2C%201976%5D.%2C%20Einband%3A%20Restaurierter%20Originaleinband%3A%20Rotes%20Leder%20mit%20Streicheisenlinien%20%28Rautenmuster%29%20%5Cu00fcber%20Holzdeckeln%2C%20Wien%20%3F%2C%2015.%20Jhdt.%22%2C%22date%22%3A%221400%22%2C%22language%22%3A%22%22%2C%22url%22%3A%22http%3A%5C%2F%5C%2Fwww.onb.ac.at%5C%2Fsammlungen%5C%2Fhschrift%5C%2Fhandschriften_benuetzung.htm%22%2C%22collections%22%3A%5B%5D%2C%22dateModified%22%3A%222019-05-08T07%3A31%3A21Z%22%7D%7D%2C%7B%22key%22%3A%2265Z6KSFD%22%2C%22library%22%3A%7B%22id%22%3A1698736%7D%2C%22meta%22%3A%7B%22creatorSummary%22%3A%22Wadsworth%20and%20Lesuer%22%2C%22parsedDate%22%3A%222000%22%2C%22numChildren%22%3A0%7D%2C%22bib%22%3A%22%26lt%3Bdiv%20class%3D%26quot%3Bcsl-bib-body%26quot%3B%20style%3D%26quot%3Bline-height%3A%202%3B%20padding-left%3A%202em%3B%20text-indent%3A-2em%3B%26quot%3B%26gt%3B%5Cn%20%20%26lt%3Bdiv%20class%3D%26quot%3Bcsl-entry%26quot%3B%26gt%3BWadsworth%2C%20J.%2C%20%26amp%3B%20Lesuer%2C%20D.%20J.%20%282000%29.%20The%20knives%20of%20J.%20Richtig%20as%20featured%20in%20Ripley-Yens%20Believe%20it%20or%20Not.%20%26lt%3Bi%26gt%3BMaterials%20Characterization%26lt%3B%5C%2Fi%26gt%3B%2C%20%26lt%3Bi%26gt%3B45%26lt%3B%5C%2Fi%26gt%3B%2C%20315%26%23x2013%3B326.%26lt%3B%5C%2Fdiv%26gt%3B%5Cn%26lt%3B%5C%2Fdiv%26gt%3B%22%2C%22data%22%3A%7B%22itemType%22%3A%22journalArticle%22%2C%22title%22%3A%22The%20knives%20of%20J.%20Richtig%20as%20featured%20in%20Ripley-Yens%20Believe%20it%20or%20Not%22%2C%22creators%22%3A%5B%7B%22creatorType%22%3A%22author%22%2C%22firstName%22%3A%22Jeffrey%22%2C%22lastName%22%3A%22Wadsworth%22%7D%2C%7B%22creatorType%22%3A%22author%22%2C%22firstName%22%3A%22Donald%20J.%22%2C%22lastName%22%3A%22Lesuer%22%7D%5D%2C%22abstractNote%22%3A%22%22%2C%22date%22%3A%222000%22%2C%22language%22%3A%22%22%2C%22DOI%22%3A%22%22%2C%22ISSN%22%3A%22%22%2C%22url%22%3A%22%22%2C%22collections%22%3A%5B%22RI8HAJ3J%22%5D%2C%22dateModified%22%3A%222019-05-08T07%3A31%3A08Z%22%7D%7D%2C%7B%22key%22%3A%22WPIAXX6M%22%2C%22library%22%3A%7B%22id%22%3A1698736%7D%2C%22meta%22%3A%7B%22creatorSummary%22%3A%22Wagner%20et%20al.%22%2C%22parsedDate%22%3A%221980%22%2C%22numChildren%22%3A0%7D%2C%22bib%22%3A%22%26lt%3Bdiv%20class%3D%26quot%3Bcsl-bib-body%26quot%3B%20style%3D%26quot%3Bline-height%3A%202%3B%20padding-left%3A%202em%3B%20text-indent%3A-2em%3B%26quot%3B%26gt%3B%5Cn%20%20%26lt%3Bdiv%20class%3D%26quot%3Bcsl-entry%26quot%3B%26gt%3BWagner%2C%20G.%20A.%2C%20Gentner%2C%20W.%2C%20Gropengiesser%2C%20H.%2C%20%26amp%3B%20Gale%2C%20N.%20H.%20%281980%29.%20Early%20Bronze%20Age%20lead-silver%20mining%20and%20metallurgy%20in%20the%20Aegean%3A%20the%20ancient%20workings%20on%20Siphnos.%20In%20P.%20T.%20Craddock%20%28Ed.%29%2C%20%26lt%3Bi%26gt%3BScientific%20Studies%20in%20Early%20Mining%20and%20Extractive%20Metallurgy%26lt%3B%5C%2Fi%26gt%3B%20%28pp.%2063%26%23x2013%3B80%29.%20London%3A%20British%20Museum.%26lt%3B%5C%2Fdiv%26gt%3B%5Cn%26lt%3B%5C%2Fdiv%26gt%3B%22%2C%22data%22%3A%7B%22itemType%22%3A%22bookSection%22%2C%22title%22%3A%22Early%20Bronze%20Age%20lead-silver%20mining%20and%20metallurgy%20in%20the%20Aegean%3A%20the%20ancient%20workings%20on%20Siphnos%22%2C%22creators%22%3A%5B%7B%22creatorType%22%3A%22author%22%2C%22firstName%22%3A%22G.A.%22%2C%22lastName%22%3A%22Wagner%22%7D%2C%7B%22creatorType%22%3A%22author%22%2C%22firstName%22%3A%22W.%22%2C%22lastName%22%3A%22Gentner%22%7D%2C%7B%22creatorType%22%3A%22author%22%2C%22firstName%22%3A%22H.%22%2C%22lastName%22%3A%22Gropengiesser%22%7D%2C%7B%22creatorType%22%3A%22author%22%2C%22firstName%22%3A%22N.%20H.%22%2C%22lastName%22%3A%22Gale%22%7D%2C%7B%22creatorType%22%3A%22editor%22%2C%22firstName%22%3A%22Paul%20T.%22%2C%22lastName%22%3A%22Craddock%22%7D%5D%2C%22abstractNote%22%3A%22%22%2C%22bookTitle%22%3A%22Scientific%20Studies%20in%20Early%20Mining%20and%20Extractive%20Metallurgy%22%2C%22date%22%3A%221980%22%2C%22language%22%3A%22%22%2C%22ISBN%22%3A%22%22%2C%22url%22%3A%22%22%2C%22collections%22%3A%5B%22RI8HAJ3J%22%5D%2C%22dateModified%22%3A%222019-05-08T07%3A31%3A01Z%22%7D%7D%2C%7B%22key%22%3A%223BA32HUA%22%2C%22library%22%3A%7B%22id%22%3A1698736%7D%2C%22meta%22%3A%7B%22creatorSummary%22%3A%22Wallbrecht%20et%20al.%22%2C%22parsedDate%22%3A%221981-05%22%2C%22numChildren%22%3A0%7D%2C%22bib%22%3A%22%26lt%3Bdiv%20class%3D%26quot%3Bcsl-bib-body%26quot%3B%20style%3D%26quot%3Bline-height%3A%202%3B%20padding-left%3A%202em%3B%20text-indent%3A-2em%3B%26quot%3B%26gt%3B%5Cn%20%20%26lt%3Bdiv%20class%3D%26quot%3Bcsl-entry%26quot%3B%26gt%3BWallbrecht%2C%20P.%20C.%2C%20Blachnik%2C%20R.%2C%20%26amp%3B%20Mills%2C%20K.%20C.%20%281981%29.%20The%20heat%20capacity%20and%20enthalpy%20of%20some%20Hume%26%23x2013%3BRothery%20phases%20formed%20by%20copper%2C%20silver%20and%20gold.%20Part%20I.%20Cu%20%2B%20Sb%2C%20Ag%20%2B%20Sb%2C%20Au%20%2B%20Sb%2C%20Au%20%2B%20Bi%20systems.%20%26lt%3Bi%26gt%3BThermochimica%20Acta%26lt%3B%5C%2Fi%26gt%3B%2C%20%26lt%3Bi%26gt%3B45%26lt%3B%5C%2Fi%26gt%3B%282%29%2C%20189%26%23x2013%3B198.%20%26lt%3Ba%20class%3D%26%23039%3Bzp-DOIURL%26%23039%3B%20href%3D%26%23039%3Bhttps%3A%5C%2F%5C%2Fdoi.org%5C%2F10.1016%5C%2F0040-6031%2881%2980143-8%26%23039%3B%26gt%3Bhttps%3A%5C%2F%5C%2Fdoi.org%5C%2F10.1016%5C%2F0040-6031%2881%2980143-8%26lt%3B%5C%2Fa%26gt%3B%26lt%3B%5C%2Fdiv%26gt%3B%5Cn%26lt%3B%5C%2Fdiv%26gt%3B%22%2C%22data%22%3A%7B%22itemType%22%3A%22journalArticle%22%2C%22title%22%3A%22The%20heat%20capacity%20and%20enthalpy%20of%20some%20Hume%5Cu2013Rothery%20phases%20formed%20by%20copper%2C%20silver%20and%20gold.%20Part%20I.%20Cu%20%2B%20Sb%2C%20Ag%20%2B%20Sb%2C%20Au%20%2B%20Sb%2C%20Au%20%2B%20Bi%20systems%22%2C%22creators%22%3A%5B%7B%22creatorType%22%3A%22author%22%2C%22firstName%22%3A%22Peter%20C.%22%2C%22lastName%22%3A%22Wallbrecht%22%7D%2C%7B%22creatorType%22%3A%22author%22%2C%22firstName%22%3A%22Roger%22%2C%22lastName%22%3A%22Blachnik%22%7D%2C%7B%22creatorType%22%3A%22author%22%2C%22firstName%22%3A%22Kennth%20C.%22%2C%22lastName%22%3A%22Mills%22%7D%5D%2C%22abstractNote%22%3A%22The%20heat%20capacity%20and%20enthalpy%20between%20230%20and%20800%20K%20have%20been%20determined%20by%20differential%20scanning%20calorimetry%20for%20several%20alloy%20compositions%20in%20the%20Cu%20%2B%20Sb%2C%20Ag%20%2B%20Sb%2C%20Au%20%2B%20Sb%20and%20Au%20%2B%20Bi%20systems.%20The%20following%20alloy%20compositions%20have%20been%20studied%3A%20Cu0.81Sb0.19%2C%20Cu0.67Sb0.33%2C%20Cu0.75Sb0.25%2C%20Cu0.715Sb0.285%2C%20Ag0.9Sb0.1%2C%20Ag0.77Sb0.23%2C%20Au0.34Sb0.66%20and%20Au0.67Bi0.33%2C%20and%20any%20transition%20data%20recorded%20have%20been%20used%20to%20provide%20phase%20diagram%20information.%22%2C%22date%22%3A%22May%201981%22%2C%22language%22%3A%22%22%2C%22DOI%22%3A%2210.1016%5C%2F0040-6031%2881%2980143-8%22%2C%22ISSN%22%3A%220040-6031%22%2C%22url%22%3A%22http%3A%5C%2F%5C%2Fwww.sciencedirect.com%5C%2Fscience%5C%2Farticle%5C%2FB6THV-44FF6HW-DF%5C%2F2%5C%2F438d336655dc3ca3b90905b2590323d2%22%2C%22collections%22%3A%5B%22RI8HAJ3J%22%5D%2C%22dateModified%22%3A%222019-05-08T07%3A30%3A42Z%22%7D%7D%2C%7B%22key%22%3A%2237ZXKRVZ%22%2C%22library%22%3A%7B%22id%22%3A1698736%7D%2C%22meta%22%3A%7B%22creatorSummary%22%3A%22Walther%22%2C%22parsedDate%22%3A%221982%22%2C%22numChildren%22%3A0%7D%2C%22bib%22%3A%22%26lt%3Bdiv%20class%3D%26quot%3Bcsl-bib-body%26quot%3B%20style%3D%26quot%3Bline-height%3A%202%3B%20padding-left%3A%202em%3B%20text-indent%3A-2em%3B%26quot%3B%26gt%3B%5Cn%20%20%26lt%3Bdiv%20class%3D%26quot%3Bcsl-entry%26quot%3B%26gt%3BWalther%2C%20H.%20%281982%29.%20Die%20varistische%20Lagerst%26%23xE4%3Bttenbildung%20im%20westlichen%20Mitteleuropa.%20%26lt%3Bi%26gt%3BZeitschrift%20Der%20Deustchen%20Gesellschaft%20F%26%23xFC%3Br%20Geowissenschaften%26lt%3B%5C%2Fi%26gt%3B%2C%20%26lt%3Bi%26gt%3B133%26lt%3B%5C%2Fi%26gt%3B%2C%20667%26%23x2013%3B698.%26lt%3B%5C%2Fdiv%26gt%3B%5Cn%26lt%3B%5C%2Fdiv%26gt%3B%22%2C%22data%22%3A%7B%22itemType%22%3A%22journalArticle%22%2C%22title%22%3A%22Die%20varistische%20Lagerst%5Cu00e4ttenbildung%20im%20westlichen%20Mitteleuropa%22%2C%22creators%22%3A%5B%7B%22creatorType%22%3A%22author%22%2C%22firstName%22%3A%22Hansjust%22%2C%22lastName%22%3A%22Walther%22%7D%5D%2C%22abstractNote%22%3A%22%22%2C%22date%22%3A%221982%22%2C%22language%22%3A%22%22%2C%22DOI%22%3A%22%22%2C%22ISSN%22%3A%22%22%2C%22url%22%3A%22%22%2C%22collections%22%3A%5B%22RI8HAJ3J%22%5D%2C%22dateModified%22%3A%222019-05-08T07%3A30%3A36Z%22%7D%7D%2C%7B%22key%22%3A%22N3CAKDKI%22%2C%22library%22%3A%7B%22id%22%3A1698736%7D%2C%22meta%22%3A%7B%22creatorSummary%22%3A%22Watkinson%20et%20al.%22%2C%22parsedDate%22%3A%222005%22%2C%22numChildren%22%3A0%7D%2C%22bib%22%3A%22%26lt%3Bdiv%20class%3D%26quot%3Bcsl-bib-body%26quot%3B%20style%3D%26quot%3Bline-height%3A%202%3B%20padding-left%3A%202em%3B%20text-indent%3A-2em%3B%26quot%3B%26gt%3B%5Cn%20%20%26lt%3Bdiv%20class%3D%26quot%3Bcsl-entry%26quot%3B%26gt%3BWatkinson%2C%20D.%2C%20Weber%2C%20L.%2C%20%26amp%3B%20Anheuser%2C%20K.%20%282005%29.%20Staining%20of%20archaeological%20glass%20form%20manganese-rich%20environments.%20%26lt%3Bi%26gt%3BArchaeometry%26lt%3B%5C%2Fi%26gt%3B%2C%20%26lt%3Bi%26gt%3B47%26lt%3B%5C%2Fi%26gt%3B%281%29%2C%2069%26%23x2013%3B82.%26lt%3B%5C%2Fdiv%26gt%3B%5Cn%26lt%3B%5C%2Fdiv%26gt%3B%22%2C%22data%22%3A%7B%22itemType%22%3A%22journalArticle%22%2C%22title%22%3A%22Staining%20of%20archaeological%20glass%20form%20manganese-rich%20environments%22%2C%22creators%22%3A%5B%7B%22creatorType%22%3A%22author%22%2C%22firstName%22%3A%22D.%22%2C%22lastName%22%3A%22Watkinson%22%7D%2C%7B%22creatorType%22%3A%22author%22%2C%22firstName%22%3A%22L.%22%2C%22lastName%22%3A%22Weber%22%7D%2C%7B%22creatorType%22%3A%22author%22%2C%22firstName%22%3A%22K.%22%2C%22lastName%22%3A%22Anheuser%22%7D%5D%2C%22abstractNote%22%3A%22%22%2C%22date%22%3A%222005%22%2C%22language%22%3A%22%22%2C%22DOI%22%3A%22%22%2C%22ISSN%22%3A%22%22%2C%22url%22%3A%22%22%2C%22collections%22%3A%5B%22RI8HAJ3J%22%5D%2C%22dateModified%22%3A%222019-05-08T07%3A30%3A31Z%22%7D%7D%2C%7B%22key%22%3A%228EQVNNQG%22%2C%22library%22%3A%7B%22id%22%3A1698736%7D%2C%22meta%22%3A%7B%22creatorSummary%22%3A%22Wattenbach%22%2C%22parsedDate%22%3A%221877%22%2C%22numChildren%22%3A0%7D%2C%22bib%22%3A%22%26lt%3Bdiv%20class%3D%26quot%3Bcsl-bib-body%26quot%3B%20style%3D%26quot%3Bline-height%3A%202%3B%20padding-left%3A%202em%3B%20text-indent%3A-2em%3B%26quot%3B%26gt%3B%5Cn%20%20%26lt%3Bdiv%20class%3D%26quot%3Bcsl-entry%26quot%3B%26gt%3BWattenbach%2C%20W.%20%281877%29.%20Ekkehart%20%28Chronist%29.%20In%20%26lt%3Bi%26gt%3BAllgemeine%20Deutsche%20Biographie%26lt%3B%5C%2Fi%26gt%3B%20%28Vol.%205%2C%20pp.%20793%26%23x2013%3B794%29.%20Leipzig%3A%20Duncker%20%26amp%3B%20Humblot.%20Retrieved%20from%20%26lt%3Ba%20class%3D%26%23039%3Bzp-ItemURL%26%23039%3B%20href%3D%26%23039%3Bhttp%3A%5C%2F%5C%2Fmdz10.bib-bvb.de%5C%2F%20db%5C%2Fbsb00008363%5C%2Fimages%5C%2Findex.html%3Fseite%3D795%26%23039%3B%26gt%3Bhttp%3A%5C%2F%5C%2Fmdz10.bib-bvb.de%5C%2F%20db%5C%2Fbsb00008363%5C%2Fimages%5C%2Findex.html%3Fseite%3D795%26lt%3B%5C%2Fa%26gt%3B%26lt%3B%5C%2Fdiv%26gt%3B%5Cn%26lt%3B%5C%2Fdiv%26gt%3B%22%2C%22data%22%3A%7B%22itemType%22%3A%22bookSection%22%2C%22title%22%3A%22Ekkehart%20%28Chronist%29%22%2C%22creators%22%3A%5B%7B%22creatorType%22%3A%22author%22%2C%22firstName%22%3A%22Wilhelm%22%2C%22lastName%22%3A%22Wattenbach%22%7D%5D%2C%22abstractNote%22%3A%22%22%2C%22bookTitle%22%3A%22Allgemeine%20Deutsche%20Biographie%22%2C%22date%22%3A%221877%22%2C%22language%22%3A%22%22%2C%22ISBN%22%3A%22%22%2C%22url%22%3A%22http%3A%5C%2F%5C%2Fmdz10.bib-bvb.de%5C%2F%20db%5C%2Fbsb00008363%5C%2Fimages%5C%2Findex.html%3Fseite%3D795%22%2C%22collections%22%3A%5B%22RI8HAJ3J%22%5D%2C%22dateModified%22%3A%222019-05-08T07%3A30%3A26Z%22%7D%7D%2C%7B%22key%22%3A%22E42RXVRP%22%2C%22library%22%3A%7B%22id%22%3A1698736%7D%2C%22meta%22%3A%7B%22creatorSummary%22%3A%22Wedepohl%20and%20Baumann%22%2C%22parsedDate%22%3A%221997%22%2C%22numChildren%22%3A0%7D%2C%22bib%22%3A%22%26lt%3Bdiv%20class%3D%26quot%3Bcsl-bib-body%26quot%3B%20style%3D%26quot%3Bline-height%3A%202%3B%20padding-left%3A%202em%3B%20text-indent%3A-2em%3B%26quot%3B%26gt%3B%5Cn%20%20%26lt%3Bdiv%20class%3D%26quot%3Bcsl-entry%26quot%3B%26gt%3BWedepohl%2C%20K.%20H.%2C%20%26amp%3B%20Baumann%2C%20A.%20%281997%29.%20Isotope%20composition%20of%20medieval%20lead%20glasses%20reflecting%20early%20silver%20production%20in%20Central%20Europe.%20%26lt%3Bi%26gt%3BMineralium%20Deposita%26lt%3B%5C%2Fi%26gt%3B%2C%20%26lt%3Bi%26gt%3B32%26lt%3B%5C%2Fi%26gt%3B%2C%20292%26%23x2013%3B295.%26lt%3B%5C%2Fdiv%26gt%3B%5Cn%26lt%3B%5C%2Fdiv%26gt%3B%22%2C%22data%22%3A%7B%22itemType%22%3A%22journalArticle%22%2C%22title%22%3A%22Isotope%20composition%20of%20medieval%20lead%20glasses%20reflecting%20early%20silver%20production%20in%20Central%20Europe%22%2C%22creators%22%3A%5B%7B%22creatorType%22%3A%22author%22%2C%22firstName%22%3A%22K.H.%22%2C%22lastName%22%3A%22Wedepohl%22%7D%2C%7B%22creatorType%22%3A%22author%22%2C%22firstName%22%3A%22A.%22%2C%22lastName%22%3A%22Baumann%22%7D%5D%2C%22abstractNote%22%3A%22%22%2C%22date%22%3A%221997%22%2C%22language%22%3A%22%22%2C%22DOI%22%3A%22%22%2C%22ISSN%22%3A%22%22%2C%22url%22%3A%22%22%2C%22collections%22%3A%5B%22RI8HAJ3J%22%5D%2C%22dateModified%22%3A%222019-05-08T07%3A30%3A15Z%22%7D%7D%2C%7B%22key%22%3A%22HNBF6T46%22%2C%22library%22%3A%7B%22id%22%3A1698736%7D%2C%22meta%22%3A%7B%22creatorSummary%22%3A%22Wedepohl%20et%20al.%22%2C%22parsedDate%22%3A%221978-02%22%2C%22numChildren%22%3A0%7D%2C%22bib%22%3A%22%26lt%3Bdiv%20class%3D%26quot%3Bcsl-bib-body%26quot%3B%20style%3D%26quot%3Bline-height%3A%202%3B%20padding-left%3A%202em%3B%20text-indent%3A-2em%3B%26quot%3B%26gt%3B%5Cn%20%20%26lt%3Bdiv%20class%3D%26quot%3Bcsl-entry%26quot%3B%26gt%3BWedepohl%2C%20K.%20H.%2C%20Delevaux%2C%20M.%20H.%2C%20%26amp%3B%20Doe%2C%20B.%20R.%20%281978%29.%20The%20potential%20source%20of%20lead%20in%20the%20Permian%20Kupferschiefer%20bed%20of%20Europe%20and%20some%20selected%20Paleozoic%20mineral%20deposits%20in%20the%20Federal%20Republic%20of%20Germany.%20%26lt%3Bi%26gt%3BContributions%20to%20Mineralogy%20and%20Petrology%26lt%3B%5C%2Fi%26gt%3B%2C%20%26lt%3Bi%26gt%3B65%26lt%3B%5C%2Fi%26gt%3B%283%29%2C%20273%26%23x2013%3B281.%20%26lt%3Ba%20class%3D%26%23039%3Bzp-DOIURL%26%23039%3B%20href%3D%26%23039%3Bhttps%3A%5C%2F%5C%2Fdoi.org%5C%2F10.1007%5C%2FBF00375513%26%23039%3B%26gt%3Bhttps%3A%5C%2F%5C%2Fdoi.org%5C%2F10.1007%5C%2FBF00375513%26lt%3B%5C%2Fa%26gt%3B%26lt%3B%5C%2Fdiv%26gt%3B%5Cn%26lt%3B%5C%2Fdiv%26gt%3B%22%2C%22data%22%3A%7B%22itemType%22%3A%22journalArticle%22%2C%22title%22%3A%22The%20potential%20source%20of%20lead%20in%20the%20Permian%20Kupferschiefer%20bed%20of%20Europe%20and%20some%20selected%20Paleozoic%20mineral%20deposits%20in%20the%20Federal%20Republic%20of%20Germany%22%2C%22creators%22%3A%5B%7B%22creatorType%22%3A%22author%22%2C%22firstName%22%3A%22Karl%20Hans%22%2C%22lastName%22%3A%22Wedepohl%22%7D%2C%7B%22creatorType%22%3A%22author%22%2C%22firstName%22%3A%22Maryse%20H.%22%2C%22lastName%22%3A%22Delevaux%22%7D%2C%7B%22creatorType%22%3A%22author%22%2C%22firstName%22%3A%22Bruce%20R.%22%2C%22lastName%22%3A%22Doe%22%7D%5D%2C%22abstractNote%22%3A%22New%20lead%20isotopic%20compositions%20have%20been%20measured%20for%20Paleozoic%20bedded%20and%20vein%20ore%20deposits%20of%20Europe%20by%20the%20high%20precision%20thermal%20emission%20%28triple%20filament%29%20technique.%20Eleven%20samples%20have%20been%20analyzed%20from%20the%20Upper%20Permian%20Kupferschiefer%20bed%20with%20representatives%20from%20Poland%20to%20England%2C%20three%20samples%20from%20the%20Middle%20Devonian%20Rammelsberg%20deposit%20and%20one%20from%20the%20Middle%20Devonian%20Meggen%20deposit%2C%20both%20of%20which%20are%20conformable%20ore%20lenses%20and%20are%20in%20the%20Federal%20Republic%20of%20Germany%20%28FRG%29%3B%20and%20also%20two%20vein%20deposits%20from%20the%20FRG%20were%20analyzed%2C%20from%20Ramsbeck%20in%20Devonian%20host%20rocks%20and%20from%20Grund%20in%20Carboniferous%20host%20rocks.%20For%20Kupferschiefer%20bed%20samples%20from%20Germany%2C%20the%20mineralization%20is%20of%20variable%20lead%20isotopic%20composition%20and%20appears%20to%20have%20been%20derived%20about%20250%20m.y.%20ago%20from%201700%20m.y.%20old%20sources%2C%20or%20detritus%20of%20this%20age%2C%20in%20Paleozoic%20sedimentary%20rocks.%20Samples%20from%20England%2C%20Holland%2C%20and%20Poland%20have%20different%20isotopic%20characteristics%20from%20the%20German%20samples%2C%20indicative%20of%20significantly%20different%20source%20material%20%28perhaps%20older%29.%20The%20isotopic%20variability%20of%20the%20samples%20from%20the%20Kupferschiefer%20bed%20in%20Germany%20probably%20favors%20the%20lead%20containing%20waters%20coming%20from%20shoreward%20%28where%20poor%20mixing%20is%20to%20be%20expected%29%20rather%20than%20basinward%20%28where%20better%20mixing%20is%20likely%29%20directions.%20The%20data%20thus%20support%20the%20interpretation%20of%20the%20metal%20source%20already%20given%20by%20Wedepohl%20in%201964.%20Data%20on%20samples%20from%20Rammelsberg%20and%20Meggen%20tend%20to%20be%20slightly%20less%20radiogenic%20than%20for%20the%20Kupferschiefer%2C%20about%20the%20amount%20expected%20if%20the%20leads%20were%20all%20derived%20from%20the%20same%20source%20material%20but%20100%20to%20150%20m.y.%20apart%20in%20time.%20The%20vein%20galena%20from%20Ramsbeck%20is%20similar%20to%20that%20from%20Rammelsberg%20conformable%20ore%20lenses%2C%20both%20in%20rocks%20of%20Devonian%20age%3B%20vein%20galena%20from%20Grund%20in%20Upper%20Carboniferous%20country%20rocks%20is%20similar%20to%20some%20bedded%20Kupferschiefer%20mineralization%20in%20Permian%20rocks%2C%20as%20if%20the%20lead%20composition%20was%20formed%20at%20about%20the%20same%20time%20and%20from%20similar%20source%20material%20as%20the%20bedded%20deposits.%20Although%20heat%20has%20played%20a%20more%20significant%20role%20in%20the%20formation%20of%20some%20of%20these%20deposits%20%28veins%20and%20Rammelsberg-Meggen%29%20than%20in%20others%20%28Kupferschiefer%29%2C%20there%20is%20no%20indication%20of%20radically%20different%20sources%20for%20the%20lead%2C%20all%20apparently%20coming%20from%20sedimentary%20source%20material%20containing%20Precambrian%20detritus.%20One%20feldspar%20lead%20sample%20from%20the%20Brocken-Oker%20Granite%20is%20not%20the%20same%20in%20isotopic%20composition%20as%20any%20of%20the%20ores%20analyzed.%22%2C%22date%22%3A%22February%201978%22%2C%22language%22%3A%22%22%2C%22DOI%22%3A%2210.1007%5C%2FBF00375513%22%2C%22ISSN%22%3A%22%22%2C%22url%22%3A%22%22%2C%22collections%22%3A%5B%22RI8HAJ3J%22%5D%2C%22dateModified%22%3A%222019-05-08T07%3A30%3A05Z%22%7D%7D%2C%7B%22key%22%3A%229657RCIG%22%2C%22library%22%3A%7B%22id%22%3A1698736%7D%2C%22meta%22%3A%7B%22creatorSummary%22%3A%22Weeks%20et%20al.%22%2C%22parsedDate%22%3A%222009%22%2C%22numChildren%22%3A0%7D%2C%22bib%22%3A%22%26lt%3Bdiv%20class%3D%26quot%3Bcsl-bib-body%26quot%3B%20style%3D%26quot%3Bline-height%3A%202%3B%20padding-left%3A%202em%3B%20text-indent%3A-2em%3B%26quot%3B%26gt%3B%5Cn%20%20%26lt%3Bdiv%20class%3D%26quot%3Bcsl-entry%26quot%3B%26gt%3BWeeks%2C%20L.%20R.%2C%20Keall%2C%20E.%2C%20Pashley%2C%20V.%2C%20Evans%2C%20J.%2C%20%26amp%3B%20Stock%2C%20S.%20%282009%29.%20Lead%20isotope%20analyses%20of%20Bronze%20Age%20copper-base%20artefacts%20from%20al-Midamman%2C%20Yemen%3A%20towards%20the%20identification%20of%20an%20indigenous%20metal%20production%20and%20exchange%20system%20in%20the%20southern%20Red%20Sea%20region.%20%26lt%3Bi%26gt%3BArchaeometry%26lt%3B%5C%2Fi%26gt%3B%2C%20%26lt%3Bi%26gt%3B51%26lt%3B%5C%2Fi%26gt%3B%284%29%2C%20576%26%23x2013%3B597.%26lt%3B%5C%2Fdiv%26gt%3B%5Cn%26lt%3B%5C%2Fdiv%26gt%3B%22%2C%22data%22%3A%7B%22itemType%22%3A%22journalArticle%22%2C%22title%22%3A%22Lead%20isotope%20analyses%20of%20Bronze%20Age%20copper-base%20artefacts%20from%20al-Midamman%2C%20Yemen%3A%20towards%20the%20identification%20of%20an%20indigenous%20metal%20production%20and%20exchange%20system%20in%20the%20southern%20Red%20Sea%20region%22%2C%22creators%22%3A%5B%7B%22creatorType%22%3A%22author%22%2C%22firstName%22%3A%22Lloyd%20R.%22%2C%22lastName%22%3A%22Weeks%22%7D%2C%7B%22creatorType%22%3A%22author%22%2C%22firstName%22%3A%22E.%22%2C%22lastName%22%3A%22Keall%22%7D%2C%7B%22creatorType%22%3A%22author%22%2C%22firstName%22%3A%22V.%22%2C%22lastName%22%3A%22Pashley%22%7D%2C%7B%22creatorType%22%3A%22author%22%2C%22firstName%22%3A%22J.%22%2C%22lastName%22%3A%22Evans%22%7D%2C%7B%22creatorType%22%3A%22author%22%2C%22firstName%22%3A%22S.%22%2C%22lastName%22%3A%22Stock%22%7D%5D%2C%22abstractNote%22%3A%22%22%2C%22date%22%3A%222009%22%2C%22language%22%3A%22%22%2C%22DOI%22%3A%22%22%2C%22ISSN%22%3A%22%22%2C%22url%22%3A%22%22%2C%22collections%22%3A%5B%22RI8HAJ3J%22%5D%2C%22dateModified%22%3A%222019-05-08T07%3A29%3A56Z%22%7D%7D%2C%7B%22key%22%3A%22P2WW876R%22%2C%22library%22%3A%7B%22id%22%3A1698736%7D%2C%22meta%22%3A%7B%22creatorSummary%22%3A%22Weisgerber%22%2C%22parsedDate%22%3A%222006%22%2C%22numChildren%22%3A0%7D%2C%22bib%22%3A%22%26lt%3Bdiv%20class%3D%26quot%3Bcsl-bib-body%26quot%3B%20style%3D%26quot%3Bline-height%3A%202%3B%20padding-left%3A%202em%3B%20text-indent%3A-2em%3B%26quot%3B%26gt%3B%5Cn%20%20%26lt%3Bdiv%20class%3D%26quot%3Bcsl-entry%26quot%3B%26gt%3BWeisgerber%2C%20G.%20%282006%29.%20The%20mineral%20wealth%20of%20ancient%20Arabia%20and%20its%20use%20I%3A%20Copper%20mining%20and%20smelting%20at%20Feinan%20and%20Timna%20%26%23x2013%3B%20comparison%20and%20evaluation%20of%20techniques%2C%20production%2C%20and%20strategies.%20%26lt%3Bi%26gt%3BArabian%20Archaeology%20and%20Epigraphy%26lt%3B%5C%2Fi%26gt%3B%2C%20%26lt%3Bi%26gt%3B17%26lt%3B%5C%2Fi%26gt%3B%2C%201%26%23x2013%3B30.%26lt%3B%5C%2Fdiv%26gt%3B%5Cn%26lt%3B%5C%2Fdiv%26gt%3B%22%2C%22data%22%3A%7B%22itemType%22%3A%22journalArticle%22%2C%22title%22%3A%22The%20mineral%20wealth%20of%20ancient%20Arabia%20and%20its%20use%20I%3A%20Copper%20mining%20and%20smelting%20at%20Feinan%20and%20Timna%20%5Cu2013%20comparison%20and%20evaluation%20of%20techniques%2C%20production%2C%20and%20strategies%22%2C%22creators%22%3A%5B%7B%22creatorType%22%3A%22author%22%2C%22firstName%22%3A%22G.%22%2C%22lastName%22%3A%22Weisgerber%22%7D%5D%2C%22abstractNote%22%3A%22%22%2C%22date%22%3A%222006%22%2C%22language%22%3A%22%22%2C%22DOI%22%3A%22%22%2C%22ISSN%22%3A%22%22%2C%22url%22%3A%22%22%2C%22collections%22%3A%5B%22RI8HAJ3J%22%5D%2C%22dateModified%22%3A%222019-05-08T07%3A29%3A43Z%22%7D%7D%2C%7B%22key%22%3A%22R3ICK667%22%2C%22library%22%3A%7B%22id%22%3A1698736%7D%2C%22meta%22%3A%7B%22creatorSummary%22%3A%22Whitney%20and%20Evans%22%2C%22parsedDate%22%3A%222010%22%2C%22numChildren%22%3A1%7D%2C%22bib%22%3A%22%26lt%3Bdiv%20class%3D%26quot%3Bcsl-bib-body%26quot%3B%20style%3D%26quot%3Bline-height%3A%202%3B%20padding-left%3A%202em%3B%20text-indent%3A-2em%3B%26quot%3B%26gt%3B%5Cn%20%20%26lt%3Bdiv%20class%3D%26quot%3Bcsl-entry%26quot%3B%26gt%3BWhitney%2C%20D.%20L.%2C%20%26amp%3B%20Evans%2C%20B.%20W.%20%282010%29.%20Abbreviations%20for%20names%20of%20rock-forming%20minerals.%20%26lt%3Bi%26gt%3BAmerican%20Mineralogist%26lt%3B%5C%2Fi%26gt%3B%2C%20%26lt%3Bi%26gt%3B95%26lt%3B%5C%2Fi%26gt%3B%2C%20185187.%20Retrieved%20from%20%26lt%3Ba%20class%3D%26%23039%3Bzp-ItemURL%26%23039%3B%20href%3D%26%23039%3Bhttp%3A%5C%2F%5C%2Fwww.minsocam.org%5C%2FMSA%5C%2FAmMin%5C%2FTOC%5C%2FAbstracts%5C%2F2010_Abstracts%5C%2FJan10_Abstracts%5C%2FWhitney_p185_10.pdf%26%23039%3B%26gt%3Bhttp%3A%5C%2F%5C%2Fwww.minsocam.org%5C%2FMSA%5C%2FAmMin%5C%2FTOC%5C%2FAbstracts%5C%2F2010_Abstracts%5C%2FJan10_Abstracts%5C%2FWhitney_p185_10.pdf%26lt%3B%5C%2Fa%26gt%3B%26lt%3B%5C%2Fdiv%26gt%3B%5Cn%26lt%3B%5C%2Fdiv%26gt%3B%22%2C%22data%22%3A%7B%22itemType%22%3A%22journalArticle%22%2C%22title%22%3A%22Abbreviations%20for%20names%20of%20rock-forming%20minerals%22%2C%22creators%22%3A%5B%7B%22creatorType%22%3A%22author%22%2C%22firstName%22%3A%22D.L.%22%2C%22lastName%22%3A%22Whitney%22%7D%2C%7B%22creatorType%22%3A%22author%22%2C%22firstName%22%3A%22B.W.%22%2C%22lastName%22%3A%22Evans%22%7D%5D%2C%22abstractNote%22%3A%22%22%2C%22date%22%3A%222010%22%2C%22language%22%3A%22%22%2C%22DOI%22%3A%22%22%2C%22ISSN%22%3A%22%22%2C%22url%22%3A%22http%3A%5C%2F%5C%2Fwww.minsocam.org%5C%2FMSA%5C%2FAmMin%5C%2FTOC%5C%2FAbstracts%5C%2F2010_Abstracts%5C%2FJan10_Abstracts%5C%2FWhitney_p185_10.pdf%22%2C%22collections%22%3A%5B%22RI8HAJ3J%22%5D%2C%22dateModified%22%3A%222019-05-08T07%3A28%3A54Z%22%7D%7D%2C%7B%22key%22%3A%22UHW6RB7K%22%2C%22library%22%3A%7B%22id%22%3A1698736%7D%2C%22meta%22%3A%7B%22creatorSummary%22%3A%22Wertime%22%2C%22parsedDate%22%3A%221978%22%2C%22numChildren%22%3A0%7D%2C%22bib%22%3A%22%26lt%3Bdiv%20class%3D%26quot%3Bcsl-bib-body%26quot%3B%20style%3D%26quot%3Bline-height%3A%202%3B%20padding-left%3A%202em%3B%20text-indent%3A-2em%3B%26quot%3B%26gt%3B%5Cn%20%20%26lt%3Bdiv%20class%3D%26quot%3Bcsl-entry%26quot%3B%26gt%3BWertime%2C%20T.%20A.%20%281978%29.%20The%20search%20for%20ancient%20tin%3A%20the%20geographic%20and%20historic%20boundaries.%20In%20A.%20D.%20Franklin%2C%20J.%20S.%20Olin%2C%20%26amp%3B%20T.%20A.%20Wertime%20%28Eds.%29%2C%20%26lt%3Bi%26gt%3BThe%20Search%20for%20Ancient%20Tin%3A%20A%20Seminar%26lt%3B%5C%2Fi%26gt%3B%20%28pp.%201%26%23x2013%3B6%29.%20Smithsonian%20Institution%20Press.%26lt%3B%5C%2Fdiv%26gt%3B%5Cn%26lt%3B%5C%2Fdiv%26gt%3B%22%2C%22data%22%3A%7B%22itemType%22%3A%22bookSection%22%2C%22title%22%3A%22The%20search%20for%20ancient%20tin%3A%20the%20geographic%20and%20historic%20boundaries%22%2C%22creators%22%3A%5B%7B%22creatorType%22%3A%22editor%22%2C%22firstName%22%3A%22Alan%20D.%22%2C%22lastName%22%3A%22Franklin%22%7D%2C%7B%22creatorType%22%3A%22editor%22%2C%22firstName%22%3A%22Jacqueline%20S.%22%2C%22lastName%22%3A%22Olin%22%7D%2C%7B%22creatorType%22%3A%22editor%22%2C%22firstName%22%3A%22Theodore%20A.%22%2C%22lastName%22%3A%22Wertime%22%7D%2C%7B%22creatorType%22%3A%22author%22%2C%22firstName%22%3A%22Theodore%20A.%22%2C%22lastName%22%3A%22Wertime%22%7D%5D%2C%22abstractNote%22%3A%22%22%2C%22bookTitle%22%3A%22The%20Search%20for%20Ancient%20Tin%3A%20A%20Seminar%22%2C%22date%22%3A%221978%22%2C%22language%22%3A%22en%22%2C%22ISBN%22%3A%22978-0-87474-703-4%22%2C%22url%22%3A%22%22%2C%22collections%22%3A%5B%22RI8HAJ3J%22%5D%2C%22dateModified%22%3A%222019-05-08T07%3A28%3A50Z%22%7D%7D%2C%7B%22key%22%3A%22KK2SUK2Z%22%2C%22library%22%3A%7B%22id%22%3A1698736%7D%2C%22meta%22%3A%7B%22creatorSummary%22%3A%22Wilfried%20Tittmann%22%2C%22parsedDate%22%3A%221993%22%2C%22numChildren%22%3A1%7D%2C%22bib%22%3A%22%26lt%3Bdiv%20class%3D%26quot%3Bcsl-bib-body%26quot%3B%20style%3D%26quot%3Bline-height%3A%202%3B%20padding-left%3A%202em%3B%20text-indent%3A-2em%3B%26quot%3B%26gt%3B%5Cn%20%20%26lt%3Bdiv%20class%3D%26quot%3Bcsl-entry%26quot%3B%26gt%3BWilfried%20Tittmann.%20%281993%29.%20Die%20Gesch%26%23xFC%3Btzdarstellung%20des%20Walter%20de%20Mil%26%23xE8%3B%26%23x1E3F%3Bete%20von%201326%5C%2F7.%20%26lt%3Bi%26gt%3BWaffen-%20Und%20Kost%26%23xFC%3Bmkunde%26lt%3B%5C%2Fi%26gt%3B%2C%20%26lt%3Bi%26gt%3B36%26lt%3B%5C%2Fi%26gt%3B%2C%20145%26%23x2013%3B147.%20Retrieved%20from%20%26lt%3Ba%20class%3D%26%23039%3Bzp-ItemURL%26%23039%3B%20href%3D%26%23039%3Bhttp%3A%5C%2F%5C%2Fwww.ruhr-uni-bochum.de%5C%2Ftechnikhist%5C%2Ftittmann%5C%2F6%2520Geschuetzdarstellungen.pdf%26%23039%3B%26gt%3Bhttp%3A%5C%2F%5C%2Fwww.ruhr-uni-bochum.de%5C%2Ftechnikhist%5C%2Ftittmann%5C%2F6%2520Geschuetzdarstellungen.pdf%26lt%3B%5C%2Fa%26gt%3B%26lt%3B%5C%2Fdiv%26gt%3B%5Cn%26lt%3B%5C%2Fdiv%26gt%3B%22%2C%22data%22%3A%7B%22itemType%22%3A%22journalArticle%22%2C%22title%22%3A%22Die%20Gesch%5Cu00fctzdarstellung%20des%20Walter%20de%20Mil%5Cu00e8%5Cu1e3fete%20von%201326%5C%2F7%22%2C%22creators%22%3A%5B%7B%22creatorType%22%3A%22author%22%2C%22name%22%3A%22Wilfried%20Tittmann%22%7D%5D%2C%22abstractNote%22%3A%22%22%2C%22date%22%3A%221993%22%2C%22language%22%3A%22%22%2C%22DOI%22%3A%22%22%2C%22ISSN%22%3A%22%22%2C%22url%22%3A%22http%3A%5C%2F%5C%2Fwww.ruhr-uni-bochum.de%5C%2Ftechnikhist%5C%2Ftittmann%5C%2F6%2520Geschuetzdarstellungen.pdf%22%2C%22collections%22%3A%5B%5D%2C%22dateModified%22%3A%222019-05-08T07%3A28%3A15Z%22%7D%7D%5D%7D
Stephan Möslein. (2008). Frühbronzezeitliche Depotfunde im Alpenvorland – neue Befunde (pp. 109–130). Presented at the Vorträge des 26. NIederbayerischen Archäologentages, Deggendorf, Rahden/Westfalen.
J.J. Butler. (2002). Ingots and Insights: Reflections on Rings and Ribs. In Die Anfänge der Metallurgie in der alten Welt =: The beginnings of metallurgy in the old world (pp. 229–243). Rahden, Westf: Verlag Marie Leidorf.
Ingots and Insights: Reflections on RIngs and Ribs. (n.d.) (pp. 229–243).
Dines, I. (2010). The Theophilus Manuscript Tradition Reconsidered in the Light of New Manuscript Discoveries. In M. Mauiège & H. Westerman-Angerhausen (Eds.), Zwischen Kunsthandwerk und Kunst: Die Schedula diversarum artium (pp. 3–14). Berlin/Boston: de Gruyter.
Rossi, J.-B. de. (1890). Cloche, avec inscription dédicatoire, du VIIIe ou IXe siècle, trouvée à Canino.
Revue de l’art Chrétien , (33), 1–5. Retrieved from
https://archive.org/details/revuedelartchr1890lill
Drescher, H. (1961). Zwei mittelalterliche Gießereien auf dem Gelände des ehemaligen Hamburger Doms. Hammaburg , A. F. 8 , 107–132.
Drescher, H. (1968). Mittelalterliche Bronzegrapen aus Lübeck. Der Wagen. Ein Lübeckisches Jahrbuch , 164–171.
Drescher, H. (1982). Zu den bronzenen Grapen des 12.-16. Jahrhunderts aus Nordwestdeuschland. In R. Pohl-Weber (Ed.), Aus dem Alltag der Mittelalterlichen Stadt. Handbuch zur Sonderausstellung (Vol. 40, pp. 157–174). Bremen.
Drescher, H. (1986). Zum Guss von Bronze, Messing und Zinn “um 1200.” Zeitschrift Für Archäologie Des Mittelalters , Beiheft 4 , 389–405.
Drescher, H. (1987). Ergänzende Bemerkungen zum Giessereifund von Bonn-Schwarzrheindorf. In W. Janssen (Ed.), Eine mittelalterliche Metallgießerei in Bonn-Schwarzrheindorf (Vol. 27, pp. 201–227).
Drescher, H. (1992). Glocken und Glockenguss im 11. und 12. Jahrhundert. In G. Waurick & H. W. Böhme (Eds.), Das Reich der Salier 1024 - 1125 : Katalog zur Ausstellung des Landes Rheinland-Pfalz; [Ausstellung im Historischen Museum der Pfalz, Speyer, vom 23. März bis 21. Juni 1992] (pp. 405–414). Sigmaringen: Thorbecke.
Drescher, H. (1993). Ein Kommentar zu: Gerhard Laub, Zum Nachweis von Rammelsberger Kupfer in Kunstgegenständen aus Goslar und in anderen Metallarbeiten des Mittelalters. In Goslar Bergstadt - Kaiserstadt in Geschichte und Kunst (pp. 313–316).
Drescher, H. (1993). Zur Herstellungstechnik mittelalterlicher Bronzen aus Goslar. Der Marktbrunnen, der neu gefundene Bronze Vogel, der Greif vom Kaiserhaus und der Kaiserstuhl. In Goslar Bergstadt - Kaiserstadt in Geschichte und Kunst (pp. 251–301). Göttingen.
Drescher, H. (1993). Zur Technik berwardinischer Silber- und Bronzegüsse. In Bernward von Hildesheim und das Zeitalter der Ottonen: Katalog der Ausstellung, Hildesheim 1993. Band 1 (pp. 337–351).
Drescher, H. (1995). Gießformen früher Glocken aus Mainz. Mainzer Zeitschrift , 90/91 , 183–225.
Drescher, H. (1999). Die Glocken der karolingerzeitlichen Stiftdkirche bei Vreden, Kreis Ahaus. In C. Stiegemann & M. Wemhoff (Eds.), 799, Kunst und Kultur der Karolingerzeit: Karl der Grosse und Papst Leo III. in Paderborn: Katalog der Ausstellung, Paderborn 1999 (pp. 356–364). Mainz: P. von Zabern.
Janssen, W. (1987). Eine mittelalterliche Metallgießerei in Bonn- Schwarzrheindorf. Mit Beiträgen von Hans Drescher, Christoph J. Raub und Josef Riederer. In Beiträge zur Archäologie des Rheinlandes. Rheinische Ausgrabungen (Vol. 27, pp. 135–235). Köln.
Haiduck, H. (1997). Die mittelalterliche Gussform eines Taufkessels aus der Kirche von Cappel (Kreis Cuxhaven). Zeitschrift Für Archäologie Des Mittelalters , 25/26 , 87–105.
Sugaki, A., Shima, H., Kitakaze, A., & Mizota, T. (1981). Hydrothermal synthesis of nukundamite and its crystal structure. American Mineralogist , 66 , 398–402.
Suhling, L. (1997). Kupfer- und Silberhütten in Buchillustrationen der frühen Neuzeit. Berichte Der Geologischen Bundesanstalt , 41 , 219–231.
Telle, R., & Thönnißen, M. (2006). Prähistorische feuerfeste Werkstoffe und ihre Weiterentwicklung in keltischer und römischer Zeit. Prähistorische Feuerfeste Werkstoffe Und Ihre Weiterentwicklung in Keltischer Und Römischer Zeit , 43 (2), 55–87.
Thies, H. (1993). Goslar und die frühen niedersächsichen Gebäude. In Goslar Bergstadt - Kaiserstadt in Geschichte und Kunst (pp. 95–113).
Tholl, S. (2001). Macht und Pracht. In Der Rammelsberg. Tausend Jahre Mensch – Natur – Technik. Band 2 (pp. 302–315).
Thornton, C., Rehren, T., & Pigott, V. (2009). The Production of Speiss (Iron Arsenide) during the Early Bronze Age in Iran. Journal of Archaeological Science , 36 (2), 308–316.
Thornton, C. P., & Giardino, C. (2012). Serge Cleuziou and the “Tin Problem.” In Aux Marges de l’archeologie: Hommage a Serge Cleuziou (pp. 253–260). Paris: De Boccard.
Thornton, C. (2009). The Emergence of Complex Metallurgy on the Iranian Plateau: Escaping the Levantine Paradigm.
Journal of World Prehistory ,
22 (3), 301–327.
https://doi.org/10.1007/s10963-009-9019-1
Thornton, C. P. (2007). Of brass and bronze in prehistoric Southwest Asia. In Metals and Mines. Studies in Archaeometallurgy (pp. 123–135).
Timberlake, S. (2002). Medieval lead smelting boles near Penguelan, Cwmystwyth, Ceredigion. Archaeology in Wales , 42 , 45–59.
Tong, K.-W. (1983). Shang musical instruments (Teil 2). Asian Music , 15 , 103–184.
Toulmin, P., & Barton, P. B. (1964). A thermodynamic study of pyrite and pyrrhotite.
Geochimica et Cosmochimica Acta ,
28 (5), 641–671.
https://doi.org/10.1016/0016-7037(64)90083-3
Tsemekhman, L. S., Burylev, B. P., Golov, A. N., & Miroevskii, G. P. (2002). Modeling of Thermodynamic Properties and Fusion Diagrams of Ternary Oxosulfide Systems. Russian Journal of Applied Chemistry , 75 (2), 186–190.
Ullwer, H. (2001). Messingherstellung nach dem alten Galmeiverfahren. Erzmetall , 54 (6), 319–326.
Ünsal Yalçin, & H. Gönül Yalçin. (2009). Evidence for early use of tin at Tülintepe in eastern Anatolia. TÜBA-AR , 12 , 123–142.
Ursula Mende. (1984). Romanische Giesslöwen in Nürnberg und Wien und ihre Zuordnung zur Magdeburger Giesshütte. Anzeiger Des Germanischen Nationalmuseums , 7–12.
Valde-Nowak, P., Klappauf, L., & Linke, F. A. (2004). Neolithische Besiedlung der Gebirgslandschaften: Fallstudie Harz. Nachrichten Aus Niedersachsens Urgeschichte , 73 , 43–48.
Vályi, K. (1999). Glockengußanlage und Bronzeschmelzöfen im Hof des Klosters von Szer vom Anfang des 13. Jahrhunderts. Comunicationes Archaeologicae Hungariae , 143--169.
Verschiedene. (1400). Sammelhandschrift zur Kriegskunst. Wien. Retrieved from
http://www.onb.ac.at/sammlungen/hschrift/handschriften_benuetzung.htm
Wadsworth, J., & Lesuer, D. J. (2000). The knives of J. Richtig as featured in Ripley-Yens Believe it or Not. Materials Characterization , 45 , 315–326.
Wagner, G. A., Gentner, W., Gropengiesser, H., & Gale, N. H. (1980). Early Bronze Age lead-silver mining and metallurgy in the Aegean: the ancient workings on Siphnos. In P. T. Craddock (Ed.), Scientific Studies in Early Mining and Extractive Metallurgy (pp. 63–80). London: British Museum.
Wallbrecht, P. C., Blachnik, R., & Mills, K. C. (1981). The heat capacity and enthalpy of some Hume–Rothery phases formed by copper, silver and gold. Part I. Cu + Sb, Ag + Sb, Au + Sb, Au + Bi systems.
Thermochimica Acta ,
45 (2), 189–198.
https://doi.org/10.1016/0040-6031(81)80143-8
Walther, H. (1982). Die varistische Lagerstättenbildung im westlichen Mitteleuropa. Zeitschrift Der Deustchen Gesellschaft Für Geowissenschaften , 133 , 667–698.
Watkinson, D., Weber, L., & Anheuser, K. (2005). Staining of archaeological glass form manganese-rich environments. Archaeometry , 47 (1), 69–82.
Wattenbach, W. (1877). Ekkehart (Chronist). In
Allgemeine Deutsche Biographie (Vol. 5, pp. 793–794). Leipzig: Duncker & Humblot. Retrieved from
http://mdz10.bib-bvb.de/ db/bsb00008363/images/index.html?seite=795
Wedepohl, K. H., & Baumann, A. (1997). Isotope composition of medieval lead glasses reflecting early silver production in Central Europe. Mineralium Deposita , 32 , 292–295.
Wedepohl, K. H., Delevaux, M. H., & Doe, B. R. (1978). The potential source of lead in the Permian Kupferschiefer bed of Europe and some selected Paleozoic mineral deposits in the Federal Republic of Germany.
Contributions to Mineralogy and Petrology ,
65 (3), 273–281.
https://doi.org/10.1007/BF00375513
Weeks, L. R., Keall, E., Pashley, V., Evans, J., & Stock, S. (2009). Lead isotope analyses of Bronze Age copper-base artefacts from al-Midamman, Yemen: towards the identification of an indigenous metal production and exchange system in the southern Red Sea region. Archaeometry , 51 (4), 576–597.
Weisgerber, G. (2006). The mineral wealth of ancient Arabia and its use I: Copper mining and smelting at Feinan and Timna – comparison and evaluation of techniques, production, and strategies. Arabian Archaeology and Epigraphy , 17 , 1–30.
Whitney, D. L., & Evans, B. W. (2010). Abbreviations for names of rock-forming minerals.
American Mineralogist ,
95 , 185187. Retrieved from
http://www.minsocam.org/MSA/AmMin/TOC/Abstracts/2010_Abstracts/Jan10_Abstracts/Whitney_p185_10.pdf
Wertime, T. A. (1978). The search for ancient tin: the geographic and historic boundaries. In A. D. Franklin, J. S. Olin, & T. A. Wertime (Eds.), The Search for Ancient Tin: A Seminar (pp. 1–6). Smithsonian Institution Press.
Wilfried Tittmann. (1993). Die Geschützdarstellung des Walter de Milèḿete von 1326/7.
Waffen- Und Kostümkunde ,
36 , 145–147. Retrieved from
http://www.ruhr-uni-bochum.de/technikhist/tittmann/6%20Geschuetzdarstellungen.pdf