Archive slag | archaeometallurgy
Jan 20 2026

Bloomery Steel of the Early Iron Age from Iberia. New Article

Bastian Asmus

Background

Early iron metallurgy of the first millennium BCE is often described either as technically immature or as a sharp break from Bronze Age practice. Both views are too coarse. Our new study of a bloomery steel chisel from Rocha do Vigio shows a more gradual development (Asmus et al 2026).

A composite mesoscopic image of the bloomery steel chisel-tip. © 2025 Bastian Asmus

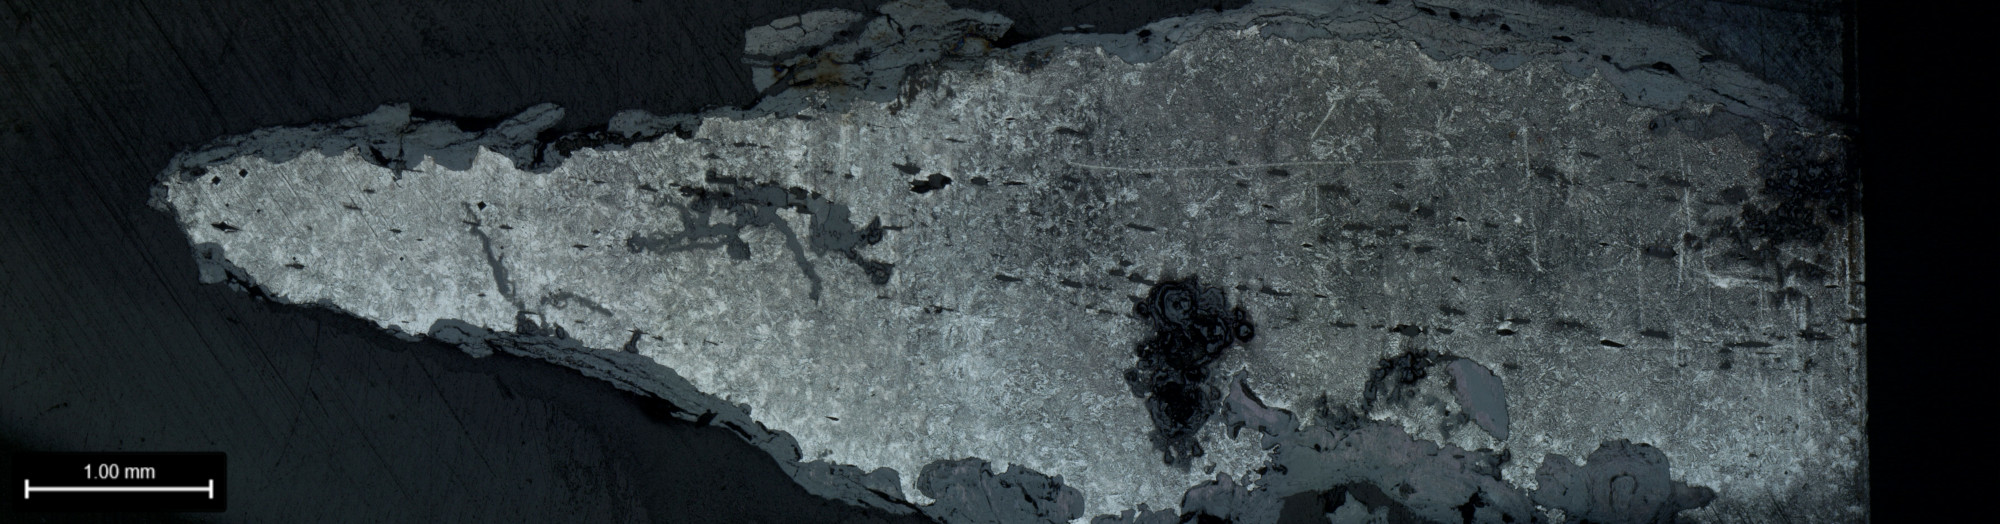
A composite mesoscopic image of the sampled bloomery steel chisel-tip. © 2025 Bastian Asmus

The artefact

The object was made for a bloomery iron and is dated to the ninth century BCE.  In an earlier study, we characterised the metal as bloomery steel and determined its carbon content. Quantifying carbon in hardened material is only partly reliable. For this reason, the first study focused on the body of the tool. The cutting edge was not examined at that stage (Araque Gonzalez et al 2023).

Based on a carbon content of about 0.5 wt% C and the early date of the artefact, we later investigated the tip itself. The aim was to assess whether, and to what extent, it had been thermally treated of it was  hardened at all.

Bloomery steel: Microstructure and hardness

Metallography of the cutting edge shows a homogeneous and very fine pearlitic to pearlitic-bainitic microstructure. Ferrite is present only in small amounts. Martensite is absent. This points to accelerated cooling, but not to full quenching in the modern sense.

Micrography of the bloomery steel sample from Rocha do Vigio, Portugal.

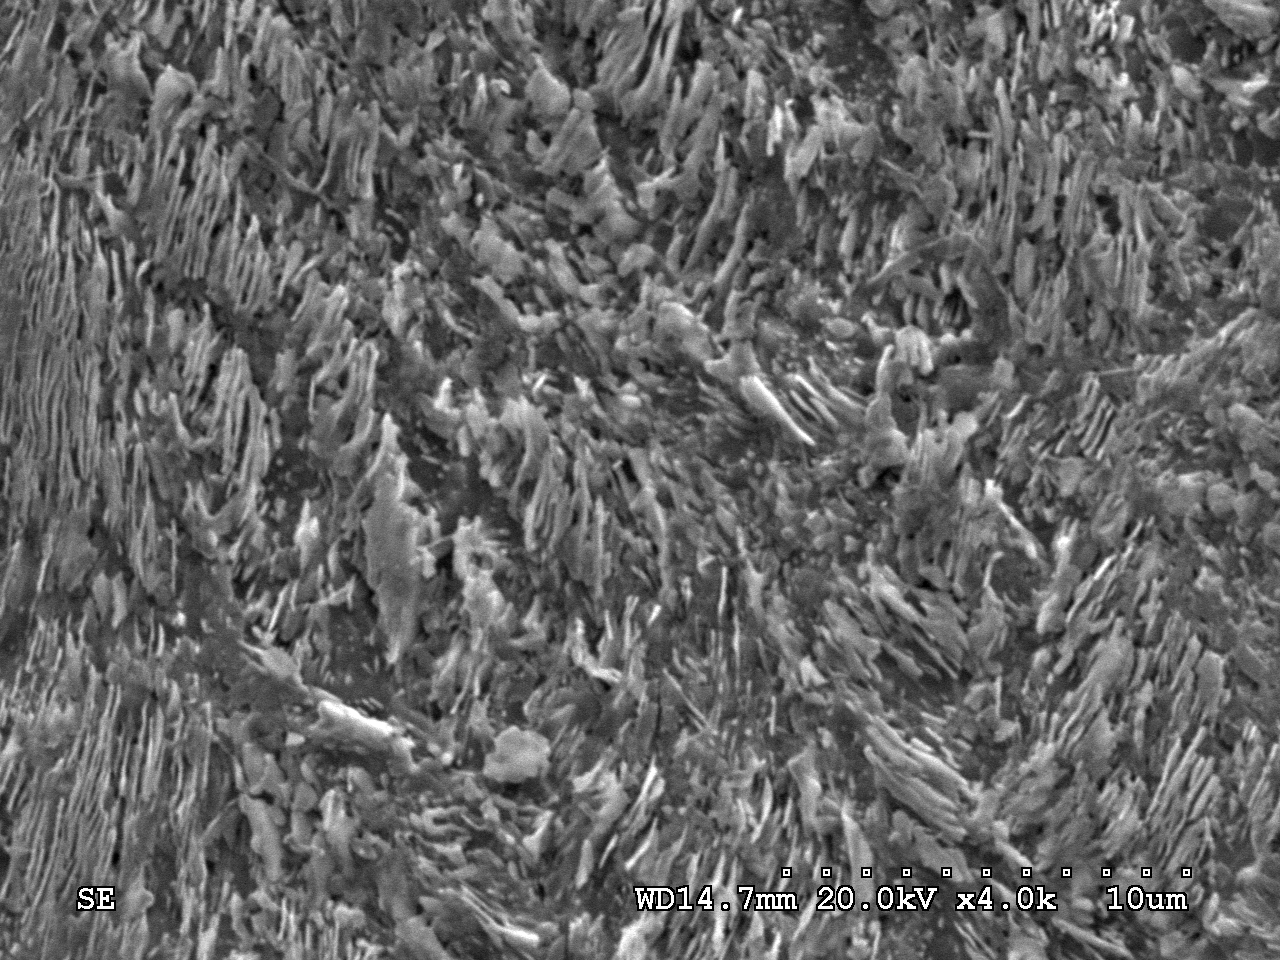
Secondary electron image of the chisel tip close to the cutting edge, showing mostly very fine pearlite, with some upper bainite in between the feathery colonies of the fine pearlite. Image: Asmus.

Vickers microhardness measurements show a moderate hardness gradient between the softer body and the refined tip. The values are consistent with controlled thermal treatment during forging. There is no indication that maximum hardness was the goal.

Alloy chemistry

The bloomery steel is low in manganese, as expected for early iron. Its hardenability therefore differs strongly from that of modern steels. Many commonly used transformation models are based on modern reference compositions. Our results show that these models are only of limited use for early iron artefacts. More accurate transformation data for low-Mn systems are – surprisingly – still lacking.

Production context

Slags from the site confirm local primary iron production. The chisel is part of a regional metallurgical practice. It is not an imported or exceptional object.

Taken together, the evidence points to a deliberate transfer of Bronze Age thermal working strategies to iron. Early iron metallurgy in this case reflects continuity of skill rather than a technological breakthrough.

The full article is available here:

https://doi.org/10.1016/j.jmrt.2026.01.091

References

Araque Gonzalez, Ralph, Bastian Asmus, Pedro Baptista, Rui Mataloto, Pablo Paniego Díaz, Vera Rammelkammer, Alexander Richter, Giuseppe Vintrici, and Rafael Ferreiro Mählmann. ‘Stone-Working and the Earliest Steel in Iberia: Scientific Analyses and Experimental Replications of Final Bronze Age Stelae and Tools’. Journal of Archaeological Science 152 (April 2023): 105742. doi:10.1016/j.jas.2023.105742.
 
Asmus, Bastian, Ralph Araque Gonzalez, Rui Mataloto, Marc Gener-Moret, Pablo Paniego-Díaz, and Pedro Baptista. ‘Negotiating between Iron and Bronze Traditions: The Impact of a Tool – The Chisel from Rocha Do Vigio’. Journal of Materials Research and Technology 41 (1 March 2026): 1615–29. doi:10.1016/j.jmrt.2026.01.091.

Feb 21 2014

how to do slag microscopy – polarising reflected light microscopy

Bastian Asmus

Polarising reflected light microscopy: Micrograph of medieval smelting slag

Image width 200 µm, PPL. Medieval copper smelting slag.
The first thing to do is to establish the number of different phases present in the sample. In this case there are five different phases.

If you managed to follow so far, you have now reached part seven part of the slag microscopy course. After sample prep, with find documentation, cutting, mounting, grinding, lapping and polishing we are now going to have a look at the tool to be used for the next sessions: the polarising reflected light microscope, also referred to as an ore microscope. Continue reading


Jan 27 2014

how to do slag microscopy – sample polishing

Bastian Asmus

sample polishing

Today is all about sample polishing. Welcome to part six of the slag microscopy series.

We need to polish our samples for polarising reflective light microscopy. A perfectly polished section is a joy to work with. More importantly it allows you to gather the optimum amount of information from your sample. This is true for optical microscopy, and even more so for electron microscopy with energy or wavelength dispersive spectrometry.

For this we need:

  • polishing cloth
  • polishing agents
  • polishing lubricant
  • sample polisher/grinder

Polishing cloth

Polishing cloth holds the polishing agents which are being used for polishing. There is a wide variety of different polishing cloths around: They are woven or napped textiles and differ in hardness. they also differ in their material. This does have significant influence on the sample polishing results: E.g. if the cloth is too soft, it is likely to create a strong relief. For slag I have had very good results with silk cloths for the final polishing step. For metals and ceramics I had  good polishing results with short napped discs.

Polishing agents and lubrication

There is no definite answer as to where polishing begins and where lapping ends, but generally we speak of polishing, when the polishing agents are smaller than 10 microns. Sample polishing is done on polishing cloth, by a polishing agent and polishing lubricant. Most common polishing agents are corundum and diamonds

Sample polishing

For manual sample polishing move the sample in figure eight fashion across the polishing cloth. You can also use a star like motion, however this is difficult  with polishing discs smaller than 300 mm diameter.

Polishing needs to remove all previous traces of grinding or lapping. Make regular checks with your stereo microscope to minimise your preparation time. As with lapping the ratio of diamonds to lubricant is essential for the polishing success. Use too much lubrication and the samples will only skid across the polishing disc. Use too little and you may end up damaging your polishing cloth.

If you start with a new polishing cloth, make sure to note the grain size on the metal platen. If you prepare a lot of different materials, it might also be a good idea to note the materials you wish to polish on the platen.In this series I am using diamonds of three and one microns grain size. Very seldom I do use a quarter micron as well.

Make sure to inspect the section before and after polishing. Put three to four 1 cm long strips of 3 micron diamond paste on the polishing cloth, rub them into the cloth, so that no diamond paste protrudes from the cloth. Add a few squirts of polishing lubricant. There is enough lubrication on your finger becomes slightly glossy when you touch the disc. Start the polisher, move the sample in a figure eight fashion across the polishing disc. There is no need to check the progress within the first three to five minutes.

For checking up on the polishing progress, place the cleaned sample under a reflected light microscope as well. I have an old one for this purpose in the sectioning lab. Sections should be clean, because abrasive diamond residues and optical instruments should not be mixed.

Before you continue to polish the section with the next finer diamond abrasive, make extra sure to have cleaned the sample in a fresh bath of IMS in the ultra-sonic cleaner. Rinse samples with IMS before putting them onto the new polishing disc. A single 3 micron diamond will leave your sample badly scratched. Repeat all polishing steps with the finder abrasive.

Contamination is a problem

A word of caution: Utmost care must be taken to keep polishing cloths and polishing agents of different grain sizes  separate! Cleaning the polishing machines is essential. Wash your hands and wash them often! I cannot stress this point enough. Careless work with polishing agents of different grain sizes will only lead to frustration.

Under no circumstances may the cloths be stored in a way that they touch each other. Do not leave them to dry in a manner that water drops from one cloth onto an other. If you use storing cabinet for polishing discs, make sure that the larger grain sizes are below the finer grain sizes.

If your disc is contaminated, there are three possibilities:

  1. exchange the cloth
  2. rinse the cloth with a lot of water and hope the contamination is removed
  3. Polish the section with the contamination, take images form non-scratched areas

Recap

  • clean your hands, sections and tools before and after use, especially if you work in a bigger lab: you never know how thoroughly the previous user left the place
  • Clean the sample before you place it anywhere, otherwise you are spreading diamonds around the lab
  • three to four 1 cm strips of diamond paste are enough for polishing a section
  • massage diamond paste and lubricant into the polishing cloth
  • polish by moving the section in a figure eight fashion across the cloth
  • inspect polishing progress with a microscope
  • clean all tools, machines and sections with IMS

That’s it for now. Be sure to be back for the next instalment, where we are going to explore the microscope.