
Today is all about sample polishing. Welcome to part six of the slag microscopy series.
We need to polish our samples for polarising reflective light microscopy. A perfectly polished section is a joy to work with. More importantly it allows you to gather the optimum amount of information from your sample. This is true for optical microscopy, and even more so for electron microscopy with energy or wavelength dispersive spectrometry.
For this we need:
- polishing cloth
- polishing agents
- polishing lubricant
- sample polisher/grinder
Polishing cloth
Polishing cloth holds the polishing agents which are being used for polishing. There is a wide variety of different polishing cloths around: They are woven or napped textiles and differ in hardness. they also differ in their material. This does have significant influence on the sample polishing results: E.g. if the cloth is too soft, it is likely to create a strong relief. For slag I have had very good results with silk cloths for the final polishing step. For metals and ceramics I had good polishing results with short napped discs.
Polishing agents and lubrication
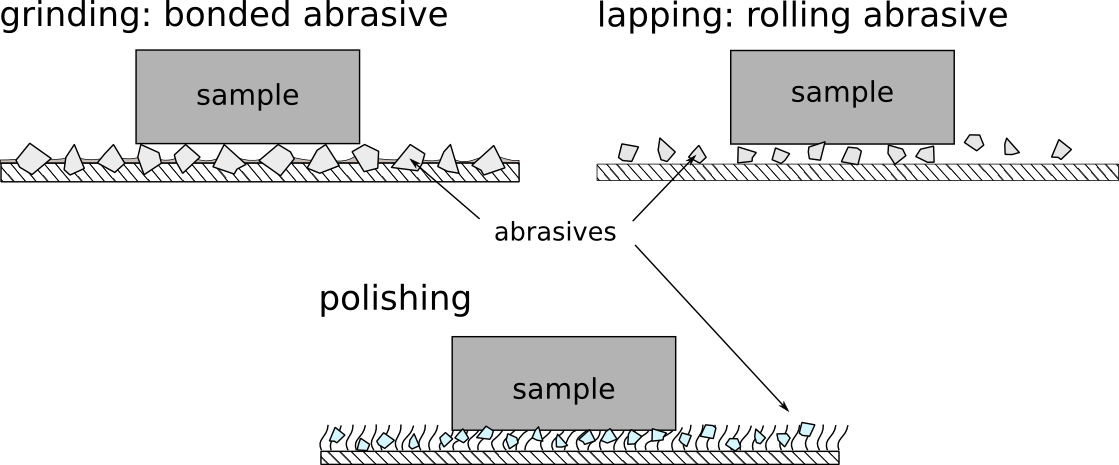
There is no definite answer as to where polishing begins and where lapping ends, but generally we speak of polishing, when the polishing agents are smaller than 10 microns. Sample polishing is done on polishing cloth, by a polishing agent and polishing lubricant. Most common polishing agents are corundum and diamonds
Sample polishing
For manual sample polishing move the sample in figure eight fashion across the polishing cloth. You can also use a star like motion, however this is difficult with polishing discs smaller than 300 mm diameter.
Polishing needs to remove all previous traces of grinding or lapping. Make regular checks with your stereo microscope to minimise your preparation time. As with lapping the ratio of diamonds to lubricant is essential for the polishing success. Use too much lubrication and the samples will only skid across the polishing disc. Use too little and you may end up damaging your polishing cloth.
If you start with a new polishing cloth, make sure to note the grain size on the metal platen. If you prepare a lot of different materials, it might also be a good idea to note the materials you wish to polish on the platen.In this series I am using diamonds of three and one microns grain size. Very seldom I do use a quarter micron as well.
Make sure to inspect the section before and after polishing. Put three to four 1 cm long strips of 3 micron diamond paste on the polishing cloth, rub them into the cloth, so that no diamond paste protrudes from the cloth. Add a few squirts of polishing lubricant. There is enough lubrication on your finger becomes slightly glossy when you touch the disc. Start the polisher, move the sample in a figure eight fashion across the polishing disc. There is no need to check the progress within the first three to five minutes.
For checking up on the polishing progress, place the cleaned sample under a reflected light microscope as well. I have an old one for this purpose in the sectioning lab. Sections should be clean, because abrasive diamond residues and optical instruments should not be mixed.
Before you continue to polish the section with the next finer diamond abrasive, make extra sure to have cleaned the sample in a fresh bath of IMS in the ultra-sonic cleaner. Rinse samples with IMS before putting them onto the new polishing disc. A single 3 micron diamond will leave your sample badly scratched. Repeat all polishing steps with the finder abrasive.
Contamination is a problem
A word of caution: Utmost care must be taken to keep polishing cloths and polishing agents of different grain sizes separate! Cleaning the polishing machines is essential. Wash your hands and wash them often! I cannot stress this point enough. Careless work with polishing agents of different grain sizes will only lead to frustration.
Under no circumstances may the cloths be stored in a way that they touch each other. Do not leave them to dry in a manner that water drops from one cloth onto an other. If you use storing cabinet for polishing discs, make sure that the larger grain sizes are below the finer grain sizes.
If your disc is contaminated, there are three possibilities:
- exchange the cloth
- rinse the cloth with a lot of water and hope the contamination is removed
- Polish the section with the contamination, take images form non-scratched areas
Recap
- clean your hands, sections and tools before and after use, especially if you work in a bigger lab: you never know how thoroughly the previous user left the place
- Clean the sample before you place it anywhere, otherwise you are spreading diamonds around the lab
- three to four 1 cm strips of diamond paste are enough for polishing a section
- massage diamond paste and lubricant into the polishing cloth
- polish by moving the section in a figure eight fashion across the cloth
- inspect polishing progress with a microscope
- clean all tools, machines and sections with IMS
That’s it for now. Be sure to be back for the next instalment, where we are going to explore the microscope.
 ..for any microscope you might happen to work with. During your microscopy sessions, did you ever wish for less of the dull work, such as noting meta data, contrast method, sample id, photo no or image width? Well – I did.
