Pimp your microscope – automatic objective lens detection


 ..for any microscope you might happen to work with. During your microscopy sessions, did you ever wish for less of the dull work, such as noting meta data, contrast method, sample id, photo no or image width? Well – I did.
I did wish for a long time to have a way that my microscope and my camera would speak to each other whenever I change objectives. I am working with Zeiss Universal microscope, mostly with reflected polarising light, i.e. there is no objective revolver. I have to change the objectives individually, which of course, all has to do with the ability to centre the objective for certain steps in polarising microscopy.
To make a long story short: the old days where I have to sit there with a notepad and have to write down all these dull informations are over! From now on my camera, or rather my computer registers any change of my microscope objective and adds this information to my micrographs automatically.
Automatic objective lens detection
How did I achieve this?
Since I have learned how to add meta data to my my photos and micrographs the moment I take them I have found an increasing number of projects that assist me in keeping the lid on administrative tasks. What’s more the system needs to robust enough not to make any mistakes! What could be worse than a few hundred images with uncertainties as to whether the section width in the meta data is correct? I tried a number of ways to get my computer to recognise objective lens change accurately:
- add an RFID chip to the lens and a coil to the microscope -> cool, but too much metal in the microscope for the coil to work properly
- use opencv to read the colour and/or the number on the objective lens -> too much programming work needed
- Monitor changes in storage location of your objective lenses rather than on the microscope -> cool idea, but not fail safe enough
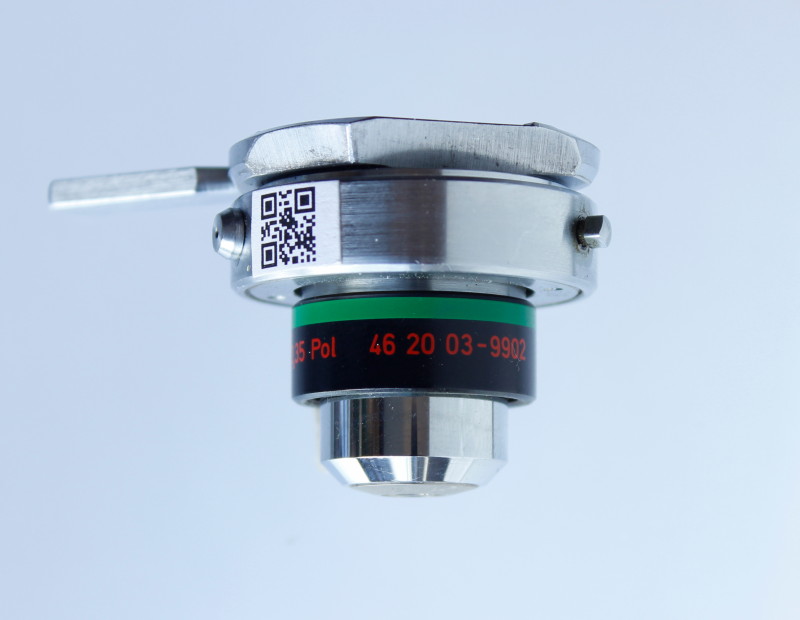
- use a tiny camera and qr codes to identify the objective lens you are using in the microscope -> way to go
Point four is the simplest solution. I added qr codes with double sided adhesive tape on the centering mounts. A small USB camera in conjunction with zbar decodes the qr code and a few lines of bash script add the necessary meta data to my micrograph. Assuming that you are working with Linux or similar, first get the camera to work. Plug in the camera, fire up the terminal and type:
ls /dev/video*
It should return something like this
/dev/video0
So now you know that the camera is recognised and can be accessed under /dev/video0. If you have zbar installed, try this:
zbarcam /dev/video0
This will open up a window and present you with a live feed from your camera. If there is any qr code in the feed zbar will decode it and return the data in the terminal.
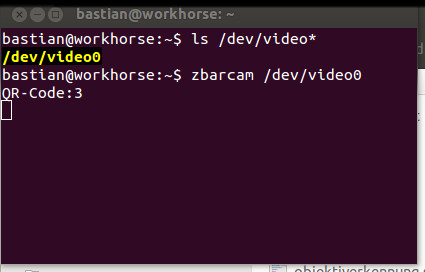
Open terminal and check if your USB camera works with linux.
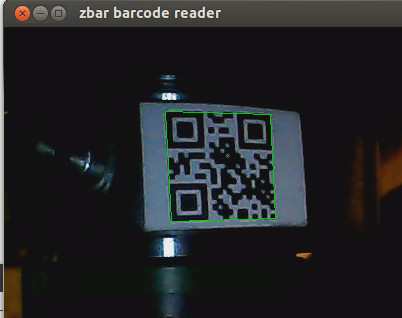
zbarcam is small and very useful utility for decoding qr codes. Here it is used for the automatic objective lens detection.
In case you are wondering which USB camera I used. I used the cheap borecsope/endoscope cameras sold at a large online auction site. These cameras work well with Linux. Mine came in a small metal box and CD, which I never bothered to look at. They have a low resolution of 640 x 400 pixel, which is more than enough for the task at hand. Now that the camera is working and decoding qr codes, it is a very small step to your own automatic microscope lens detection. Add unique Qr code labels on your lens start scripting.
The script
This is really simple, even if it does not look like this at the first glance. The YAD stuff is just for a graphical user interface – so make sure YAD is installed. Also needed is zbar, avconv and inotifywait.
#!/bin/bash
#write_width_info.sh v0.3
# Automatic objective lens detection
# Bastian Asmus 4. November 2014
# modified 10. November 2014
# Inotify waits fo the files to appear in the
# file system and adds the image width info to
# to the  xmp-lr name space as hierarchical subject.
# this can be read from digikam directly and is then
# stored in "my keywords"
#
# Log file in ~/.microscopy/miclog...

function clean_up {
	# Perform program exit housekeeping
  if [ -f /tmp/out.jpg ]; then
  rm /tmp/out.jpg
  fi
  echo "Stopped script at $(date +%T)" >> .microscopy/miclog$(date +%B%Y)
	exit
}

trap clean_up SIGINT

clear
echo "***********************
      End script with CTRL C!"

#currently the array $tags holds the dimension info. I am
# working with four objective lenses, which have the unique IDs 1 to 4.
# These IDs coincide with the position in  the array. the entry Photomicrograph is
# used by my own hierarchical data structure. If you remove it make sure to count
# your objective lenses from zero.
tags=(Photomicrograph 2.7mm 1.4mm 720µm 275µm)
pa=`ls /dev/video*`
if [ -z $pa ]; then
  yad --info --title="WEBCAM"  --mouse --geometry=320x200 --text="You should connect the webcam first" --button="OK"
  exit 0
else
  echo "Webcamera is at $pa"
fi
#Log all the stuff in a hidden folder .microscopy/miclog in case you need
# to debug
mkdir -p ~/.microscopy || exit 1
if [ ! -f .microscopy/miclog$(date +%B%Y) ]; then
echo "Logfile for microscopy images" > .microscopy/miclog$(date +%B%Y)  #log all photos and associated info
fi
echo "Started script at $(date +%T)" >> .microscopy/miclog$(date +%B%Y)
inotifywait -m -r /your/path/to/the7micropgraphy/directory/ -e create |
  while read path action file; do
        echo "The file '$file' appeared in directory '$path' via '$action'"
         if [[ $file = *.jpg ]]
	          then
	           scale=""
	            while [ -z $scale ]
	             do
	                #streamer -f jpeg -o /tmp/image.jpeg &
	                 avconv -f video4linux2 -s 320x240 -i $pa -ss 0:0:2 -frames 1 /tmp/out.jpg &
                   wait
                   scale=`zbarimg --raw /tmp/out.jpg`
                   timestamp=`date`
	                 #scale=`zbarimg --raw /tmp/image.jpeg`
	                 mv /tmp/out.jpg /tmp/out1.jpg
            done
          echo "$timestamp, objektive code: $scale, imgae width: ${tags[$scale]}, $file" >> .microscopy/miclog$(date +%B%Y)
          echo "This is the ID tag of the microscope lens: $scale. This is the image width: ${tags[$scale]}"
	        exiftool -xmp-lr:HierarchicalSubject="${tags[0]}" -xmp-lr:HierarchicalSubject="${tags[0]}|${tags[$scale]}" -xmp-lr:HierarchicalSubject="${tags[0]}|${tags[$scale]}" $path$file
	        echo "${tags[0]}/${tags[$scale]}"
	       fi
  done
The script also does a bunch of other things:
- it checks if the camera is there
- it automatically finds the correct path to the camera
- it creates a log file in a hidden folder in your User directory .microscopy/miclog…
- it uses avconv to take still images from the feed
- these are used decode the qr codes, as I did not want the camera to run the whole time
- the stills are stored in the systems tmp directory
- to end the script hit CTRL C, which is trapped to exit the script properly
Well, that’s it really. Feel free to contact me if you do have any queries.